Advertisement
Quick Links
Congratulations! And thank you for purchasing the CORE-1 Signal Processor, a complete
audio signal processing and power management solution for whose seeking performance,
customization and OEM integration. The CORE-1 features the newest Analog Devices DSPs for
state-of-the-art music reproduction, at the same time providing you with endless tweaking capabilities
by the infinite settings and combinations of Parametric Equalizer, Time Alignment, Multiple Crossover
choices and much more. Additionally, the CORE-1 fully protects your vehicle's electrical system and
audio system components against low battery voltage and blown speakers.
1) 8 Fully configurable output channels capable of 4V RMS (12.5Vpp) RCA output swing.
2) 8 Summing Input channels compatible with Low-Level & High-Level input types;
3) Bluetooth Audio Streaming with Apt-X codec for audiophile audio quality;
4) State-of-the-art Audio Reproduction:
24-bit resolution ADC / DACs;
56-bit double precision signal processing
Frequency Response from 10 to 22Khz +/- 1 dB
THD < 0.003%
SNR > 93 dB
5) Audio Signal Processor:
Precision Crossover System: Linkwitz-Riley, Bessel and Butterworth topologies,
12, 18, 24, 36 and 48 dB / octave crossover slopes available;
Full Pass / High Pass / Low Pass / Band Pass / Peaking / Shelving filters;
Up to 96 Parametric Equalizer Bands with adjustable Frequency and Bandwidth;
Full Time Alignment Correction and Phase rotation;
R.M.S. Limiter with adjustable Threshold, Attack and Decay
6) Power Management Processor with fully automated actions for Low Battery and Very Low
Battery conditions, with adjustable voltage threshold levels.
User's Manual
Introduction:
Features:
Advertisement

Related Manuals for Massive Audio CORE-1

Summary of Contents for Massive Audio CORE-1
- Page 1 Parametric Equalizer, Time Alignment, Multiple Crossover choices and much more. Additionally, the CORE-1 fully protects your vehicle’s electrical system and audio system components against low battery voltage and blown speakers.
- Page 2 CD Software, open “Core1_Installer.exe” and proceed clicking “Next” till the end. Please consult “Software Installation”. 2) Connect CORE-1 directly to the battery (12Volt DC). Do not power it from the ignition switch or any type of switch. “Power Source Connector”.
-
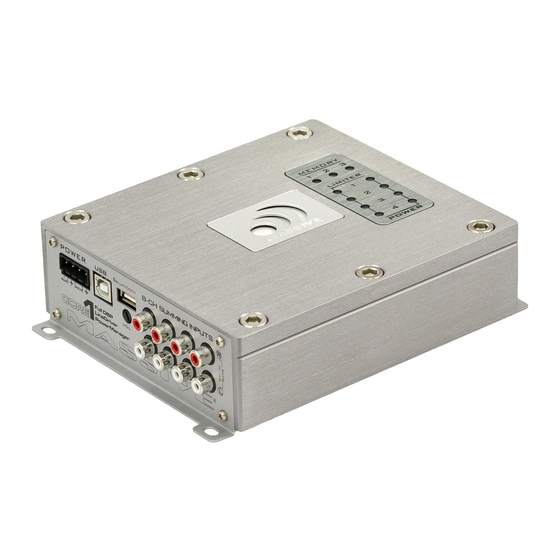
Page 3: Overview / Hardware Installation
Memory Slot Indicators Memory Select Button Gain control Knob Limiter Actuation LEDs Power Indicator LEDs SOFTWARE INSTALLATION UTILIZING CORE-1: INPUTS / OUTPUTS TAB: Master Input Gain Sound Stage Depth Output Group Type Output Gain ... - Page 4 Action to take (automatic action) Startup Delay (sequential Power On) Manually Selecting Remote ON / OFF TOP MENU: SAVE / LOADING settings to / from CORE-1 Frequency Response Graph Language Selection COM PORT Selection TROUBLESHOOTING: ...
- Page 5 GND: Connect to vehicle’s ground; REM: Remote wire input, connect to the Head Unit blue wire. DO NOT use in case CORE-1 is being used with a “High-Level” audio source. +: Connect directly to +12V of the vehicle’s battery. DO NOT power Core-1 from a switched power source.
- Page 6 In case you’re using Low Level (or line level), make sure that you connect at least one pair (Left / Right) of RCA cables from the RCA Outputs of your Head-Unit to the RCA Inputs of CORE-1. In case you’re using High Level (or speaker level), use the supplied “RCA to High Level” adapter cables to connect CORE-1 to the speaker wires of your head-unit.
- Page 7 Make sure that the gain control of your power amplifier is set to the minimum, to prevent your amplifiers from saturating due to the strength of the signal output by CORE-1. In case of hiss or noise, please consult Troubleshooting Item 7.
- Page 8 REMOTE OUTPUTs: Connect to the Remote Input of your amplifiers. Utilize a small flat screwdriver to secure the wires connection to the plug. The CORE-1 must be able to manage the amplifiers in order to ensure “pop” / “thump” free operation. We recommend only one amplifier per output, thus maximum of 4 amplifiers.
- Page 9 GAIN CONTROL knob: Use to control “on-the-fly” the gain (volume) of the desired output group(s). By default, CORE-1 comes with the knob assigned to all four output groups, however you can (and should) change it at any time by utilizing the software. On the lower left corner of the software, you can use the check-boxes to select the output group(s) that the knob will be able to control.
-
Page 10: Software Installation
SOFTWARE INSTALLATION: Step 1: Please install the CORE-1 Software by advancing through the installation process as indicated:... - Page 11 Wait for completion of the first installation part. Following that, automatically another installer window will open to install the necessary Microsoft.NET Chart Control component. Please advance through the installation process as indicated:...
- Page 12 Step 2: If CORE-1 hardware unit is already properly installed on your vehicle, go ahead and turn your Head- Unit ON, make sure you set the Volume all the way down. The CORE -1 will take about 7 seconds to initialize in the following sequence: 1- Power LEDs going up and down (alternating green color): Boot sequence;...
- Page 13 USB port, the USB Device Driver will be reinstalled and a different COM port will appear. We suggest that you use always the same USB port. Now, click and you’re ready to fully enjoy all of CORE-1 features! Remember that you can always select your preferred language by clicking on the language box:...
- Page 14 Utilizing CORE-1: The CORE-1 Signal Processor offers a wide variety of tools to help you get the most out of your sound system, as well as achieve the best listening experience in different music styles. In order to accomplish that, let’s take a closer look at each of the CORE-1 functions: Inputs / Outputs: This is the main control Tab, where the most important adjustments are realized.
- Page 15 CORE-1 features 4 stereo output groups (8-CH RCA outputs). Each group can be individually configured to suit the type of transducer (speaker) that you wish to use, for example, subwoofers, midbass, tweeters and more. By selecting one of the listed types of transducers, CORE-1 will automatically suggest parameters for Low Pass, High Pass and Output Type settings.
- Page 16 (speakers) in your car. Enter the distances found on the “Measured Distance” fields and hit “Calculate!” CORE-1 will automatically calculate and apply optimum values for Balance and Time Alignment, so you don’t have to worry about doing it manually. This will result in perfect soundstage, as if all speakers were perfectly aligned and at the same distance from the listener.
- Page 17 By doing so, CORE-1 will automatically adjust the Crossover for perfectly safe operation and optimal performance with most transducers. However, if you like to experiment and explore the maximum capabilities of your sound system components, you feel free to experiment with it.
- Page 18 Frequency Response at 100Hz : 12dB/oct Blue, 24dB/oct Green, 36dB/oct Purple, 48dB/oct Orange The Output Type provides you with 4 different ways to configure the CORE-1 RCA outputs: 1 - “Stereo (L/R)” for Stereo audio reproduction. Application example: front speakers of your car.
- Page 19 V. U. Meters: The V.U. Meters correspond directly to the instant output signal level of the RCA output channels. Therefore, it is important to configure both the Master Gain and the gain of each Output Group so that the signal intensity isn’t high enough to reach 0dB at the maximum volume setting, which is the absolute maximum limit before distortion occurs, as well as not so low that you can’t even see the...
- Page 20 Whenever the limiter starts compressing the music signal to protect your system, the indicative yellow LEDs on top of the CORE-1 hardware unit will lit up. At any moment you can know if the Limiters are actuating just by looking at CORE-1.
- Page 21 Boost / Cut represents the gain of the EQ Band. You can adjust using the track bar. Frequency is the frequency in which the EQ band is centered. The CORE-1 software automatically suggests the optimum frequency for each EQ band based on your crossover settings and the number of EQ Bands that you chose.
- Page 22 Parametric: It is a “peaking” filter based on “Frequency” and “Bandwidth” parameters explained above. The CORE-1 software automatically suggests both of these parameters based on the operating frequency range of your speaker and the number of EQ bands that your chose. If you don’t change these parameters, it will work perfectly and similar to a commonly seen Graphic...
- Page 23 The CORE-1 incorporates a complete Power Management system to care for your vehicle’s electrical system and your car audio components. Whether you have a simplistic or powerful sound system, CORE-1 will ensure that no damage is done to your battery, amplifiers or speaker components while you’re having fun enjoying your music! Power Management section of CORE-1 Software Just like CORE-1 has four fully independent “Output Groups”...
- Page 24 In order to assure that CORE-1 will be able to protect your electrical system, it is very important that the voltage settings for “Low Battery”...
- Page 25 Memory slot from 1 to 3. By doing so, all your custom settings will be permanently store onto the non- volatile CORE-1’s memory, meaning that even if you disconnect the battery, you will not loose any of your configurations. Likewise, you can always load your settings from CORE1 at anytime by using File ...
- Page 26 Audio, all these adjustments interact with each other, always resulting in an unique combination. The graph corresponds directly to the signals being processed by Core-1. In other words, it translates what is happening inside the actual CORE1’s Hardware Unit in a form of a nice and understandable graph.
- Page 27 Just make sure that you select the COM port that actually corresponds to your CORE-1 unit. If this is the case, it is easy to verify: Observe the COM port(s) listed with CORE-1 disconnected (or powered down), and then observe the COM ports listed with CORE-1 connected (and powered up).
-
Page 28: Troubleshooting
TROUBLESHOOTING:... - Page 29 I have no “COM Ports” listed. SOLUTION: By default, if you install the CORE-1 software prior to connecting the USB cable, the computer should be able to automatically detect and install the correct device driver software for CORE-1 unit. However, if this process fails for any reason, you can always manually install the correct device driver software, which is a fairly easy and straightforward process.
- Page 30 3- Right click on the “CDC RS-232 Emulation Demo” and select “Update Driver Software...” 4- Choose “Browse my computer for driver software”.
- Page 31 5- Click “Browse...” and locate the path “C:\Program Files (x86)\Massive Audio\Driver”...
- Page 32 6- Make sure that the correct path was chosen and click Next. 7- Wait for installation to complete, and click Close.
- Page 33 8- Now you should be able to see the correctly installed “USB Serial Port”. The “COM” name will vary from computer to computer, so don’t worry about that. CORE-1sucessfully listed on “Windows Device Manager” as a USB Serial Port. 9- You should now be able to see the COM Port by clicking on the Drop-Down list. Select it and proceed clicking “Connect”.
- Page 34 You can always modify or disable this protection, but be aware that most car batteries can be damaged if their voltage go lower than 11V. This is considered the “Very Low Battery” condition and the CORE-1 leds will be RED, or not lit up at all depending on your settings.
- Page 35 CORE-1 software, rather than on your power amplifiers. If the hiss continues to happen, try reducing the Gain levels using the CORE-1 software. For best noise optimization, the Gain should be set to the minimum possible level that still statisfies your desired level of Sound Pressure.
- Page 36 Typical original wiring diagram (factory unmodified) Modified wiring diagram with Dummy Load resistors and “speaker wire to RCA” converter.
- Page 37 ON, and only stop emitting the signal once the car is locked, thus powering it OFF. So it is normal to expect thar CORE-1 will Turn ON when the car is unlocked and Turn OFF when the car is locked, and there’s nothing wrong with it.
Need help?
Do you have a question about the CORE-1 and is the answer not in the manual?
Questions and answers