Table of Contents
Advertisement
Advertisement
Table of Contents

Summary of Contents for Dash Cam Twister 4SK909
- Page 1 Item No.: 4SK909 User’s Manual...
-
Page 2: Table Of Contents
Thank you for purchasing The Original Dash Cam Twister. Please review this guide fully before use. For any questions not answered in this guide, please visit www.GetDashCam.com Contents About this Guide ..............5 WARNING ................6 Notice ……………………………………………………………6 Canada ................6 Battery warning.............. - Page 3 2.5.2.2 Manual Power Off ........17 2.5.2.3 Resetting the device ......... 17 2.5.3 Formatting the microSD Card ....18 2.5.4 Connecting as a Bluetooth Speaker ..19 Basic Setup ............19 2.6.1 Set the Date / Time ........19 Using TODC Twister ..........21 Recording Videos ...........
-
Page 4: About This Guide
About this Guide The content in this manual is for informational purposes only and is subject to change without prior notice. FCC declaration of conformity Responsible party: 4Sight, Inc. 12285 Colony Ave. Chino, CA 91710 (714) 988-5838 Fax: (714) 285-5828 This device complies with Part 15 of the FCC Rules. -
Page 5: Warning
WARNING THIS DEVICE SHOULD NOT BE ADJUSTED BY THE DRIVER WHILE DRIVING. IN THE EVENT OF AN ACCIDENT, DEVICE MAY DISLODGE AND BECOME UNSAFE FOR PASSENGERS. Notice Memory card comes pre-inserted. Please be sure memory card is in unit before recording. TODC Twister supports microSD cards up to 32GB When the battery is depleted, TODC Twister will display, “Out of Battery Power”... -
Page 6: Notes On Installation
Notes on Installation 1. This product is best used when installed near the rear view mirror, at the center and top of windshield (must follow all local laws related to mounted devices in vehicle). 2. Do not touch the lenses with your fingers. Finger grease may be left on the lens and will result in unclear videos or snapshots. -
Page 7: Introduction
1 Introduction Thank you for purchasing The Original Dash Cam Twister. If after reviewing this manual you still have questions, please visit TODC (The Original Dash Cam) website at www.GetDashCam.com 1.1 Features Two wide angle HD lenses Still snapshots for photographic evidence ... -
Page 8: Package Contents
1.2 Package Contents MicroSD Card Dash Cam Suction Cup Mount User’s manual USB Cable 12v Car Charger... -
Page 9: Product Overview
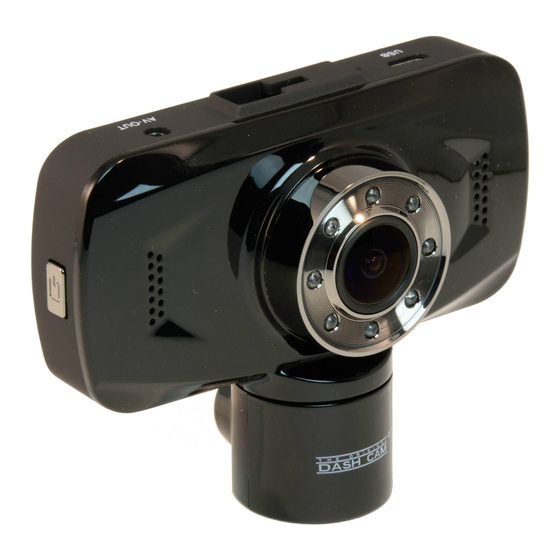
1.3 Product Overview... - Page 10 Item Item Up Button / IR sensor Mic 1 On/Off Menu / Back Button Mic 2 Down / Mute Button MicroSD Slot OK / Record Button Power Button Mode / Emergency Lock AV Out Button Connect Bluetooth 320° Rotating Lens Reset Button Micro USB Port Fixed Lens...
-
Page 11: Getting Started
2 Getting Started 2.1 Inserting the Memory Card Insert memory card with both the pins on the memory card and the screen of TODC Twister facing up, as illustrated below. Push the memory card in until a click sound is heard, indicating the card is locked in position. -
Page 12: Installing In Vehicle
4. When removing the memory card, be careful that the card does not spring out and get lost. The memory slot has this spring function for easy removal of the card. 2.2 Installing in Vehicle 2.2.1 Mount to Windshield Push the mount tip into mount socket on top of device and slide, until firmly locked into place. -
Page 13: Connecting To Power
Note: 1. The Seller or Manufacturer of The Original Dash Cam Twister 4SK909 shall not be held responsible for any traffic violations related to the positioning or improper use of this product. 2.3 Connecting to Power Use the included 12v car charger to power on TODC Twister and charge the built-in battery (TODC Twister is made to be plugged in continuously while driving;... - Page 14 Plug the other end of the car charger into the 12v port in your vehicle. Once the vehicle engine is started (depending on your vehicle), the device will automatically power on. Note: 1. Whether or not your vehicle’s 12v outlet remains active while the car is turned off varies from vehicle to vehicle.
-
Page 15: Led Indicator
2.5 Powering the Device On / Off 2.5.1 Auto Power On/Off The Original Dash Cam Twister’s default settings are for TODC Twister to automatically power on and begin recording when TODC Twister is connected to a power source. Once the vehicle’s 12v... -
Page 16: Manual Power On/Off And Reset
Twister will automatically turn on and begin recording. When TODC Twister is unplugged, or otherwise disconnected from the power source, TODC Twister will automatically power down and save your footage. 2.5.2 Manual Power On/Off and Reset 2.5.2.1 Manual Power On To manually power on TODC Twister, simply long press the Power Button. -
Page 17: Formatting The Microsd Card
the reset button located on the bottom of TODC Twister next to the bottom lens as illustrated on page 10. Hold the button down for three seconds and release. Resume normal use of TODC Twister. 2.5.3 Formatting the microSD Card To format the microSD card follow these instructions: First be sure TODC Twister is NOT recording. -
Page 18: Connecting As A Bluetooth Speaker
From your mobile phone, enter the Bluetooth settings and locate the Dash Cam enable the connection on your phone. Your Dash Cam can now be used as a hands-free Bluetooth speaker. To adjust the volume, simply use the normal volume adjustment on your mobile phone. - Page 19 Menu Button to return to the main recording screen. Note: 1. The Original Dash Cam Twister runs on a 24 hour military clock. 1:00pm shows as 13:00 on TODC Twister’s clock. For questions regarding the 24 clock, contact TODC at...
-
Page 20: Using Todc Twister
1, 3 or 5 minute video clips. 3.1.2 Emergency Recording The Original Dash Cam Twister has a built in emergency recording function which, when activated, prevents video files from being overwritten by TODC Twisters Loop Recording feature. To manually... -
Page 21: The Recording Screen
Note: 1. If the G-Sensor function is enabled and a collision is detected, emergency recording will automatically be triggered. For more info, please refer to G-Sensor (3.1.5). 2. It is recommended that you clear locked videos either by deleting them, or transferring them to your computer a minimum of once a month in order to prevent the microSD card from filling up. - Page 22 Indicates your currently selected Exposure Exposure Value (EV). Date Stamp Indicates the current date. Time Stamp Indicates the current time. Indicates the current status of the Battery Indicator battery. When screen, indicates SD Card Indicator microSD card IS inserted. Resolution Indicates the currently Indicator selected resolution.
-
Page 23: Motion Detection
3.1.4 Motion Detection When Motion Detection is enabled and TODC Twister is powered on, TODC Twister will detect any motion in front of either lens and TODC Twister will begin to record. TODC Twister will continue to record as long as there is motion detected. Once motion stops, TODC Twister will stop recording after ten seconds. -
Page 24: G-Sensor
2. As the device is used, the battery storage capacity will decrease gradually. This is normal for all batteries. 3.1.5 G-Sensor When enabled, the G-Sensor will detect if and when a collision happens and will activate emergency recording, locking your video file so it will not be deleted by the Loop Recording feature. -
Page 25: Playback Videos
Your desired G-Sensor settings are now saved, press the Menu Button to return to the recording screen. Note: Caution: formatting the microSD card will delete all videos, including emergency locked videos. 3.2 Playback Videos 3.2.1 Playing Videos To playback video files on TODC Twister’s LCD screen, follow these instructions: Be sure TODC Twister is NOT recording. -
Page 26: The Playback Screen
When your desired video is highlighted, press the OK Button to playback the video. When video is playing, the Up and Down Buttons control the volume. Once you begin playing back a video, you cannot select a different video until the video playback comes to an end. 3.2.2 The Playback Screen Icon Item... -
Page 27: Deleting Files
Icon Item Description Playback This icon indicates you are in video Mode playback mode, ready to play a Indicator video. Embedded This is the time & date stamp that is Time & embedded in the actual video file. Date Stamp Playback Indicates whether the video is Status... - Page 28 Press the Menu Button to enter the Playback Settings Menu. Use the Down Button to highlight Delete and press the OK Button. Use the Down Button to highlight Delete Current to delete the currently selected video, or highlight Delete All to delete all footage from TODC Twister.
-
Page 29: Adjusting The Settings
4 Adjusting the Settings 4.1 Using the Menu There are two setup menus that you can access; Video Settings Menu, and Setup Settings Menu. To access each settings menu do the following: Accessing the Video Settings Menu Be sure TODC Twister is NOT recording. Press the Menu Button to enter the Video Settings Menu. -
Page 30: Menu Items
Use the Up / Down Buttons to highlight different menu options in the Setup Settings Menu. Press the OK Button to enter the highlighted settings sub-menu. 4.2 Menu Items Refer to the below table for details of each menu option and its function. - Page 31 Available Menu Setting Description Options Adjust the G-Sensor G-Sensor sensitivity or turn the G-Sensor off. Turn on or off the beep sound that sounds Beep Sound On/Off when you press a button. section Date/Time Set the Date and Time. 2.6.1 When TODC Auto Power...
- Page 32 Available Menu Setting Description Options time. TODC will continue to record. To reactivate the screen, simply touch button. Power IR Sensor sensors to assist with Off/On night recording Perform a format when powering on TODC Twister for the first time. If experiencing memory issues, SD Card...
-
Page 33: Transferring Videos To Pc
5.1 Using included USB Cable Included with TODC Twister is a microUSB cable, this cable will be used to transfer video from the Dash Cam to your PC. Follow these instructions to transfer videos to your PC: Connect the microUSB tip of the USB cable to TODC Twister. - Page 34 If the Auto Play pop-up box above does not appear on your computer once you have selected, Mass Storage on the camera; launch the My Computer application on your computer.
- Page 35 You will see a new disk drive named something similar “Removable Disk (E:)” – the letter following Removable Disk will vary from computer to computer. Double click on this disk to enter TODC Twister’s microSD card and navigate to the screen below.
- Page 36 Note: 1. For additional assistance transferring files from TODC Twister to your computer, contact The Original Dash Cam team at www.GetDashCam.com Copyright © 2015 All rights reserved. All other marks, products or company names mentioned in this guide are...
Need help?
Do you have a question about the Twister 4SK909 and is the answer not in the manual?
Questions and answers