Table of Contents
Advertisement
Dear LifeWatch V owner:
Thank you for selecting the LifeWatch V mobile medical phone.
This user manual includes information and instructions for using your new LifeWatch V device. Please read
this manual carefully before you start using the device.
If you have any questions about your LifeWatch V, please contact your representative:
Illustrations included in this manual are general representations only and are not meant to
comply with specific regulatory requirements.
By default, your phone is provided with pre-set applications.
Installation of new applications may affect the performance of your phone and is the sole
responsibility of the user.
Before using the LifeWatch V medical and wellness functions please read the Warnings
and Precautions, Appendix A, thoroughly.
1
Advertisement
Table of Contents
Troubleshooting

Subscribe to Our Youtube Channel
Related Manuals for LifeWatch V

Summary of Contents for LifeWatch V
- Page 1 Dear LifeWatch V owner: Thank you for selecting the LifeWatch V mobile medical phone. This user manual includes information and instructions for using your new LifeWatch V device. Please read this manual carefully before you start using the device. If you have any questions about your LifeWatch V, please contact your representative: Illustrations included in this manual are general representations only and are not meant to comply with specific regulatory requirements.
- Page 2 Copyright 2012 LifeWatch Technologies Ltd.® All rights reserved. LifeWatch Technologies Ltd., LifeWatch Inc., LifeWatch Inc. logo, and LifeWatch V are trademarks or registered trademarks of LifeWatch AG®. All other brand names and product names used in this document are trade names, service marks, trademarks, or registered trademarks of their respective owners.
- Page 3 The LifeWatch V is not intended for use by persons with external defibrillators The LifeWatch V is not intended for the treatment or alleviation of disease The LifeWatch V is not to be used in a magnetic resonance imaging (MRI) environment...
- Page 4 Servicing of the device shall be done by qualified personnel only The user of the LifeWatch V should not take any actions of a medical or clinical nature based on his/her understanding or interpretation of test results without consulting a healthcare professional.
- Page 5 Label Description Warning, consult accompanying text or documents Precaution; consult accompanying text or documents Warning, potential biohazard Notes, indicates important general information for using the system successfully. Consult instructions for use Manufacturer and date of Manufacture XXXX Type BF Applied Part...
- Page 6 Label Description In vitro device Store at specified temperatures; location of thermometer WEEE Directive for disposal of Electrical and Electronic Equipment Symbol for no alarms Symbol indicating a USB connector Symbol indicating location of glucose meter...
-
Page 7: Table Of Contents
Table of Contents LifeWatch V Basic Operation ............20 For Your General Safety (Precautions) ........20 Getting Started ................22 Overview ................... 22 Starting up ................25 Charging the Battery ..............27 Getting Around Your Device ............29 Touch Control ................29 Home Screen ................ - Page 8 Dialer Screen ................37 Making Calls ................37 Call Screen ................39 Receiving Calls ................. 40 Adjusting Your Call Settings ............. 41 Contacts ..................42 Importing/Exporting Contacts from/to the microSD Card ..42 Entering Text ................44 Messaging ................. 46 Email ....................
- Page 9 Getting Connected to the Internet ..........51 Adding a New GPRS/EDGE/3G Connection ......52 Turning On Wi-Fi ..............52 Using the Device as a Wi-Fi Hotspot ........53 Browsing the Internet ..............54 Bluetooth® ................57 Making the Most of Multimedia ............59 Taking Pictures with Your Camera ...........
- Page 10 Managing Other Settings ............73 Other Applications ................73 Calculator .................. 73 SIM Tool Kit ................73 LifeWatch V Health and Medical Functions ........74 Getting Started with the LifeWatch V Medical and Wellness Applications ............. 74 License Agreement ................ 74 First Time Launch ................
- Page 11 Test Screens Description ............... 79 History .................... 84 Performing Tests ................86 Blood Glucose Test ..............86 Glucose Test Troubleshooting ..........92 Alternative Site Testing (AST) ..........93 Control Solution Test ..............95 Control Solution Troubleshooting ..........99 ECG/HR/BFA/SP02/Stress Level Analyzer Tests ....100 Body Temperature Test ............
- Page 12 Measurement Units ..............107 Sounds ..................107 Diet Application ................108 General ..................108 Meal Planner ................108 Exercise Tracker ..............109 Weight Tracker ............... 109 Water Tracker ................ 109 Measurement Tracker ............109 Calendar Application ..............110 Drug Reminder ................111 Heart Rate Calculation Method ............
- Page 13 Maintenance ..................113 Conditions of Use................. 113 Caring for your LifeWatch V ............113 Cleaning .................. 113 Disinfecting ................113 Environment ................114 Preventive Maintenance ..............115 Troubleshooting ................116 Specifications .................. 117 Declaration of RoHS Compliance ........... 122 Disposal of Your Device ............122 Appendix A Warnings and Precautions ........
- Page 14 Radio Frequency (RF) Exposure (Precautions) ......128 General Statement on RF Energy .......... 128 EMI Considerations..............128 Body Worn Operation ............. 128 Limiting Exposure to Radio Frequency (RF) Fields (Precautions)128 Distraction ..................129 Driving (Precautions) .............. 129 Operating Machinery (Precautions) ........129 Product Handling (Precautions) ...........
- Page 15 Electrical Safety (Precautions) ............. 131 Accessories ................131 Connection to a Car ..............131 Faulty and Damaged Products ..........131 General Statement on Interference ........132 Pacemakers ................132 Hearing Aids ................132 Use of LifeWatch V with other Medical Devices ..... 132...
- Page 16 Hospitals ................. 132 Aircraft ..................132 Interference in Cars ..............133 Explosive Environments (Precautions) ........133 Petrol Stations and Explosive Atmospheres ......133 Blasting Caps and Areas ............133 Index ....................134...
- Page 17 Installation of new applications may affect the performance of your phone and is the sole responsibility of the user.” WARNING The user of the LifeWatch V should not take any actions of a medical or clinical nature based on his/her understanding or interpretation of test results without consulting a healthcare professional.
- Page 18 Pediatrics as defined per medical module The following applications of the LifeWatch V as described in this User Manual, are not within the scope of the Medical Device Directive 93/42/EEC and are therefore not considered as medical devices, nor are they covered by the this Directive: ...
- Page 19 Thermometer Body Fat Analyzer Stress Level Analyzer Diet Management Drug Management NOTE: The LifeWatch V can be used as a stand-alone device or via a subscription plan; full functionality is available only to paying subscribers.
-
Page 20: Lifewatch V Basic Operation
For Your General Safety (Precautions) As the LifeWatch V device is a medical device that can be used both as a regular cell phone and as a medical device, this manual includes both warnings and precautions relating to the use of the LifeWatch V as a cell phone, AND warnings and precautions concerning the use of the LifeWatch V as a medical device. - Page 21 Your device can produce a loud sound. materials or liquids. Avoid contact with anything magnetic. Only use approved accessories. Don’t rely on your device for emergency communications. Before using the LifeWatch V medical and wellness functions please read Appendix A Warnings and Precautions thoroughly.
-
Page 22: Getting Started
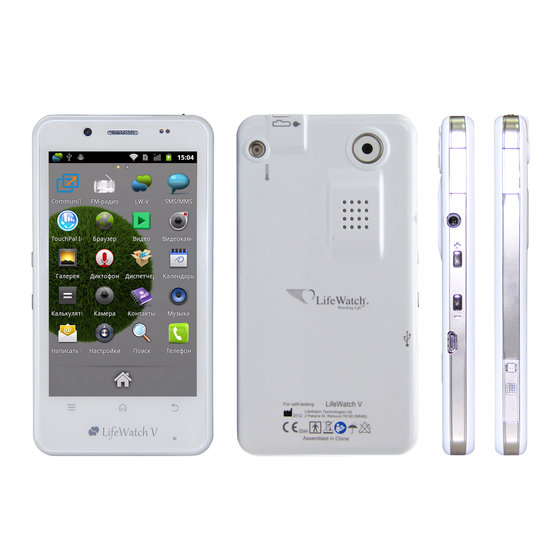
Getting Started Overview Gluco-meter slot Front camera Power on/off Biocompatible Speaker Electrode Menu Ear phone plug Home Volume +/– Back Key USB connector Microphone... - Page 23 Back cover removed Biocompatible Thermometer Loudspeaker Camera Reset button Electrode microSD card Biocompatible SIM card Electrode with SP02 sensor...
- Page 24 Icons LifeWatch V icon Call icon Contacts icon Messages icon Applications icon Keys Explained Function • Hold to turn on or off Silent or Airplane mode, or to power off. • Press to switch your device to Sleep mode. Power •...
-
Page 25: Starting Up
Starting up Installing the SIM/microSD Card Switch off your device before installing, SIM, or memory card. Lock Card holder Remove the back cover. Open the SIM card holder by sliding it in the direction of the OPEN arrow. Hold the SIM card by the cut corner and slip it into the card holder. - Page 26 Removing the SIM/microSD Card Switch off your device. Remove the back cover. Open SIM card holder by sliding it in the direction of the OPEN arrow. Slide the SIM card out. Pull the microSD cover tag. Slide the microSD card out. Press the microSD cover down.
-
Page 27: Charging The Battery
Charging the Battery Connect the supplied USB cable’s micro USB plug to the LifeWatch USB/adapter jack. Ensure that the plug is inserted with the correct orientation. Do not force the plug into the jack. USB input is 5 VDC: maximum 5.25VDC to minimum 4.75VDC at 1.7A max. - Page 28 Switching Your Device On/Off Hold Power to switch on your device. To switch it off, hold Power to get the device options. Select Power off, and then tap OK. Always place the adapter in easily accessible main plugs. In case of electrical malfunction of device during connection to adapter, remove adapter from main plug immediately.
-
Page 29: Getting Around Your Device
Waking Up Your Device Press Power to activate your screen display. Drag the icon to the right. NOTE: If you have set an unlock pattern, PIN or password for your device you’ll need to draw the pattern or enter the PIN/password to unlock your screen. Getting Around Your Device Touch Control You can use finger gestures to control your device. -
Page 30: Home Screen
Home Screen You can modify your Home Screen. Set your own wallpaper, add the widgets or application shortcuts you need, or remove them as you like. Extended Home Screen The Home Screen extends beyond the screen width, giving you lots more space to add more stuff. - Page 31 Adding Items to Your Home Screen Tap Home to return to the Home Screen. Slide left or right to find a part of the Home Screen with free space. Tap Menu and select Add. You can also tap and hold the blank area of the Home Screen until the Add to Home screen menu is displayed.
-
Page 32: Status And Notification Icons
Status and Notification Icons GPRS connected No signal Connected to a Wi-Fi network GPRS in use Signal strength New Wi-Fi network detected EDGE connected Phone speaker off Portable Wi-Fi hotspot is on EDGE in use Phone microphone off Airplane mode 3G connected No SIM installed Call in progress... - Page 33 Battery partially drained Battery charging Downloading data Vibrate mode Wired headset Song is playing Syncing Bluetooth on Bluetooth connected New mail Speaker on Alarm set New MMS Upcoming event New SMS Problem with ECG result notification icon Reminder notification icon SMS/MMS delivery Using the Notification Panel Flick the status bar downwards from across the top of the screen to open the...
-
Page 34: Applications And Settings
Applications and Settings Applications Your device has lots of functions such as shown below. Tap to see the following. Applications Benefit Browser Browse the Internet. Calculator Do basic calculation. Calendar Schedule appointments and events. Camcorder Shoot video clips. Camera Take pictures. Contacts Manage your contacts information. -
Page 35: Settings
Search Search for information online or on your device. Settings Adjust device settings. Appears if your SIM card provides this function. SIM Tool Kit Sound Recorder Capture audio clips. Videos Browse and watch video files. Settings To change or view your device’s settings, tap Home > >... - Page 36 Applications Manage your applications. Accounts & sync Manage your accounts and configure synchronization settings. Privacy Configure privacy settings, such as back-up and restoration, and personal data. Storage Check available memory on the external card and on the internal device storage. Language &...
-
Page 37: Phone Calls
Phone Calls Dialer Screen This screen is used for phone call actions. on the Home Screen to open the dialer. You can select dialing, check voicemail, view call log, contacts and favorite numbers. Making Calls Calling from the Dialer 1. Tap on the Home Screen or tap Home >... - Page 38 Calling from Your Contacts on the Home Screen or tap Home > > Contacts. Slide your finger to scroll the contacts list and tap the contact you want to call. You can search for a contact by tapping on the bottom of the screen. to initiate the call.
-
Page 39: Call Screen
Call Screen This appears during a call, you are able to perform the following: Dialpad - Open dialer End call Add call (conference call) Speaker – switch between speaker and loud speaker Mute – turns off the device microphone Bluetooth – connects to a Bluetooth handsfree or earphone device... -
Page 40: Receiving Calls
Receiving Calls Answering a Call Drag to the right to answer the call. Rejecting a Call Drag to the left to reject the call. Muting a Call During a call, you can mute your microphone so that the person you are speaking to cannot hear you, but you can still hear them: Tap Mute to turn your microphone off. -
Page 41: Adjusting Your Call Settings
Turning the Speakerphone On/Off Tap Speaker during a call to turn the speakerphone on. This icon appears in the status bar. Tap Speaker again to turn off the speakerphone. Ending a Call to finish a call. Adjusting Your Call Settings From the Home Screen, you can open the call settings menu by tapping Menu >... -
Page 42: Contacts
Contacts You can add contacts to your device and synchronize them with the contacts in your account that support contact syncing. To see and edit your contacts, tap on the Home Screen or Home > > Contacts. Importing and Exporting Contacts You can import or export contacts from/to your SIM card or microSD card. - Page 43 For import, you should have vCard files saved in the microSD card. If there’s more than one vCard file, you need to select the vCard file and tap OK. For export, the device will prompt you with the name of the vCard file. Tap OK to create the file on the microSD card.
-
Page 44: Entering Text
Searching for a Contact Tap Menu > Search at the bottom of the Contacts Screen. Input the name you seek. The matching contact(s) are listed. Creating a New Group Tap Menu > More > Group Management from the Contacts Screen. Tap Menu >... - Page 45 Android Keyboard The Android Keyboard provides a layout similar to a desktop computer keyboard. Turn the device sideways and the keyboard will change from portrait to landscape. In order to select the keyboard type, hold the input box and select Input method from the pop-up menu to change the input method.
-
Page 46: Messaging
• Tap to change input method or to set up the Android keyboard. • Tap to use Google’s networked voice input. Messaging Your SMS (text message) and MMS (multimedia messaging service) are combined into one menu, tap on the Home Screen or Home > >... - Page 47 4. Tap Type to compose and type your message. Tap Menu to insert Quick Text, signature, smiley, or contact. If you are sending an MMS, tap Menu to add a subject, or attach pictures, videos, audios, or slideshows. Tap Send to send your message.
-
Page 48: Email
Manage SIM card messages: Manage the messages saved to your SIM card. Multimedia message (MMS) settings: Delivery reports: Request a delivery report for every MMS message sent. Read reports: Request a read report for each MMS message sent. ... -
Page 49: Creating An Email Account
Creating an Email Account When you open Email for the first time, enter your Email address and password. Then tap Next. Select your account type and tap Next. Edit the settings for the incoming server and the outgoing server. Tap Next. Your device will connect to the Internet and verify the settings before proceeding to the next step. -
Page 50: Composing And Sending An Email
Composing and Sending an Email After creating an Email account, you can compose and send Email messages. Tap Menu > Compose from the Inbox Screen. Tap To and enter the recipient’s address. When you start to enter an address, auto-complete suggests matching contacts. -
Page 51: Getting Connected To The Internet
Deleting an Email Account Open the Email application. If there is only one account, tap Menu > Accounts to get the Accounts list. Tap and hold the account you want to delete and select Remove account from the pop-up menu. Tap OK to confirm. -
Page 52: Adding A New Gprs/Edge/3G Connection
Adding a New GPRS/EDGE/3G Connection To connect via GPRS/EDGE/3G you need a data plan with your service provider. Also if the GPRS/EDGE/3G settings are not pre-configured on your device, please contact your provider to get the necessary information. Tap Home > >... -
Page 53: Using The Device As A Wi-Fi Hotspot
Connecting to a Wi-Fi Network Tap Home > > Settings > Wireless & networks > Wi-Fi settings. The Wi-Fi access points, or “hotspots”, that your device has detected are displayed with their names and security settings. Tap an access point to form a connection. If security features are implemented, you’ll need to enter a password. -
Page 54: Browsing The Internet
When the portable Wi-Fi hotspot function is enabled, you cannot access the Internet with any application on your device via its Wi-Fi connection. Enabling the Wi-Fi Hotspot Tap Home > Menu > Settings > Wireless & networks > Tethering & portable hotspot and tick the Portable Wi-Fi hotspot check box. - Page 55 beside the address bar or tap Menu > Bookmarks. Select the bookmarked webpage you want to open. beside the address bar or tap Menu > Bookmarks. Choose an item from the Most visited tab or History tab. Browsing Options Press Menu to access the following options when browsing web pages. ...
- Page 56 Using Bookmarks To bookmark a web page, open it and tap or Menu > Bookmarks. Then tap Add or Add bookmark. Give the bookmark a name and tap OK. TIPS: You can press Menu > List view/Thumbnail view to change how you view bookmarks on your device screen.
-
Page 57: Bluetooth
Changing Browser Settings Tap Menu > More > Settings from a browser window to change browser settings. Bluetooth® Bluetooth® is a short-range wireless communication technology. Phones or other devices with Bluetooth capabilities can exchange information wirelessly within a distance of about 10 meters. The Bluetooth devices must be paired before the communication is performed. - Page 58 Select Bluetooth if it isn’t already selected. Select Discoverable to make your device visible for 120 seconds. To make your device ‘invisible’, simply clear the Discoverable check box. Changing the Device Name When your device is visible to other Bluetooth devices it listed by its name, and you can choose – for example: ‘Ben’s Phone’.
-
Page 59: Making The Most Of Multimedia
If required, enter your PIN and tap OK. If a PIN is required, the same PIN should be entered on the other device. Making the Most of Multimedia Taking Pictures with Your Camera Your device has a 5-megapixel camera. Open it by tapping Home > >... - Page 60 Shooting Video with Your Camcorder Open the camcorder by tapping Home > > Camcorder. Then tap to start shooting, and tap stop. Select the picture in the right corner of the screen to view the video you’ve just shot. Or tap Menu > Gallery to see all your video clips.
- Page 61 icon pops up in the status bar. Tap Menu > Sleep to set the FM radio settings. to switch off the radio. Playing Your Music You can play digital audio files from your device’s memory card. Tap Home > >...
- Page 62 Managing Playlists From the Music Screen tap Playlists to see them all. Hold the playlist you want to play or edit until a shortcut menu pops up. Tap Play, Delete or Rename. Adding a Song to a Playlist Open Music and find the song under Artists, Albums, Songs, or Playlists. Hold the song until a shortcut menu pops up.
- Page 63 Tap a video file to start playing it. Tap on the screen and the control bar appears as seen below. You can play, pause, fast forward, rewind, etc. Opening Your Gallery Tap Home > > Gallery. You can use the Gallery to view pictures and play videos. You can also do some basic picture editing –...
-
Page 64: Sorting Out Your Phone Settings
Sorting out Your Phone Settings Setting Date and Time Tap Home > Menu > Settings > Date & time. Clear the Automatic check box if you want to set the time and date by yourself. Configure the date, time, time zone, and date/time format. Display Settings Tap Home >... - Page 65 Silence Ringer When Face Down: Enable this function, to mute the incoming call ringtone by flipping the device over. Vibrate: Enable vibration. Volume: Tap to adjust volume levels for ringtone, media, alarm, and notification. Phone ringtone: Select the default ringtone for incoming calls. ...
- Page 66 Language Settings You can change the language of your device system in two simple steps. Tap Home > > Settings > Language & keyboard > Select language. Select a language from the list. Mobile Network Services Tap Home > > Settings > Wireless & networks > Mobile networks to enable or disable a data service, allow data services when roaming, or set access point names for data access.
-
Page 67: Security Settings
Tap Search networks to scan for available networks, tap a network to register manually. Tap Select automatically to select preferred network automatically. Setting Access Point Names To connect to the Internet you can use the default Access Point Names (APN). And if you want to add a new APN, please contact the service provider to find out more instructions. -
Page 68: Protecting Your Device With A Pin Or Password
Draw your own pattern and tap Continue. Draw the pattern again and tap Confirm. Press Power to lock the screen. TIPS: Clear the Use visible pattern check box if you want to hide the pattern as you draw it on the screen. Unlocking the Screen with Your Pattern Press Power to wake up the screen. - Page 69 Enter it again and tap OK to confirm. Unlocking the Screen with Your PIN or Password Press Power to wake up the device. Drag the icon to the right. Enter the PIN or password you set. Tap OK. Disabling Screen Lock Settings If you have created an unlock-pattern, PIN or password, you can disable it.
- Page 70 Enter the PIN you’ve been given and tap OK. Changing Your SIM PIN You can change the PIN you’ve been given to one easier for you to remember and harder for others to guess. Tap Home > > Settings > Location & security > Set up SIM card lock. Make sure that Lock SIM card is enabled.
- Page 71 Tap Home > > Settings > Location & security. Tap Set password and create a password for the credential storage. Select Use secure credentials. TIPS: You can also install encrypted certificates from your microSD card by tapping Install from SD card. Deleting Secure Credentials Tap Home >...
-
Page 72: Managing Your Device Memory
Managing Your Device Memory Tap Home > > Settings > Storage. You can view the microSD card and the device storage details. Unmount/Mount SD card: You can unmount the microSD card to safely remove it, or mount the card. ... -
Page 73: Managing Applications
Managing Applications Managing Other Settings Search Settings You can manage search settings and search history by opening Search and tapping Menu > Search settings. Searchable items: Choose what to search on the device. Clear shortcuts: Clear shortcuts to recently chosen search suggestions. Voice Input and Output You can set the text-to-speech and voice recognition options by tapping Home >... -
Page 74: Lifewatch V Health And Medical Functions
LifeWatch V Health and Medical Functions Getting Started with the LifeWatch V Medical and Wellness Applications Press the LifeWatch V icon on the desktop. This activates the application and opens the license agreement. License Agreement Please read the license agreement. The login screen appears after accepting the terms. -
Page 75: First Time Launch
First Time Launch The first time you open the application the registration screens are displayed. For registered user - enter your user name and password and tap on the “Sign In” button. For new user - tap on “Create Account” in order to start the registration process. -
Page 76: Login Screen
Login Screen This is the log-in screen for LifeWatch V medical applications. Use the keypad to enter your quick access code. The Start screen appears. Some LifeWatch V medical and wellness features are available to subscribers only! Guest log-in Guest Login Select Guest Login to start Guest Mode. - Page 77 Start Screen Select the required application to start. Application Icon Test Diet Drug Calendar Information...
-
Page 78: Test Application
Test Application Test General Description The LifeWatch V implements the following test features in a single device to help you track and record your health/wellness: ECG - The graphical recording of your heart activity, to be used whenever you are concerned about your heart rhythm or if you experience the following symptoms of abnormal heart rhythms: ... -
Page 79: Test Screens Description
Test Screens Description Use to cycle between tests and select the relevant Wheel test Information Press to open the relevant information about the icon selected test type Test type Displays test type Start button Press to start test History Press to display test history (3 last tests) button Reminder Press to display the calendar... - Page 80 Press To display Reminder NOTE: Tapping opens the Reminder Creation window for the current type of test. History Note: Tapping the graph opens History, see page 84.
- Page 81 Test Wheel Icons BFA (body fat Glucose testing Temperature analysis) Stress Level HR (heart rate) (electrocardiogram) Analyzer SP02 (blood oxygen saturation) NOTE: For tests involving the use of electrodes it is important to: a. Clean electrodes with a lint free dry cloth. b.
- Page 82 Results Each test type has its own units and scale values. Warning - The user of the LifeWatch V should not take any actions of a medical or clinical nature based on his/her understanding or interpretation of test results without...
- Page 83 Test Results Icons Reminder - Opens the Reminder window. Share - Opens the Sharing Selection popup, share the results via Email or SMS. Notepad Comment - Pop-up for commenting on results. Auto sharing results are sent without the comments. Call - Initiate a call to the Call Center (Premium Users). Crossed-out apple means before meal Apple means after meal Retake test...
-
Page 84: History
History The screen default is to show the last test type chosen. Scroll using the wheel to change test type. Wheel – scroll to change test type All Tests– show all tests (all types) Other Users – displays the test results of other users that you “follow” Graph –... - Page 85 Share Results– select to open Sending (SMS/email) option.
-
Page 86: Performing Tests
LifeWatch V, Test Strips, Lancing Device, and Sterile Lancet Wash and dry your hands. Use only the glucose strips provided with the LifeWatch V device. 1. To start the glucose test press Start. The screen rotates to the horizontal mode, please hold the LifeWatch V horizontally. - Page 87 2. A new screen opens, select Before or After meal. Please insert a new glucose strip into the glucose slot when instructed.
- Page 88 4. Prepare the lancing device: Screw off the cap of Lancing Device. Insert a lancet into the lancet holder and push down firmly until it is fully seated. Twist the protective disk until it separates from the lancet. Replace the lancet device cap. Turn the cap until it is snug but not too tight.
- Page 89 The adjustable tip offers 5 levels of skin penetration. Twist the adjustable tip in either direction until the number lines up with the Arrow: 1-2 for soft or thin skin, 3-4 for average skin, 5 for thick or calloused skin. Please select the most suitable depth for you to avoid unnecessary pain.
- Page 90 5. Take a blood sample using the lancing device (see supplied lancing device instructions). 6. Place the finger with the acquired drop of blood at the tip of the glucose strip, as shown on the screen and below.
- Page 91 7. The Processing screen appears, after a few seconds the results screen appears. 8. When the test is completed the results screen appears. Remove the used test strip and lancet; dispose of them. Glucose strips are for single use only; dispose of used strips as per the instructions included with the strips.
-
Page 92: Glucose Test Troubleshooting
If you are experiencing symptoms that are not consistent with your blood glucose test results AND you have followed all the instructions described in the LifeWatch V User Manual, call your healthcare professional. A red blood cell count (hematocrit) that is either very high (above 55%) or very low (below 30%) can cause false results. -
Page 93: Alternative Site Testing (Ast)
Alternative Site Testing (AST) Important: There are limitations for doing AST. Please consult your healthcare professional before you do AST. What is AST? Alternative site testing (AST) means that people use parts of the body other than fingertips to check their blood glucose levels. This system provides you to test on the palm, the forearm, the upper arm, the calf, or the thigh with the equivalent results to fingertip testing. - Page 94 We strongly recommend you do AST ONLY in the following intervals: In a pre-meal or fasting state (more than 2 hours since the last meal). Two hours or more after taking insulin. Two hours or more after exercise. Do NOT use AST if: ...
-
Page 95: Control Solution Test
Control Solution Test Why Use the Control Solution? Ensure that your LifeWatch V and LifeWatch V Test Strips are working together properly. Practice testing without having to use your own blood. Perform Control solution tests when: First receive your LifeWatch V. - Page 96 Insert the new glucose strip into the glucose slot when instructed. Glucose strips are for single use only; dispose of used strips as per the instructions included with the strips. Place the Control Solution: Shake the control solution vial. ...
- Page 97 Using your finger place the drop of control solution on the strip in the LifeWatch V as shown. The drop is drawn into the test strip. Move your finger away when the strip window is filled 10. The Processing screen appears, after a few seconds...
- Page 98 12. Remove the used test strip and dispose of it. 13. Compare the result of your control solution test to the range printed on your LifeWatch V Blood Glucose Test Strip vial label for the control solution level that you used.
-
Page 99: Control Solution Troubleshooting
Control Solution Troubleshooting Problem Possible Cause(s) Solution Control solution 1. Not enough control solution is 1. Rerun the test with a new Test Strip and test results are placed on the Test Strip. apply sufficient control solution to fill Test Strip inconsistent, or tip. -
Page 100: Ecg/Hr/Bfa/Sp02/Stress Level Analyzer Tests
ECG/HR/BFA/SP02/Stress Level Analyzer Tests Recommended Preparations - Wash and dry your hands. If your fingers are too dry or are extremely cool, accurate measurements may not be possible. Condition Actions Hands are dry. Slightly moisten hands with a wet towel, then measure. Your hands are cold Warm your hands by immersing in warm water or staying in a warm room. - Page 101 Use the scroll wheel to cycle between the various tests. To start the test press Start. The screen rotates to the horizontal mode, please hold the LifeWatch V horizontally. NOTE: The ECG test is shown as an example. Follow the on-screen instructions...
- Page 102 When the test is completed the results screen appears. SP02 Stress Level Analyzer Heart Rate Body Fat Percentage It is now possible to: Retake the test by pressing the Retest button Use the Scroll Wheel to scroll to another test ...
-
Page 103: Body Temperature Test
A high fever or low body temperature requires you to seek immediate medical attention The screen rotates to the horizontal mode, please hold the LifeWatch V horizontally. Follow the screen instructions and place the thermometer on your forehead when instructed. - Page 104 When the counter reaches 0 the test starts followed by beeps. Move the device from left to right, until the beeping stops (about 5 seconds). The processing screen appears while you are moving the device on your forehead, the test ends when the beeping stops. When the test is completed the results screen appears.
-
Page 105: Lifewatchv Medical Application Settings
LifeWatchV Medical Application Settings The LifeWatch V medical application settings are divided into categories: My Profile Sharing Permissions Test Settings Measurement units Sounds... -
Page 106: My Profile
My Profile Press My Profile to open the profile details. The details that have been entered during the registration process are displayed. To change a detail, select it by pressing it and then either enter the new details in the field or if there is a pop-up box, change the setting. Pop-up Example Gender... -
Page 107: Sharing Permissions
Sharing Permissions Select Sharing Permissions to display the list of people already assigned for sharing and to add new sharing contacts. Test Settings Press on Test Settings to open the tests options screen. It is possible to set the desired test goal for each test. -
Page 108: Diet Application
Diet Application General The Diet application assists users in staying on track and gaining their fitness goals through fitness and nutrition planners. It also includes diet and wellness support through personal nutrition and fitness management, along with personalized information. Meal The Meal Planner is designed to track the user's caloric intake. -
Page 109: Exercise Tracker
Exercise Exercise Tracker presents the recent exercise logs, and lets the user add new Tracker logs. Tap ‘Exercise Tracker on the scroll wheel to open this application. The screen shows the user all the previously reported exercise logs. The Exercise Tracker includes a pedometer that counts each step a person takes and uses it to calculate the distance the user has walked. -
Page 110: Calendar Application
Calendar Application The Calendar application displays the set test times and medication use in a calendar format. You can select to display only tests or only medications. The details are presented at the bottom of the screen. -
Page 111: Drug Reminder
Drug Reminder Using the Drug Reminder application to create reminders for the medications that you are taking, including usage monitoring. The dosage, time periods, length of use and any special instructions may be added. It is possible to check the Reminder details, freeze (pause) the Reminder or delete the Reminder. -
Page 112: Heart Rate Calculation Method
Heart Rate Calculation Method Introduction This section describes the heart rate (HR) calculation within the LifeWatch V. HR is defined as the number of heart beats during a GIVEN TIME INTERVAL (usually one minute). It is reported by the algorithm each time a QRS complex is detected. -
Page 113: Maintenance
Caring for your LifeWatch V Do not open or attempt to repair your LifeWatch V yourself; do not tamper or attempt to remove the battery. Only authorized service personnel may repair the device. ... -
Page 114: Environment
Environment Keep the device away from extreme heat. Do not leave it on the dashboard of a car or near a heater. Do not leave it in any place that is extremely damp or dusty. As this device is not waterproof, do not use it or store it where liquids such as water, juice, coffee, etc. -
Page 115: Preventive Maintenance
Preventive Maintenance The following simple preventive maintenance tasks should be performed weekly to ensure the continued maximum capacity performance of the device, and to reduce the possibility of failure: Mechanical Inspection - Check for splits, cracks or imperfections in the case. If you have any questions or doubts, call your service provider. -
Page 116: Troubleshooting
Check if the adapter is properly connected; if the phone battery was completely drained it may take up to one hour until the charging animation appears. No history records/cannot Make sure the internet connection is available and that your LifeWatch V receive ECG analysis from service plan is active. server Phone is frozen, a black Click on the restart button located under the device back cover. -
Page 117: Specifications
Specifications Environmental and Dimensions Operating temperature (C Cellphone -10 to +55 Medical tests 10 to +40 Transport & storage temperature (C -25 to +75 Relative humidity (%) 0 to 95, non-condensing Atmospheric pressure range (hPa) 700 to 1060 Height (mm) Width (mm) Depth (mm) Net Weight (gr.) - Page 118 1480mAh, 5.47 Wh, nominal voltage3.7 V, limited charge 4.2 V; Battery Capacity (internal) LI-IO battery model BAK5128800 Wi-Fi(WLAN) IEEE 802.11b/g/n Yes, support A-GPS also, but need network support G-Sensor FM Radio Storage Card microSD , up to 32GB Main Camera...
- Page 119 WCDMA HSPA Yes (HSDPA) USIM support Maximum Downlink Data Rate 7.2 Mbps USB revision USB 2.0 high speed USB charging System I/O connector Micro USB Audio Jack 3.5 Audio jack Bluetooth Bluetooth revision Ver. 2.1 with BT/WiFi coexistence Bluetooth power class Class 2 USIM USIM support...
- Page 120 Medical Module ECG sample rate transmission 250 samples /sec Sample resolution 12 bits Heart Rate HR measurement range 40 to 240 bpm HR accuracy ± 5 bpm or 10% whichever is greater R-R interval measured range 225 to 2000 msec R-R interval measured resolution ±...
- Page 121 Accuracy Pulse rate 3 % ± 1 digits Body fat accuracy percentage 15 % relative the Caliper measurement IR thermometer Body temperature range 34 to 41 Cº Ambient temperature 10 to 40 Cº Measurement accuracy (vs. black body) ± 0.2 Cº Glucometer 0.7 μL Sample Size...
-
Page 122: Declaration Of Rohs Compliance
To minimize the environmental impacts and take more responsibilities to the earth we live on, this document shall serve as a formal declaration that the LifeWatch V manufactured by LifeWatch Technologies Ltd. complies with Directive 2011/65 /EC of the European Parliament - RoHS (Restriction of Hazardous Substances) - with respect to the following substances: ... -
Page 123: Appendix A Warnings And Precautions
Appendix A Warnings and Precautions WARNING Potential Biohazard Healthcare professionals or persons using the LifeWatch V device on multiple patients should be aware of the following and should follow the infection control procedure approved by their facility. All products or objects which come in contact with human blood, even after cleaning, should be handled as if capable of transmitting viral diseases. -
Page 124: Warnings
The LifeWatch V is not intended for use in the diagnosis of myocardial infarction or for chest pain monitoring. Due to the risk of ignition or fire, the LifeWatch V is not intended for use in a hyperbaric chamber, within an oxygen tent or in the presence of flammable anesthetics / medical gases. ... - Page 125 Heart failure The LifeWatch V device should not be used to monitor chest pain and it cannot predict or diagnose a heart attack (myocardial infarction). Do not operate the LifeWatch V in combination with the following medical electronic devices as this may cause a malfunction of this device: ...
- Page 126 The LifeWatch V generates, uses, and can radiate radio frequency energy and, if not used in accordance with the instruction manual, may cause harmful interference to radio communications. The LifeWatch V employs cellular technology. The location of the LifeWatch V and the associated environment, including cellular phone coverage in the particular area, may cause transmission interruption or delay.
- Page 127 Perform control-solution tests for any new vial or if “abnormal” results are shown. Disinfection is performed after each use of the LifeWatch V glucose meter using an EPA registered germicidal disposable wipes (such as Nice-Pak Products, Inc. "Super Sani-Cloth+® Germicidal Disposable Wipe").
-
Page 128: Radio Frequency (Rf) Exposure (Precautions)
Radio Frequency (RF) Exposure (Precautions) General Statement on RF Energy Your phone contains a transmitter and a receiver. When it is ON, it receives and transmits RF energy. When you communicate with your phone, the system handling your call controls the power level at which your phone transmits. EMI Considerations This equipment generates, uses and can radiate radio frequency energy and, if not installed and used in accordance with the instructions, may cause harmful interference to radio communications. -
Page 129: Driving (Precautions)
‘hands-free’ devices to keep mobile phones away from the head and body when using the LifeWatch V device as a cell phone. Further information on this subject can be obtained from the WHO home page http://www.who.int/peh-emf (WHO Fact sheet 193: June 2011). -
Page 130: Children
Please check local regulations for disposal of electronic products. Do not carry your device in your back pocket as it could break when you sit down. Children Do not leave your device and its accessories within the reach of small children or allow them to play with it. They can hurt themselves or others, or they can accidentally damage the device. -
Page 131: Repetitive Strain Injuries
Repetitive Strain Injuries To minimize the risk of Repetitive Strain Injury (RSI) when texting or playing games with your device: Do not grip the device too tightly. Press the buttons lightly. Use the special features which are designed to minimize the times of pressing buttons, such as Message Templates and Predictive Text. -
Page 132: Hospitals
You may also consult your hearing aid manufacturer to discuss alternatives. Use of LifeWatch V with other Medical Devices Please consult your doctor and the device manufacturer to determine if operation of your phone may interfere with the operation of your medical device. -
Page 133: Interference In Cars
Interference in Cars Please note that because of possible interference to electronic equipment, some vehicle manufacturers forbid the use of mobile phones in their vehicles unless a hands-free kit with an external antenna is included in the installation. Explosive Environments (Precautions) Petrol Stations and Explosive Atmospheres In locations with potentially explosive atmospheres, obey all posted signs instructing to turn off wireless devices such as your phone or other radio equipment. -
Page 134: Index
Getting Connected to the Internet .... 51 Contraindications ........3 Getting Started ........22 Control Solution Test ....... 95 Getting Started with the LifeWatch V Creating an Email Account ...... 49 Medical and Health Applications ..74 Device Definition ........19... - Page 135 Important Symbols........4 Receiving Emails ........49 Keys Explained ........24 Replying to or Forwarding an Email ..50 LifeWatch V Kit Contents ......3 Security Settings ........67 Limiting Exposure to Radio Frequency .. 128 SIM Toolkit ..........73 Making Calls ..........
- Page 136 Test Results Icons ........83 Turning On Wi-Fi ........52 Test Screens Description ......79 Using the Notification Panel..... 33 Test Wheel Icons ........81 Using the Phone as a Wi-Fi Hotspot ..53 Touch Control .......... 29 UG-00079 rev04 11/12...
Need help?
Do you have a question about the V and is the answer not in the manual?
Questions and answers
My watch does not have a "SET TIME" in the settings. How do I set the time on my watch?
To set the time on a LifeWatch V:
1. Tap Home > Menu > Settings > Date & time.
2. Clear the "Automatic" checkbox to manually set the time.
3. Configure the date, time, time zone, and date/time format.
This answer is automatically generated
How do I know the battery status on a lifewatch 2
If the battery is low, a message will appear on the screen. While charging, the screen will display the exact battery level each time you wake up the device. If the device is on, a charging icon will be shown on the status bar. Once charging is finished, a different icon will appear on the status bar.
This answer is automatically generated