Advertisement
Quick Links
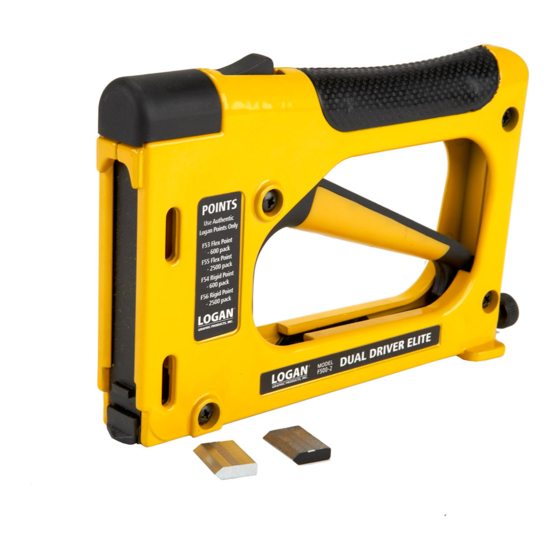
Instruction Sheet
Dual DrivE Elite Point Driver
Operating Instructions
Loading Points
1. Press release button
2. Pull up cover
3. Install point strips with point facing
forward
NOTE: Make sure points are inserted
down into nose piece.
4. Slide cover closed
(Fig. 1)
Operation
1. Hold outside of frame
2. Press driver nose against inside frame
3. Keep drive flat on material - DO NOT
LIFT OR ANGLE
4. Squeeze trigger to insert point
5. Space points 6" apart, 3" from corners
(Fig. 2)
Adjust Point Depth
1. Turn adjustment screw to increase
tension for hardwoods or decrease
tension for softwoods.
(Fig. 3)
Troubleshooting
IF GUN JAMS & NO LONGER FIRES POINTS
•
Keep 1" or higher stack of points in gun at all times
•
Make sure you are using authentic Logan rigid or flexible points (F53, F54, F55, F56).
•
Make sure points are loaded and seated correctly. Try removing and re-loading the point strip.
•
To remove a point jammed in the nose piece, reference the instructions to remove the nose piece, clear
it and re-install it.
•
If point does not leave the gun, try reducing or tightening tension.
•
Check to see that main body screws holding two halves of the tool together are not loose. If necessary,
re-tighten with Phillips screwdriver.
IF THE POINT BENDS
•
If flexible inserts are bending or not staying in the wood, try increasing the tension or switch to rigid
points.
•
Try reducing the tension if handle is hard to pull.
Logan Graphic Products Inc. 1100 Brown Street, Wauconda, IL 60084 1-847-526-5515 1-800-331-6232
PICTURE FRAMING
Identification
Point Loading Cover
Nose
Point Jammed
1. Remove points
2. Remove nose screw and nut
3. Remove nose piece and discard
jammed point (Fig. 4)
Replacement Points
Use only authentic Logan Points
F53 - Flex (600)
F55 - Flex (2500) F56 - Rigid (2500)
Model F500-2
Cover Release Button
Point Depth Adjustment
F54 - Rigid (600)
Fig. 1
1.
2.
3.
Fig. 2
Fig. 3
Adjustment Screw
Fig. 4
2.
1.
3.
LoganGraphic.com
N1329 1-15
Advertisement

Summary of Contents for Logan F500-2
-
Page 1: Operating Instructions
• Keep 1” or higher stack of points in gun at all times • Make sure you are using authentic Logan rigid or flexible points (F53, F54, F55, F56). Fig. 4 • Make sure points are loaded and seated correctly. Try removing and re-loading the point strip. - Page 2 6. Using trimmer, start beyond edge of a corner, hold on slight angle up against frame edge. Draw trimmer along edge to trim. (Fig. 6) 7. Repeat for other three sides. Fig. 4 Fig. 5 Fig. 6 Logan Graphic Products Inc. 1100 Brown Street, Wauconda, IL 60084 1-847-526-5515 1-800-331-6232 www.logangraphic.com L2222 01/15...
- Page 3 These will prevent the frame from scratching the wall. The pads simply peel off a sheet of release paper and adhere to the dust cover (Fig. 5). Fig.5 Logan Graphic Products Inc. 1100 Brown Street, Wauconda, IL 60084 1‑847‑526‑5515 1‑800‑331‑6232 www.logangraphic.com N1328 01/15...
Need help?
Do you have a question about the F500-2 and is the answer not in the manual?
Questions and answers