Table of Contents
Advertisement
Quick Links
INSTRUCTION MANUAL
Model #: V-8506
CAUTION :
Read and follow all safety and operating instruction before first use of this product.
TABLE OF CONTENTS
Before Using Your New Vacuum cleaner -----------------------------
Parts and Features -------------------------------------------------------
Assembly Instruction ----------------------------------------------------
Operation Instruction ----------------------------------------------------
Carpet Height Adjustment & Suction ---------------------------------
Attachments --------------------------------------------------------------
Vacuum Cleaner Care ---------------------------------------------------
Filter change & Clean ---------------------------------------------------
Belt change & Agitator Clean ------------------------------------------
Trouble Shooting ---------------------------------------------------------
Guarantee & & Important Safety Instruction ------------------------
Important Safety Instruction -------------------------------------------
Specification & Order Parts --------------------------------------------
BEFORE USING YOUR NEW CLEANER
Please read this guide. It will help you assemble and operate your new vacuum
cleaner in safest and most effective way.
We suggest you record the model, serial numbers and purchase date below. The
serial numbers and model number are located on the silver rating plate on your
cleaner. For prompt and complete service information, always refer to these
numbers when inquiring about service.
Model No: ___________________________________
Serial No: ____________________________________
Date of Purchase: ______________________________
- 1/12 -
1
2-3
4-6
7
8-9
10-11
12-13
14-15
16-18
19
20
21-22
23
Advertisement
Table of Contents

Summary of Contents for SPT V-8506
-
Page 1: Table Of Contents
For prompt and complete service information, always refer to these numbers when inquiring about service. Model #: V-8506 Model No: ___________________________________ CAUTION : Read and follow all safety and operating instruction before first use of this product. -
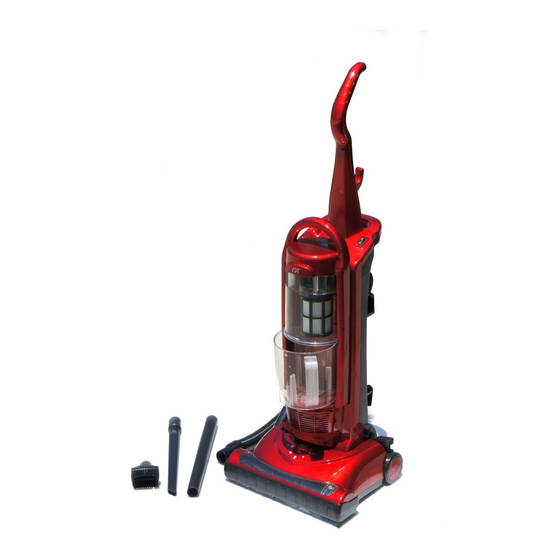
Page 2: Parts And Features
1 Furniture Guard PARTS AND FEATURES 2 Nozzle Cover 3 Light Lens 4 Exhaust Filter 5 Dust Bin 6 Dust Bin Release Handle 7 Dust Bin Release button 8 Hose 9 Handle 10 Carry handle 11 On/Off Switch 12 Quick Release Cord Hook 13 Lower Cord Retainer 14 Handle Release Pedal 15 Wand... -
Page 3: Assembly Instruction
ASSEMBLY INSTRUCTION Insert the screw so it passes through the handle into the vacuum. Begin to tighten the screw with your fingers. It may be necessary to adjust the handle slightly. Using a screwdriver tighten the screw. CAUTION Do not over tighten. Over tightening could strip the screw holes. -
Page 4: Operation Instruction
OPERATION INSTRUCTION Qui ck Rel ease hook HOW TO START 1. Turn the quick release cord hook to either side and down to release the power cord. Power cord Quick release cord hook Lower Cord Retai ner ATTACHMENT ASSEMBLY After the handle has been assembled to the body and the power cord has been 2. -
Page 5: Releasing The Handle
CARPET HEIGHT SETTING AND SUCTION RELEASING THE HANDLE To select a carpet height setting: Release the handle by placing your foot on the pedal and pull back on the handle For maximum cleaning performance, the following carpet height settings are until it releases from its upright position. -
Page 6: Attachments
If the dusting brush is being used and more distance is needed, the crevice tool ATTACHMENTS can be added to the wand, then the dusting brush can be added to the wand. W ARNING wand cr evi ce t ool Dust br ush Do not place hands or feet underneath the brush unit at any time. -
Page 7: Vacuum Cleaner Care
VACUUM CLEANER CARE DUST BIN CLEANING Always follow all safety precautions when cleaning and servicing the vacuum It is recommended that the dust bin be emptied before the dirt reaches the upper cleaner. dust bin or after every use if preferred. CAUTION: Very fine materials, such as face powder or cornstarch, may seal the VACUUM STORAGE filter and cause loss of suction. - Page 8 To remove the upper dust bin for cleaning, unlock the switch from the back FILTER CHANGING /CLEANING of the dust bin and pull the dust bin forward. EXHAUST FILTER HEPA FILTER The filter cannot be washed, or it will lose its dust trapping ability. The filter cannot be washed, or it will lose its dust trapping ability.
-
Page 9: Belt Changing And Agitator Cleaning
To remove belt/clean agitator: BELT CHANGING AND AGITATOR CLEANING Position hands on the agitator. If the belt is still attached to the agitator, there will be tension on it. The belt on your vacuum cleaner causes the agitator to rotate and is important Carefully lift the left end of the agitator and then lift the right end. -
Page 10: Troubleshooting
TROUBLESHOOTING PROBLEM POSSIBLE CAUSE POSSIBLE 1. Plug in firmly, push on/off switch 1. Unplugged at wall outlet. to on. Bel t 2. Tripped circuit breaker/blown fuse 2. Reset circuit breaker or replace Cleaner won’t run at household service panel. fuse. 3. - Page 11 W ARNING: Your safety is important to us. To reduce the risk of fire, electrical shock, injury to person or damage when using your vacuum cleaner, follow basic Your Guarantee safety precautions including the following: If this product is found to be faulty as a result of faulty materials or workmanship within one year 1.
-
Page 12: Specifications
16. Always clean the dust after vacuuming carpet cleaners or freshener, powders and fine dust. These products clog the filter, reduce airflow and can cause damage to the cleaner. Failure to clean the dust could cause permanent Model No. V-8506 1,200 Watt s Power Consumption damage to the cleaner.
Need help?
Do you have a question about the V-8506 and is the answer not in the manual?
Questions and answers