
Summary of Contents for U-RIGHT TD-4234
-
Page 1: Monitoring System
TD-4234 BLOOD GLUCOSE MONITORING SYSTEM OWNER’S MANUAL 311-4234100-005 Version 2.0, 2010/04... -
Page 2: Blood Glucose
Thank you for choosing TD-4234 BLOOD GLUCOSE MONITORING SYSTEM Dear U-RIGHT TD-4234 System Owner: This manual contains important information you must know about the system. Please read it thoroughly and carefully. For other questions regarding this system, please contact your local customer service or place of purchase. -
Page 3: Important Safety Instructions
IMPORTANT SAFETY INSTRUCTIONS READ THIS BEFORE USE The following basic safety precautions should always be taken. 1. Close supervision is necessary when the device is used by, on, or near children, handicapped persons or invalids. 2. Use the device only for the intended use described in this manual. 3. -
Page 4: Table Of Contents
TABLE OF CONTENTS IMPORTANT INFORMATION ABOUT ALTERNATIVE SITE TESTING (AST) INTRODUCTION TO THE SYSTEM Intended Use Principle of Measurement Contents of the System Appearance and Key Function of the Meter Indicators for Main Control Mode Test Strip BEFORE USE Battery Recharge Indicators for System Setting Mode Modify Meter Settings Alarm Function... - Page 5 USING THE METER MEMORY Indicators for Memory Recall Mode Viewing Results on the Meter VIEWING RESULTS ON A PERSONAL COMPUTER TAKING CARE FOR YOUR METER AND TEST STRIPS Cleaning Storage PROBLEM-SOLVING GUIDE Special Message Error Message Operational Problem SPECIFICATIONS...
-
Page 6: Important Information
IMPORTANT INFORMATION ·Severe dehydration and excessive water loss may cause readings which are lower than actual values. If you believe you are suffering from severe dehydration, consult a healthcare professional im- mediately. ·If your blood glucose results are lower or higher than usual, and you do not have symptoms of illness, first repeat the test. -
Page 7: About Alternative Site Testing (Ast)
Alternative Site Testing (AST) Important: AST results serve as references only. Please consult your healthcare professional before you begin AST. What is AST? Alternative site testing (AST) refers to when individuals check their blood glucose levels using areas of the body other than the fingertip. - Page 8 We strongly recommend you do AST in the following intervals: ˙In a pre-meal or fasting state (more than 2 hours since the last meal). ˙Two hours or more after taking insulin. ˙Two hours or more after exercise. Do NOT use AST if: ˙You think your blood glucose is low.
-
Page 9: Introduction To The System
INTRODUCTION TO THE SYSTEM Intended Use The system is intended for use outside the body (in vitro diagnostic use). It should be used only for testing glucose (sugar) and only with fresh capillary whole blood samples (from the finger, the palm, the forearm, the upper arm, the calf and the thigh). -
Page 10: Contents Of The System
These products have been designed, tested, and proven to work together as a system to produce accurate blood glucose test results. Use only the U-RIGHT TD-4234 test strips and a control solution with the blood glucose meter. -
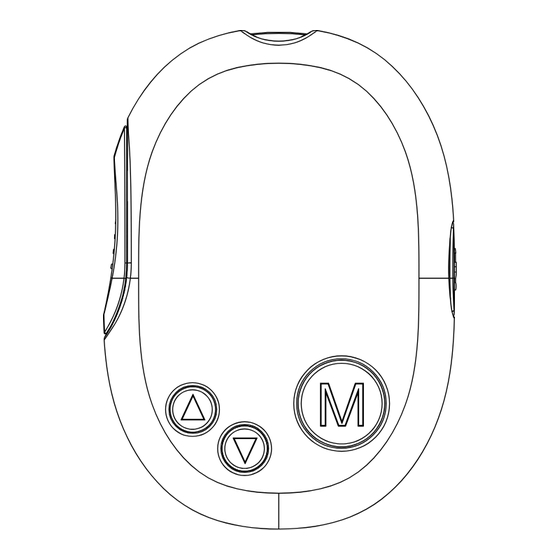
Page 11: Appearance And Key Function Of The Meter
Appearance and Key Function of the Meter LCD SCREEN guides you through the test using symbols and simple messages. TEST SLOT is where you insert the test strip. The meter will turn on automatically after insertion. STRIP-EJECTION BUTTON is where the used strip will be automatically ejected after you push up the button. -
Page 12: Indicators For Main Control Mode
The screen displays several indicators that help you to perform the main functions of this meter. When you start to use the meter, press the M button to turn on the meter and then U-RIGHT logo with date and time appears. Press M button again to enter the Main Control Mode. -
Page 13: Test Strip
Test Strip This system measures the amount of sugar (glucose) in whole blood. Blood is applied to the absorbent hole of the test strip and is automatically drawn into the reaction cell where the reaction takes place. The test strip consists of the following parts: Contact Bars Insert this end of the test strip into the meter. -
Page 14: Before Use
BEFORE USE Battery Recharge Your meter comes with built-in rechargeable Li-polymer battery which allows recharging the meter. If the low battery symbol appears on the screen indicating that the battery is low and it is time to recharge the battery. 1. -
Page 15: Indicators For System Setting Mode
Indicators for System Setting Mode Your meter comes with the time, date, date format, unit of measurement and memory deletion preset. The following indicators for System Setting Mode help you to set your meter easily. Indictor Meaning / You can do this Time and Date Setting: Set the date and time for the meter 12- 25... -
Page 16: Modify Meter Settings
Modify Meter Settings Follow the below steps to modify the meter settings. In Main Control Mode, press Up or Down button to select System Setting Mode indicator . Press M button to enter System Setting Mode. Setting the Time and Date Step1 Press Up or Down button to select Time and Date Setting indicator. - Page 17 Unit of Measurement Setting Step1 Press Up or Down button to select Unit of Measurement Setting indicator. Glucose unit is mg/dL 12-25 14:52 12-25 14:52 Press M button to enter the setting. Step2 Press Up or Down button to select Glucose unit is mg/dL Glucose unit is mmol mg/dL or mmol/L.
- Page 18 Exit Mode Please select the below screen when you want to exit System Setting Mode and turn to Main Control Mode. NOTE 1. The milligram per deciliter (mg/dL) is the standard unit in the United States. The millimole per liter (mmol/L) is the standard unit in Canada. Use of the wrong unit of measure may cause you to misinterpret your blood glucose level, and may lead to incorrect treatment.
-
Page 19: Alarm Function
Alarm Function The meter provides four alarms. The alarm function alerts you to per- form your blood glucose regularly. In Main Control Mode, press Up or Down button to select Alarm Setting and press M button to en- ter Alarm Setting indicator. 12- 25 12:25 Setting the Alarm... -
Page 20: Display Self-Checks
Display Self-Checks The system provides AC/PC modes. Glucose AC is the glucose value before meal; and PC is the glucose value after meal. While you insert a test strip, the meter turns on automatically and displays a message: “Did you eat any thing within 4 hours?” Please press Up or Down button to select Yes for PC mode or No for AC mode and then press M button to confirm it. -
Page 21: Control Test
CONTROL TEST TaiDoc control solutions contain a known amount of glucose that re- acts with test strips. By comparing your control solution test results with the expected range printed on the test strip vial label, it is able to check that the meter and the test strips are working together as a system and that you are performing the test correctly. -
Page 22: Important Control Solution Information
Important Control Solution Information ►Use only TaiDoc control solutions. ►Check the expiration date on the control solution vial. Do not use if expired. ►Control solution, meter, and test strips should come to room temperature 68 to 77°F (20 to 25°C) before testing. ►Shake the vial, discard the first drop of control solution, and wipe off the dispenser tip to ensure a clean sample and an accurate result. -
Page 23: Performing A Control Solution Test
Performing a Control Solution Test Step1 Insert Test Strip Insert a test strip with contact bars end first and Did you eat any thing within 4 facing up into the test slot. The meter will turn on hours ? automatically and display a message: M : Confir m : Change ►“Did you eat any thing within 4 hours?”... - Page 24 Step2 Obtain Control Solution Shake the control solution vial well. Remove the cap from the control solution bottle. Place cap on flat surface. Squeeze the vial, discard the first drop, and wipe off the dispenser tip to prevent contamination. Squeeze the vial again to produce another drop and place this drop on the top of cap.
- Page 25 Step4 Read and Compare the Result Compare the result shown on the screen with the range printed on the test strip vial. It mg/dL should fall within this range. 109~165 Out-of-range results If test results fall outside the range printed on the test strip vial, check “Operating Problem”...
-
Page 26: Testing Your Blood Glucose
TESTING YOUR BLOOD GLUCOSE Be sure to read this section and the test strip package insert found in the test strip box carefully before testing. Make sure you have all items needed to test: Blood Glucose Meter Test Strip Lancing Device Sterile Lancet Clear Cap (For AST use) Lancing device overview:... -
Page 27: Testing Your Blood Glucose
Testing Your Blood Glucose Wash and dry your hands before starting. Set the lancing device ► Pull off the cap of the lancing device. ► Insert a lancet into the lancet holder and push down firmly until it is fully secured. - Page 28 Blood from sites other than the fingertip Substitute the lancing device cap with the clear cap for alternative site testing. Pull the cocking control back until it clicks. When lancing the forearm, upper arm, hand, thigh, or calf, avoid lancing the areas with obvi- ous veins in order to prevent excess bleeding.
-
Page 29: Fingertip Testing
Step3 Get a Drop of Blood Select the puncture site either in finger or in other parts (AST). Clean the puncture site with 70% using cotton moistened with 70% alcohol and let it air dry. ► Fingertip testing Press the lancing device’s tip firmly against the lower side of your fingertip. - Page 30 Step4 Apply Blood into the Test Strip Apply your blood to the absorbent hole of the test strip until the confirmation hole is fully covered. The hourglass symbol will flash when the meter is working. Step5 Obtain an Accurate Result in 7 Seconds mg/dL The result of your blood glucose test will appear...
- Page 31 Step6 Eject the Used Test Strip After finishing the measurement, you can either take out the used strip by simply pushing up the Strip-Ejection button or remove the test strip directly by your hand. The meter will return to Main Control Mode and turn off automatically without any action in two minutes.
-
Page 32: Expected Test Results
60%. The results provided by the U-RIGHT TD-4234 system can help you and your healthcare professional monitor and adjust your treatment plan to gain better control of your diabetes. -
Page 33: Comparing Meter And Laboratory Results
COMPARING METER AND LABORATORY RESULTS The meter provides you with whole blood equivalent results. The result you obtain from your meter may differ somewhat from your laboratory result due to normal variation. Meter results can be affected by factors and conditions that do not affect laboratory results in the same way. - Page 34 You may still have a variation from the result because blood glucose levels can change significantly over short periods of time, especially if you have recently eaten , exercised, taken medication, or experienced stress* . In addition, if you have eaten recently, the blood glucose level from a finger prick can be up to 70 mg/dL higher than blood drawn from a vein (venous sample) used for a lab test.* Therefore, it is best to fast for eight hours before doing comparison...
-
Page 35: Using The Meter Memory
USING THE METER MEMORY Indicators for Memory Recall Mode Your meter stores the 400 most recent blood glucose test results along with their respective dates and times in its memory. It also provides you with 7-, 14- averages of your blood glucose test results. - Page 36 Indictor Meaning / You can do this Glucose Trend Report for 14-day Average Re- sults: View each 14-day average results in glucose trend 12-25 14:52 report. Exit Mode: Exit the memory recall mode.
-
Page 37: Viewing Results On The Meter
Viewing Results on the Meter Follow the below steps to review test results in memory. In Main Control Mode, press Up or Down button to select Memory Recall Mode indicator . Press M button to enter Memory Recall Mode. Glucose Results Step1 Press Up or Down button to select Glucose Results indicator. - Page 38 7-day/14-day Average Results Step1 Press Up or Down button to select recall mode 7-day Average Result 14-day Memory Recall 12-25 14:52 12-25 14:52 Average Result indicator. Press M button to enter day average results reviewing. recall mode Memory Recall 12-25 14:52 12-25 14:52...
- Page 39 Glucose Trend Report for 7-day/14-day Average Results Step1 Press Up or Down button to select the following screen. Press M button to Memory Recall recall mode 12-25 12-25 14:52 14:52 enter glucose trend report reviewing. recall mode Memory Recall 12-25 14:52 12-25 14:52...
- Page 40 Exit Mode Please select the below screen when you want to exit System Setting Mode and turn to Main Control Mode. NOTE The meter will turn off automatically without any action in two minutes.
-
Page 41: Viewing Results On A Personal Computer
Step2 Enter the PC Linking Mode Press the M button to turn on the meter and then “U-RIGHT” logo, date and time appear. Press M button again to select PC Linking Mode. Press M button again to enter it. - Page 42 Step4 Transmit Data Follow the instructions provided in the software to transmit data. Results with respective date and time will be transmitted. Remove the USB cable and then the meter will return to Main Control Mode. It will automatically turn off if left idle for 2 minutes. NOTE While the meter is connecting to the PC, it is unable to perform a blood glucose test.
-
Page 43: Taking Care For Your Meter And Test Strips
TAKING CARE OF YOUR MONITOR & STRIP To protect the meter and test strips from dirt, dust and other contaminants, please wash and dry your hands thoroughly before use. Cleaning 1. To clean the meter’s exterior, wipe with a cloth moistened with tap water or a mild cleaning agent, then dry the device with a soft and dry cloth. - Page 44 2. Strip Storage • Storage condition: 4 to 40°C, below 85% relative humidity. Do NOT freeze. • Store your test strips in their original vial only. Do not transfer to another container. • Store test strip packages in a cool, dry place. Keep away from direct sunlight and heat.
- Page 45 3. Control Solution Storage • Storage condition: Store the control solution with lid tightly closed at temperatures 2 to 30°C (36 to 86°F). Do NOT freeze. • Record the discard date (date opened plus 90 days) on the control solution vial. Discard after 90 days.
-
Page 46: Problem-Solving Guide
PROBLEM-SOLVING GUIDE The following is a summary of various display messages. These messages help to identify certain problems but do not always appear in all cases when a problem has occurred. Improper use may cause an inaccurate result without producing an error message. -
Page 47: Special Message
Special Message Special symbols and messages appear together with your test result. MESSAGE WHAT IT MEANS WHAT TO DO Your result is below You should immediately measurement limit, treat hypoglycemia as 20 mg/dL (1.1 mmol/L). recommended by your Out of range. healthcare professional. -
Page 48: Error Message
Error Message MESSAGE WHAT IT MEANS WHAT TO DO Strip has been used. Start again with a new test strip. Strip has been... No strip is inserted to the Insert a test strip. meter during measuring. None strip. Recharge the battery The battery is low. -
Page 49: Operational Problem
Operating Problem 1. If the meter does not display a message after inserting a test strip: POSSIBLE CAUSE WHAT TO DO Batteries exhausted. Recharge the battery. Test strip inserted upside down or Insert the test strip facing up with incompletely. the contact bars end first. - Page 50 3. If the control solutions test result is out of range: POSSIBLE CAUSE WHAT TO DO Error in performing the test. Read the instructions thoroughly and repeat the test. Control solution poorly shaken. Shake the control solution vigor- ously and repeat the test again. Expired or contaminated control Check the expiration date or the dis- solution.
-
Page 51: Specifications
SPECIFICATIONS Power Source: built-in rechargeable Li-polymer battery Dimension & Weight: 84mm(L) x 59mm(W) x 17mm(H), 46g Memory: 400 measurement results with respective dates and times Auto electrode inserting detection Auto sample loading detection Auto reaction time countdown Operating Condition: 10 to 40°C, below 85% R.H. (noncondensing) Meter Storage/Transportation Condition: -20 to 60°C, below 95% R.H.
Need help?
Do you have a question about the TD-4234 and is the answer not in the manual?
Questions and answers