Linksys PVC2300 Quick Installation
Business internet video camera with audio
Hide thumbs
Also See for PVC2300:
- Product data (3 pages) ,
- User manual (63 pages) ,
- User manual (66 pages)
Advertisement
Advertisement
Table of Contents

Related Manuals for Linksys PVC2300


Summary of Contents for Linksys PVC2300
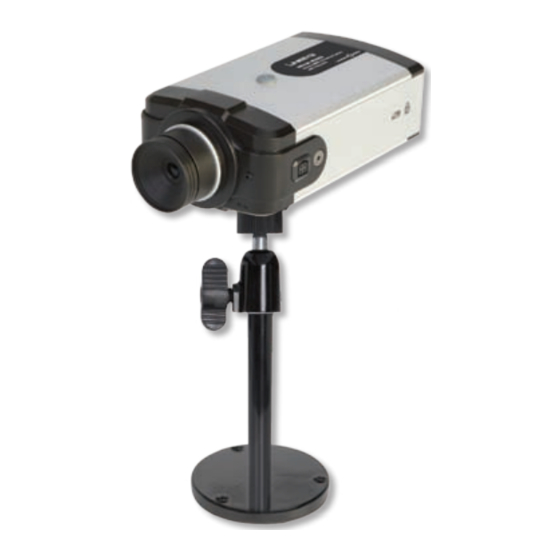
- Page 1 Stand Kit • Power Supply (12V 1A) • 6’ Ethernet Cable • Lens Adapter Ring • Allen Wrench • Quick Installation Guide • Setup CD • Antenna (WVC2300) Business Internet Video Camera with Audio PVC2300, WVC2300 Model: QUICK INSTALLATION BUSINESS SERIES...
-
Page 3: Online Resources
Network Security Copyright and Trademarks Linksys is a registered trademark or trademark of Cisco Systems, Inc . and/or its affiliates in the U .S . and certain other countries . Copyright © 2007 Cisco Systems, Inc . All rights reserved . Other brands and product names are trademarks or registered trademarks of their respective holders . -
Page 4: Minimum Requirements
Minimum Requirements Minimum System Requirements (for 1 camera): Pentium 4 class, 2GHz Memory Operating System Microsoft Windows 2000, XP or Vista Hard Drive 30MB of available space Graphics Card AGP with a minimum 64MB Internet Explorer 6 .0 (or above), Mozilla Browser Netscape7 .0 (or above) Mozilla users must download ActiveX plug-in at http://www.iol.ie/~locka/mozilla/mozilla.htm... -
Page 5: Installation
NOTE: Before attaching the camera extension or swivel head, the stand base can be mounted in a permanent location by using three screws to secure the stand base to the desired location . The Camera stand can be connected two different ways: Attach the stand base to the camera extension and attach the camera extension to the swivel... - Page 6 Installation Connect the included Ethernet network cable to your network router or switch . Connect the other end of the cable to the Camera’s Ethernet port . If your network switch provides Power over Ethernet to the Camera, verify the Camera’s LEDs are lit and skip steps E-G .
- Page 7 NOTE: Steps F and G on this page are only necessary if you are using the WVC2300 Wireless-G Business Internet Video Camera . Connect the antennas to the antenna connectors on the Camera . Place the antennas in an upright position . Installation...
-
Page 8: Configuration
Configuration 2� Insert the Setup CD into your CD-ROM drive . If the CD doesn’t run automatically, go to My Computer and click on your CD-ROM drive . The Setup screen will appear . Click the Click Here to Start button . The license agreement screen will appear, click Next if you agree and wish to proceed . - Page 9 The Wizard will now search for your camera . Once found highlight the camera and click Next . If the Camera you want is not displayed in the Selection box, click Search Again . NOTE: The Camera defaults to DHCP mode . If your network doesn’t have a DHCP server or if you are having issues obtaining an IP address, you can assign a...
- Page 10 Installation The default username and password is admin . Type admin in lowercase letters, in the Administrator Name and Administrator Password fields, then click OK . For security purposes, it is recommended that you change the default name and password using the Camera’s web-based utility at a later time .
- Page 11 If you know your IP address, then select Static IP address, otherwise leave the default setting, Automatic Configuration DHCP . The New Internet Camera Settings screen will appear and display the Camera’s settings . Click Next to continue or click Back to make changes .
- Page 12 Installation The Wizard will now return to the Welcome screen . Click Exit to automatically launch your default web browser and proceed to the Home page login screen . The login prompt will appear, enter admin in both the User name and Password fields .
- Page 13 Installation Click the Install button . Installation is complete! You should be able to view video on the home page .
-
Page 14: Adjusting The Lens
Adjusting the Lens 3� The Linksys Business Internet Video Camera uses an adjustable CS mount lens . Adjust the focus by slowly rotating the Camera Lens Focus clockwise or counterclockwise . NOTE: The resolution and video quality can be adjusted from the Audio/Video >... - Page 16 For additional information or troubleshooting help, refer to the User Guide on the CD-ROM . Additional support is also available via e-mail or by phone . 24-Hour Technical Support 800-326-7114 E-mail Support support@linksys.com Website http://www.linksys.com http://support.linksys.com RMA (Return Merchandise Authorization) http://www.linksys.com/support FTP Site ftp://ftp.linksys.com Sales Information 800-546-5797 (800-LINKSYS) www .linksys .com...
Need help?
Do you have a question about the PVC2300 and is the answer not in the manual?
Questions and answers