Table of Contents
Advertisement
Quick Links
Advertisement
Table of Contents

Summary of Contents for ELECTROCOMPANIET ECG 1
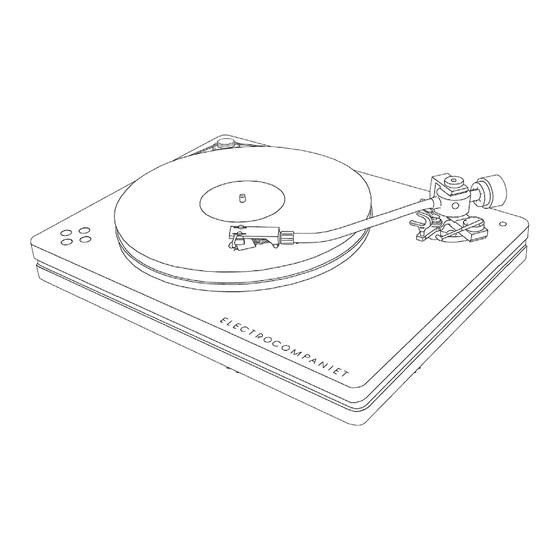
- Page 1 ECG 1 Regulated belt drive turntable Owner's Manual Version 1.0 ENGLISH...
- Page 2 Welcome to the world of Electrocompaniet! We thank you for choosing an Electrocompaniet high-end product. At Electrocompaniet we are relentlessly focused on developing audio equipment that is capable of bringing the fabulous experience of the concert hall into the very heart of your home.
-
Page 3: Important Safety Instructions
Precautions • Before connecting the AC power cord to the appliance, make sure the voltage designation of the appli- ance corresponds to the local electrical supply. If you are unsure of your power supply, contact your local power company. The acceptable power input range is AC ~100V-240V, 50/60Hz. •... -
Page 4: Setup Procedure
How to avoid noise problems The ECG 1 turntable contains delicate circuits that are to magnetic stray fields. The unit should not be placed near power voltage transformers, TV sets etc. Care should also be taken regarding placement of the interconnect and earth cables. - Page 5 The ECG 1s performance is dependent on the surface it is placed upon. It is therefore important that the surface below the ECG 1 is solid, vibration free and level. This surface can be the top shelf of an audio rack, a stand-alone table or a wall bracket.
- Page 6 Some tips before you get started Several of the procedures involved in the cartridge alignment (HTA, VTA and Azimuth) is based on visual information. A strong movable light source (spotlight) and good indirect lighting is recom- mended to use during alignment. The angle of the light is crucial, since cast shadows may give you inaccurate perception.
- Page 7 Speed control Complete cartridge alignment on your ECG 1 turntable So far, we have looked at playback and the basic setup and adjustments on your tonearm, when it comes with a pre-aligned cartridge already mounted in the headshell. We will now go through how to set up the tonearm from scratch - with a new cartridge out of the box.
- Page 8 We recommend using the most modern geometry - High Fidelity. • Place a record and then the Electrocompaniet protractor on the platter with the spindle through the hole - corresponding with your choice of geometry. Let the arrow point directly towards the hori- zontal pivoting point on the armbase (the hole on top) of the Jelco arm.
-
Page 9: Adjusting Azimuth
1. Cartridge 2.Head shell 3. Azimuth adjustment 4. Armwand 5. Arm crib 6. Arm lift 7. Resonance damping 8. Anti-skating gauge 9. Stylus preassure gauge 10. Counterweight Altering the vertical tracking angle on the tonearm will change the sound character from the cartridge. Negative VTA (tilting towards the back) will sound warmer and mellower, while positive VTA (tilting towards the front) will sound brighter and tighter. -
Page 10: Technical Specifications
Technical specifications The following technical data were measured on randomized test objects and are typical data. All measurements are made at 120V / 240V // 50Hz / 60Hz Turntable ECG 1 Operation:......................Manual Drive system:................Exterior rubber belt drive Motor:..................24 V AC synchronous motor Speeds:..................33 1/3 –... -
Page 11: Product Registration
1. A sales slip or other proof of purchase if repair is claimed under warranty. 2. A proforma invoice with value of goods, stating that the ECG 1 is returned to Norway for repair. 3. An accompanying letter describing faults, symptoms, or problems with the unit. - Page 12 Verify line voltage before use. Do not remove cover. No user serviceable parts inside. Refer servicing to qualified service personal. The warranty is void if the product is tampered with by non-authorised personnel. Use only authorized Electrocompaniet service center. Made in Norway www.electrocompaniet.no...
Need help?
Do you have a question about the ECG 1 and is the answer not in the manual?
Questions and answers