Table of Contents
Advertisement
Available languages
Available languages
Advertisement
Table of Contents

Summary of Contents for Etón Satellit 750
- Page 1 SATELLIT OWNER’S MANUAL...
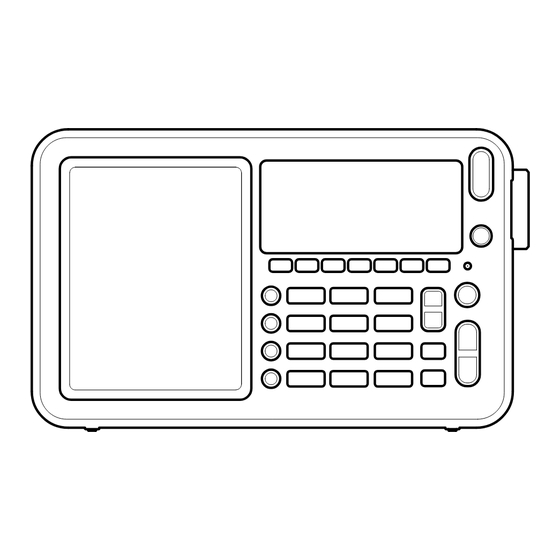
- Page 2 SATELLIT OWNER’S MANUAL MEET THE SATELLIT Thank you for purchasing the Etón SATELLIT. We want you to thoroughly enjoy the use of this product. To take advantage of its many excellent and unique features, we urge you to carefully read the user’s manual. Features: Speaker LCD display panel...
-
Page 3: Right Side
SATELLIT OWNER’S MANUAL RIGHT SIDE LEFT SIDE BACK... -
Page 4: Button Functionality
SATELLIT OWNER’S MANUAL BUTTON FUNCTIONALITY Tuning Dial Rotate the dial to select clock, frequency or air squelch level. With the radio on: 1. Quick press to select tuning speed as FAST-SLOW-STOP. 2. Press and hold to select the level of squelch feature. Note: all bands have squelch feature. - Page 5 SATELLIT OWNER’S MANUAL With the radio off: quick press to turn on the radio; press and hold to set up sleep timer (to turn off the radio automatically) With the radio on: quick press to turn off the radio; press and hold to display the countdown of sleep timer With the radio off, quick press to activate LINE-IN function;...
- Page 6 SATELLIT OWNER’S MANUAL With the radio on: in memory mode, press and hold to rename page; Quick press to select the backlight brightness level: high-medium-low-off With the radio on: in memory mode, delete preset frequency In AM band, quick press to enter SSB mode In SSB mode, quick press to select USB or LSB In SYNC mode, quick press to select USB or LSB In FM mode, quick press to select RT/PS/PTY/DATE...
-
Page 7: Setting Your Time Zone
SATELLIT OWNER’S MANUAL In Weekday mode: quick press to turn in station; press and hold to auto-scan station and ATS station In Memory mode: select preset page Reset hole SETTING YOUR TIME ZONE With the radio off, press and hold TZ/LINE IN, the time zone flashes in the display, rotate the tuning dial to switch the following world city code (see time zone abbreviation list below), the local time of world city is displayed. -
Page 8: Setting Alarms
SATELLIT OWNER’S MANUAL NYC - New York City PAR - Pairs RIO - De Janeiro SYD - Sydney TYO - Tokyo WLG - Wellington SETTING THE CLOCK AND WEEKDAY The clock is in 12 or 24 hour format. To change the format, press PAGE/TIME button. -
Page 9: Activating And Deactivating The Alarms
SATELLIT OWNER’S MANUAL Additionally, each alarm can be programmable for a specific weekday, playtime, and frequency. 1. With the radio off, perform a press and hold of one of the F1-4 buttons, causing the hour to flash, icon starts flashing. While it’s still flashing, press one of the F1-7 buttons to highlight the day(s) of the week for the alarm to turn on. -
Page 10: Resetting The Radio
SATELLIT OWNER’S MANUAL RESETTING THE RADIO If the radio has malfunction, the user should disconnect the power supply and then connect the power again to reset the radio. Or use sharp toothpick or paperclip to quick press RESET hole to reset the radio. -
Page 11: Tuning In Stations
SATELLIT OWNER’S MANUAL 4. Quick press PAGE/TIME button to select Weekday mode, the LCD will display “ ”, quick press F1~7 button to select 7 meter bands: If select “ ” mode, the LCD will display “MEMORY”. Tuning in stations Satellit has 5 kinds of tuning methods to find your desired station: 1. -
Page 12: Auto Tuning
SATELLIT OWNER’S MANUAL Auto Tuning Wth the radio off, press and hold F6 button, then rotate the tuning knob or continue to quick press F6 button to select “STOP” or “DELAY-5” , press PAGE/TIME button to confirm Note: STOP: Auto tuning in a station then stops search DELAY-5: Auto tuning in a station, after 5 seconds, then auto searches next station. -
Page 13: Storing Stations Into Memory
SATELLIT OWNER’S MANUAL Direct key in frequency Quick press numeric button 0~9 to enter the desired frequency If the input frequency is FM or AIR band, quick press FM/AIR BAND button to confirm. If the frequency is LW/MW/SW band, quick press AM/METER BAND button to confirm. For example: FM 107.5MHz, quick press that order. - Page 14 SATELLIT OWNER’S MANUAL COPY/PASTE MEMORY PAGE This feature enables copying of one memory or the entire contents of a page from one location to another. COPYING AND PASTING ONE MEMORY LOCATION TO ANOTHER 1. Turn on the radio and quick press PAGE/TIME button to select “MEMORY”...
- Page 15 SATELLIT OWNER’S MANUAL 4. Use the tuning knob to select the desired letter, digit or symbol, then quick press PAGE/TIME button to select the next “_”, repeat until to 8 letters/digits/numbers are selected. Note: 1. If one letter, digit or number space is not needed, just quick press PAGE/TIME to skip 2.
-
Page 16: Fm Stereo/Mono Selection
SATELLIT OWNER’S MANUAL 9K/10K AM(MW) STEP SELECTION/FM FREQUENCY RANGE. LCD displays: MW-9K indicates MW step at 9kHz MW-10k indicates MW step at 10kHz FM-64.0M indicates FM frequency range is 64.0-108MHz FM-76.0M indicates FM frequency range is 76.0-108MHz FM-87.0M indicates FM frequency range is 87.0-108MHz FM-87.5M indicates FM frequency range is 87.5-108MHz With the radio off, press and hold button, the LCD displays... - Page 17 SATELLIT OWNER’S MANUAL 4. When the signal strength is lower than selected squelch level, the Satellit will mute squelch, “Squelch” appears in the display; if higher, the Satellit will not mute squelch. FM/RDS 1. Turn on the radio and selected FM band; 2.
- Page 18 SATELLIT OWNER’S MANUAL To experience with SSB, turn on the Satellit and position near a window if you are in a building with stories above you. 1. Turn on 20-meter Amateur band, by pressing 14150kHz with the keypad and then pressing the AM button to enter it; 2.
- Page 19 SATELLIT OWNER’S MANUAL USING DX/LOCAL SWITCH The DX/local switch (left side panel) adjusts sensitivity. Use DX (down) as the default setting for maximum sensitivity to signals. If strong stations or SSB signals seem distorted, then use Local (up). If tune in the weak signal station,use DX.
-
Page 20: Volume Control
SATELLIT OWNER’S MANUAL socket and to the output of the other system. Press TZ/LINE IN button and “LINE IN” appears in the LCD, which indicates LINE IN is on. Press this button again to turn it off LINE IN function 2. -
Page 21: Warranty Registration
SATELLIT OWNER’S MANUAL • Unplug or remove batteries immediately if liquid has been spilled or any object has fallen into the apparatus. • Clean only with a dry cloth. Do not use detergents or chemical solvents as this might damage the finish. •... -
Page 22: Warranty
SATELLIT OWNER’S MANUAL WARRANTY If your product is still in warranty and the Etón service representative determines that warranty service is needed, a return authorization will be issued and instructions for shipment to an authorized warranty repair facility. Do not ship your radio back without obtaining the return authorization number. - Page 23 SATELLIT OWNER’S MANUAL...
-
Page 24: Caractéristiques
SATELLIT MANUEL DU PROPRIÉTAIRE FAITES CONNAISSANCE AVEC LE SATELLIT Merci d’avoir acheté le SATELLIT d’Etón. Nous voulons que vous appréciiez complètement l’utilisation de ce produit. Pour prendre avantage de ses nombreuses excellentes et uniques fonctionnalités, nous vous prions instamment de lire soigneusement ce manuel d’utilisateur. -
Page 25: Côté Droit
SATELLIT MANUEL DU PROPRIÉTAIRE CÔTÉ DROIT CÔTÉ GAUCHE ARRIÈRE... -
Page 26: Fonctions Des Boutons
SATELLIT MANUEL DU PROPRIÉTAIRE FONCTIONS DES BOUTONS Cadran d’accord Tournez le cadran pour sélectionner la montre, la fréquence ou le niveau d’atténuation de bruit de canaux. Avec la radio allumée : 1. Appuyez rapidement pour sélectionner la vitesse d’accord : FAST [RAPIDE]-SLOW [LENT]-STOP. - Page 27 SATELLIT MANUEL DU PROPRIÉTAIRE Avec la radio éteinte, maintenez appuyé F6 pour sélectionner 3 méthodes différentes d’accord : STOP/ ATS/DELAY-5 Avec la radio éteinte, maintenez appuyé F7 pour sélectionner le temps de charge en heures (1~36) Avec la radio éteinte : appuyez rapidement pour mettre la radio en marche ;...
- Page 28 SATELLIT MANUEL DU PROPRIÉTAIRE Appuyez rapidement pour désactiver tous les boutons et maintenez appuyé pour déverrouiller tous les boutons Avec la radio allumée, en mode Mémoire, maintenez appuyé pour renommer une page ; appuyez rapidement pour sélectionner le niveau de brillance du rétroéclairage : high [élevé]-medium [moyen]-low [bas]-off Avec la radio allumée, en mode mémoire, supprimer...
- Page 29 SATELLIT MANUEL DU PROPRIÉTAIRE En bande AM [MA]/AIR, appuyez rapidement pour augmenter la largeur de bande de fréquenc En bande FM [MF], appuyez rapidement pour sélectionner le mode STEREO En bande AM [MA]/AIR, appuyez rapidement pour diminuer la largeur de bande de fréquence de la bande FM [MF], appuyez rapidement pour sélectionner le mode MONO En mode Jour de la semaine : appuyez...
- Page 30 SATELLIT MANUEL DU PROPRIÉTAIRE Liste d’abréviations de fuseaux horaires : Fuseau horaire Ville et Code ANC-Anchorage BEG-Beijing BKK-Bangkok CAI-Cairo CCS-Caracas CHI-Chicago DAC-Dhaka DEL - Delhi DEN - Denver DXB - Dubai GMT - GMT HKG - Hong Kong HNL - Honolulu JED - Jeddah KHI - Kashi LAX - Los Angeles...
- Page 31 SATELLIT MANUEL DU PROPRIÉTAIRE F5 est Vendredi. Utilisez le bouton d’accord pour régler l’heure correcte puis appuyez de nouveau rapidement sur le bouton PAGE TIME pour régler les minutes correctes et appuyez de nouveau rapidement sur ce bouton pour confirmer. « RDS Auto »...
- Page 32 SATELLIT MANUEL DU PROPRIÉTAIRE l’affichage, tournez le cadran d’accord pour sélectionner la durée de fonctionnement entre 1~99 minutes puis appuyez sur ce bouton pour faire apparaitre sur l’affichage le numéro de page de mémoire. « PAGEXX » apparaitra sur l’affichage. Tournez le cadran d’accord pour sélectionner le numéro de page de mémoire.
- Page 33 SATELLIT MANUEL DU PROPRIÉTAIRE Si l’utilisateur veut revenir aux réglages d’usine, maintenez le bouton appuyé et en même temps appuyez rapidement dans le trou RESET jusqu’à ce que « RESET… » apparaisse sur l’affichage puis relâchez le bouto et la radio revient aux réglages d’usine, toutes les pages de mémoire sont effacées.
- Page 34 SATELLIT MANUEL DU PROPRIÉTAIRE 2. Appuyez rapidement sur le bouton LW [OL]/MW [OM] BAND pour choisir la bande LW [OL] ou MW [OM] 3. Appuyez rapidement sur le bouton AM [MA]/METER [MÉTRIQUE] pour passer de la bande SW [OC] à la bande métrique et vice-versa.
-
Page 35: Accord Manuel
SATELLIT MANUEL DU PROPRIÉTAIRE Accord manuel Avec la radio allumée, sélectionnez une bande, Appuyez rapidement sur le bouton PAGE/TIME pour passer en mode Jour de la semaine. Appuyez rapidement su ou pour vous accorder à votre station favorite. Accord automatique Avec la radio éteinte, maintenez appuyé... -
Page 36: Mise En Mémoire Des Stations
SATELLIT MANUEL DU PROPRIÉTAIRE station sur la page (99~1), 7 emplacements de mémoire sur chaque page. Appuyez sur n’importe quel bouton pour arrêter l’accord automatique en mode ATS. Pas d’accord Avec la radio allumée, appuyez rapidement sur le bouton d’accord pour sélectionner un pas d’accord FAST [RAPIDE]/SLOW [LENT]/ FIN:XX (pour SSB [BLU]/STOP, l’icône correspondante apparaitra sur la liste d’affichage ci-dessous :... - Page 37 SATELLIT MANUEL DU PROPRIÉTAIRE boutons numériques (0~9) pour taper directement le numéro de page et appuyez de nouveau sur PAGE/TIME quand vous avez fini ; 4. Mettez la fréquence en mémoire en appuyant sur l’un des boutons F1~7 pendant 2 secondes. Notez que l’emplacement sélectionné...
- Page 38 SATELLIT MANUEL DU PROPRIÉTAIRE 5. Répétez les étapes 1~4 pour continuer de coller puis appuyez rapidement sur PAGE/TIME pour quitter. COPIER ET COLLER TOUTE UNE PAGE DE MÉMOIRE 1. Allumez la radio et appuyez rapidement sur le bouton PAGE/ TIME pour choisir le mode MEMORY ; 2.
- Page 39 SATELLIT MANUEL DU PROPRIÉTAIRE page et supprimez l’étiquette en même temps. EFFACER UN EMPLACEMENT DE MÉMOIRE CHOISI 1. Allumez le Satellit et passez en mode MEMORY en appuyant rapidement sur le bouton PAGE/TIME ; 2. En mode mémoire, appuyez rapidement sur pour sélectionner la page de mémoire que vous voulez effacer ;...
- Page 40 SATELLIT MANUEL DU PROPRIÉTAIRE Avec la radio arrêtée, maintenez appuyé le bouton , l’affichage indique « MW-9K » ou « MW-10K », appuyez alors rapidement sur le bouton ou utilisez le bouton d’accord pour passer de 9K à 10K ou vice-versa puis appuyez rapidement sur le bouton PAGE/TIME pour confirmer le mode 9K/10K.
- Page 41 SATELLIT MANUEL DU PROPRIÉTAIRE 2. Si la station transmet des informations RDS, l’icône apparait sur l’affichage. 3. Appuyez rapidement sur le bouton SYNC/SSB/RDS pour examiner les informations RDS ; continuez à appuyer rapidement sur le bouton U/LSB/RDS MODE pour sélectionner différente informations RDS (PS/PTY/RT/DATA).
- Page 42 SATELLIT MANUEL DU PROPRIÉTAIRE le morse, les transmissions météorologiques ou de télécopie et autres signaux souvent appelés signaux de service public. L’Internet et votre bibliothèque locale sont de très bonnes ressources pour en apprendre plus. Pour essayer la BLU, mettez le Satellit en marche et placez-le près d’une fenêtre si vous êtes dans un immeuble avec des étages au- dessus de vous.
- Page 43 SATELLIT MANUEL DU PROPRIÉTAIRE fonction détecteur sync est « on », répétez l’appui rapide sur le bouton U/LSB/RDS MODE pour passer de USB à LSB et vice-versa. Appuyez rapidement de nouveau sur ce bouton pour arrêter la fonction SYNC et revenir à la réception normale. Arrêtez la fonction SYNC quand vous vous accordez à...
-
Page 44: Contrôle De Volume
SATELLIT MANUEL DU PROPRIÉTAIRE heures pour des batteries de 1100 mAh; 23 heures pour des batteries de 2300 mAh. 5.) Appuyez rapidement sur le bouton PAGE/TIME quand vous avez fini, la charge commence, l’icône de charge , est animée indiquant que la charge est en cours. Si la batterie est complètement chargée ou que le temps réglé... - Page 45 SATELLIT MANUEL DU PROPRIÉTAIRE PRISE D’ANTENNE EXTÉRIEURE La prise d’antenne extérieure est utilisée pour relier le Satellit à des antennes de haute performance pour ondes courtes en utilisant un câble coaxial de 50 ou 75 ohm pour l’écoute de la bande FM/SW/ AIR.
-
Page 46: Enregistrement De La Garantie
SATELLIT MANUEL DU PROPRIÉTAIRE vous n’êtes pas sûr, veuillez appeler l’autorité locale pertinente pour savoir comment les éliminer en sécurité et aider à protéger l’environnement. ENREGISTREMENT DE LA GARANTIE Pour assurer une couverture complète par la garantie ou les mises à jour du produit, l’enregistrement de votre produit doit être effectué... - Page 47 SATELLIT MANUEL DU PROPRIÉTAIRE...
- Page 48 MANUAL DEL USUARIO DE SATELLIT CONOZCA LA SATELLIT Gracias por adquirir Etón SATELLIT. Queremos que disfrute del uso de este producto en su totalidad. Para aprovechar todas sus magníficas y exclusivas funciones, le recomendamos que lea cuidadosamente el manual del usuario. Características: Altavoz Pantalla LCD...
-
Page 49: Lateral Derecho
MANUAL DEL USUARIO DE SATELLIT LATERAL DERECHO LATERAL IZQUIERDO PARTE TRASERA... - Page 50 MANUAL DEL USUARIO DE SATELLIT CARACTERÍSTICAS DE LOS BOTONES Sintonizador de dial Gire el sintonizador para seleccionar reloj, frecuencia o nivel de silenciador de la radio. Con la radio encendida: 1. Presione rápidamente para seleccionar la velocidad de sintonización en RÁPIDO-LENTO-PARAR. 2.
- Page 51 MANUAL DEL USUARIO DE SATELLIT Con la radio apagada, presione y mantenga presionado el botón F6 para seleccionar tres métodos de sintonía distintos, PARAR/ATS/RETRASO-5 Con la radio apagada, presione y mantenga el botón F7 para seleccionar el tiempo de carga en horas (1~36) Con la radio apagada: presione rápidamente para encender la radio;...
- Page 52 MANUAL DEL USUARIO DE SATELLIT Con la radio encendida, en el modo Memoria, presione y mantenga para copiar y pegar las presintonías de la memoria Presione rápidamente para deshabilitar todos los botones y perillas; presione y mantenga para desbloquear todos los botones y perillas Con la radio encendida: en el modo Memoria, presione y mantenga para renombrar la página;...
-
Page 53: Configuración De La Zona Horaria
MANUAL DEL USUARIO DE SATELLIT Presione rápidamente para seleccionar OC y banda de metros En la banda AM/AÉREA, presione rápidamente para aumentar la frecuencia del ancho de banda En la banda FM, presione rápidamente para seleccionar el modo ESTÉREO En la banda AM/ AÉREA, presione rápidamente para reducir la frecuencia del ancho de banda En la banda FM, presione rápidamente para seleccionar el modo MONO... - Page 54 MANUAL DEL USUARIO DE SATELLIT Lista de abreviaturas de zonas horarias: Zona horaria Ciudad mundial y código ANC-Anchorage BEG-Beijing BKK-Bangkok CAI-Cairo CCS-Caracas CHI-Chicago DAC-Dhaka DEL - Delhi DEN - Denver DXB - Dubái GMT - GMT HKG - Hong Kong HNL - Honolulu JED - Yeda KHI - Kashi...
- Page 55 MANUAL DEL USUARIO DE SATELLIT 2. Presione y mantenga presionado el botón PAGE/TIME hasta que los dígitos de la hora comiencen a destellar. Presione rápidamente F1-7 para destacar el día de la semana actual, F5 es el viernes. Utilice la perilla de sintonización para configurar la hora correcta, luego presione rápidamente el botón PAGE TIME de nuevo para configurar los minutos correctos y presione rápidamente este botón una vez más para confirmar.
- Page 56 MANUAL DEL USUARIO DE SATELLIT 3. Cuando estén destellando, utilice la perilla de sintonización para configurar los minutos, luego continúe y presione rápidamente el botón PAGE/TIME para programar o apagar la alarma, aparecerá en la pantalla LCD “DELAY-XX”, gire la perilla de sintonización para seleccionar los minutos de reproducción de la alarma desde 1 a 99, luego presione este botón para que el número de página de la memoria aparezca en la pantalla.
- Page 57 MANUAL DEL USUARIO DE SATELLIT el LCD, lo que significa que todos los botones y perillas están desbloqueados. REINICIO DE LA RADIO Si la radio no funciona bien, el usuario puede desconectar el suministro de energía y conectarlo nuevamente para reiniciar la radio.
-
Page 58: Sintonización De Estaciones
MANUAL DEL USUARIO DE SATELLIT VISUALIZACIÓN DE LA CONFIGURACIÓN DEL TEMPORIZADOR DE DESCONEXIÓN ACTUAL Con la radio encendida, presione y mantenga el botón para visualizar la cuenta regresiva del temporizador de desconexión. Si aparece “ON”, quiere decir que no hay una configuración de temporizador de desconexión. Selección de banda 1. -
Page 59: Sintonización Manual
MANUAL DEL USUARIO DE SATELLIT Lista de frecuencias a continuación: Método de sintonización | Banda | Paso Manual PARAR | RETRASO-5 ATS 100 K 100 K 100 K 9 K/10 K 9 K/10 K AÉREO Sintonización manual Con la radio encendida, seleccione una banda, Presione rápidamente el botón PAGE/TIME para cambiar al modo Semanal Presione rápidamente... - Page 60 MANUAL DEL USUARIO DE SATELLIT botón F6 para seleccionar ATS, luego presione rápidamente el botón PAGE/TIME para confirmar. Encienda la radio y seleccione la banda FM (ATS solo funciona en el modo FM) Presione rápidamente el botón PAGE/TIME para seleccionar el modo Semanal Presione y mantenga el botón para ingresar ATS, luego...
- Page 61 MANUAL DEL USUARIO DE SATELLIT ALMACENAMIENTO DE ESTACIONES EN LA MEMORIA La Satellit tiene 700 memorias (también llamas presintonías), organizadas en 100 páginas (0~99) y cada página tiene 7 memorias. Los botones F1 al 7 representan ubicaciones de memoria. Note que cuando almacena en una estación de memoria ocupada, el contenido será...
- Page 62 MANUAL DEL USUARIO DE SATELLIT COPIAR Y PEGAR UNA UBICACIÓN DE MEMORIA EN OTRA 1. Encienda la radio y presione rápidamente el botón PAGE/TIME para seleccionar el modo “MEMORY” (MEMORIA); 2. En el modo Memoria, presione rápidamente pasa seleccionar la página de la que desea copiar. 3.
- Page 63 MANUAL DEL USUARIO DE SATELLIT TIME para seleccionar la siguiente “_”, repita hasta que haya seleccionado 8 letras/dígitos/números. Nota: 1. Si el espacio de una letra, un dígito o un número no es necesario, solo presione rápidamente PAGE/TIME para saltearlo. 2.
- Page 64 MANUAL DEL USUARIO DE SATELLIT SELECCIÓN DE PASO 9 K/10 K AM (OM)/RANGO DE FRECUENCIA FM. El LCD muestra: OM-9 K indica paso OM en 9 kHz OM-10 k indica paso OM en 10 kHz FM-64.0 M indica rango de frecuencia FM es 64.0-108 MHz FM-76.0 M indica rango de frecuencia FM es 76.0-108 MHz FM-87.0 M indica rango de frecuencia FM es 87.0-108 MHz FM-87.5 M indica rango de frecuencia FM es 87.5-108 MHz...
- Page 65 MANUAL DEL USUARIO DE SATELLIT 2. Presione y mantenga presionado el sintonizador de dial, la pantalla mostrará SQL-X” (X significa 1~5 o APAGADO”, utilice la perilla de sintonización para seleccionar el nivel de silenciador deseado (SQL-1, SQL-2,..SQL-5” o “SQL-OFF” que quiere decir que la función del silenciador se apagará;...
- Page 66 MANUAL DEL USUARIO DE SATELLIT ” WGSS TUE 03-25-2014 02 : 1 5” (formato RBDS, para Norteamérica) ” TUE 03-25-2014 02 : 1 5” (formato RBDS, para Norteamérica) NOTA: si no hay indicativo de llamada, se mostrará el CÓDIGO PI de la estación actual SINTONIZACIÓN DE SSB (BANDA ÚNICA LATERAL) La SSB permite escuchar comunicaciones en dos sentidos en onda corta mediante el modo de banda lateral única como es el caso de...
- Page 67 MANUAL DEL USUARIO DE SATELLIT USO DEL DETECTOR SINCRÓNICO El detector sincrónico puede utilizarse al escuchar AM y emisoras de difusión de onda corta. Puede ayudar a minimizar la interferencia y mejorar la calidad de la señal al escuchar una estación, encienda la Satellit, seleccione una estación AM o de OC, presione rápidamente el botón SYNC/SSB/RDS para ingresar al modo SYNC, aparecerá...
- Page 68 MANUAL DEL USUARIO DE SATELLIT Para cargar las baterías: 1.) Conecte el adaptador/cargador de corriente alterna, aparecerá el ícono en el LCD; 2.) Con la Satellit apagada, instale 4 baterías Ni-MH y conecte el adaptador de CA. 3.) Presione y mantenga el botón F7 hasta que aparezca en pantalla CHARGE XX.
-
Page 69: Control Del Volumen
MANUAL DEL USUARIO DE SATELLIT TOMA DE AURICULARES 3.5MM El uso del toma de auriculares de la Satellit es exclusivo y compartido con el altavoz interno. Cuando los auriculares están enchufados al toma de auriculares, el altavoz interno se silenciará. El volumen de la señal del toma de auriculares se puede ajustar utilizando la perilla de volumen. -
Page 70: Medio Ambiente
MANUAL DEL USUARIO DE SATELLIT MEDIO AMBIENTE Eliminación Según la Directiva Europea 2002/96/CE, todos los productos eléctricos y electrónicos se deben recolectar por separado mediante un sistema local de recolección. Actúe de acuerdo con sus reglas locales y no elimine los productos viejos junto con el desecho habitual del hogar. - Page 71 MANUAL DEL USUARIO DE SATELLIT instrucciones para el envío a un taller de reparación autorizado por la garantía. No envíe la radio sin obtener un número de devolución autorizado. SIN GARANTÍA Si el producto no está cubierto por la garantía y debe ser reparado, nuestro personal técnico lo derivará...
- Page 72 Etón Corporation Corporate Headquarters 1015 Corporation Way Palo Alto, California 94303 USA tel +1 650-903-3866 tel +1 800-872-2228 fax +1 650-903-3867 Etón Canada 5580 Explorer Drive, Suite 503 Mississauga, Ontario L4W 4Y1 Canada tel +1 416-214-6885 tel +1 800-637-1648 fax +1 416-214-6886 www.etoncorp.com Designed by Etón Corporation and assembled in China.
Need help?
Do you have a question about the Satellit 750 and is the answer not in the manual?
Questions and answers