Table of Contents
Advertisement
Quick Links
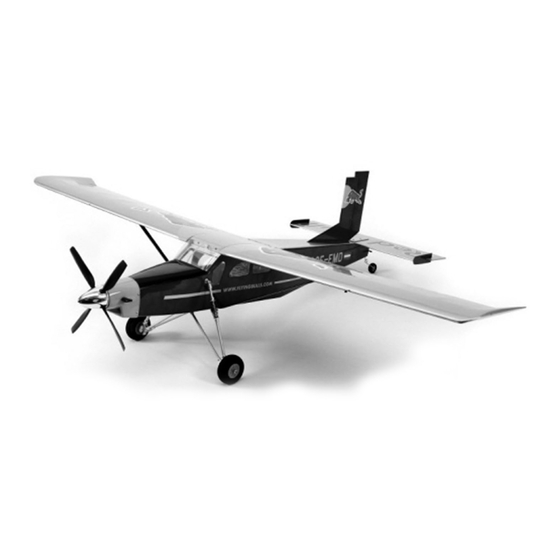
Technical data :Pilatus PC6-S
Wingspan
Length
Take off weight
Wing Area
Wing load
Motor set
Please read the instruction manual carefully and take notice of the safety guidelines.
If the model is given to a third party, always include this instruction manual to the model.
INSTRUCTION MANUAL
FLWA4002 - PILATUS PC6-S
1450 mm
1059 mm
1300 g
31,6 dm²
41 g/dm²
FW 3535/900
Distributed by
www.hobbico.de
Fully licensed through the
Red Bull GmbH - Austria
Advertisement
Table of Contents

Related Manuals for Flitework PILATUS PC6-S


Summary of Contents for Flitework PILATUS PC6-S
-
Page 1: Instruction Manual
INSTRUCTION MANUAL FLWA4002 - PILATUS PC6-S Fully licensed through the Red Bull GmbH - Austria Technical data :Pilatus PC6-S Wingspan 1450 mm Length 1059 mm Take off weight 1300 g Wing Area 31,6 dm² Wing load 41 g/dm² Motor set FW 3535/900 Please read the instruction manual carefully and take notice of the safety guidelines. -
Page 2: Table Of Contents
Introduction The model Midi Pilatus PC-6 Turbo Porter was constructed by Flitework for the advanced beginner, but also for the connoisseurs among the model pilots. In addition to the shockabsorbing scale landing gear inspires this model by its elegant Red Bull design and excellent flight characteristics. The model is covered with screen-printed, high quality film. -
Page 3: Safety Precautions
7. If you are not already an experienced R/C pilot, you should fly the model only with the help of a competent, experienced 1. Your Pilatus PC6-S should not be considered a toy, but rather R/C pilot. a sophisticated, working model that functions very much like a full-size airplane. -
Page 4: Recommended Accessories
RECOMMENDED ACCESSORIES OPTIONAL SUPPLIES AND TOOLS This is a partial list of items required to finish the Pilatus PC6-S Here is a list of optional tools mentioned in the manual that that may require planning or decision-making before starting will help you build the Pilatus PC6-S. -
Page 5: Kit Content
For United States customers, please, contact : Hobby Services 3002 N. Apollo Dr. Suite 1 Champaign IL 61822 USA E-Mail: productsupport@hobbico.com KIT CONTENT PART LIST Washer d3xD12mm (for stabilizer) - 2 pcs. Screw PWA2.3x10 mm (for cowling) - 4 pcs. •... -
Page 6: Symbols For The Building
SYMBOLS FOR THE BUILDING Apply epoxy glue Remove covering here. Do not cut wood. Drill holes with the specifi ed diameter (here : 1.5 m m Apply instant glue. Ensure smooth non-binding movement while Assemble left and right sides the same way. assembling. -
Page 7: Stabilizer
3 - STABILIZER PM3x16 mm 2 mm balsa Washer 2mm PLY d3xD12mm 2 mm balsa Elevator 4 - VERTICAL FIN Rudder 5 - TAIL LANDING GEAR Wheel 030 mm 3x4 mm 3mm PLY Steering arm 3mm PLY 3x4 mm 3x4 mm Wheel collar d2.1mm... -
Page 8: Elevator Pushrod
6 - ELEVATOR PUSHROD Pushrod 01.5x530 mm Pushrod 01.5x510 mm Horn 7 - RUDDER LINKAGE Pushrod 01.5x430 mm Horn 8 - RADIO EQUIPMENT Rudder+tail landing gear Elevator Pushrod FRONT d2mm Rudder pushrod M2 mm Rudder Tail landing gear pushrod servo Elevator Please refer to attached sheet for ❍... -
Page 9: Landing Gear
9 - LANDING GEAR PM3x12 mm 3x4 mm Wheel collar d4.1 mm Wheel 070 mm Washer d3xD12 mm From the inside, fi x the landing gear with the threated telescope Washer strut. Fasten the aluminium bolts d3xD12 mm with the 2 pcs of M3 nuts. 10 - SIDE WINDOWS 0.5 mm PVC 11 - MOTOR... -
Page 10: Main Wing
12 - MAIN WING PM3x20 mm Washer d3xD12 mm 13 - COWLING AND CANOPY Magnet retention PWA2.3x8 mm Fiberglass 14 - MOUNTING THE WING STRUTS Fix the wing struts 40mm behind the leading edge of the wing. Take care, that the struts are parallel to the main wing. Use 2,9 x 10 mm wood screws. -
Page 11: Get The Model Ready To Fly
GET THE MODEL READY TO FLY BALANCE THE MODEL (C.G.) CHECK THE CONTROL DIRECTIONS More than any other factor, the C.G. (balance point) can have the greatest eff ect on how a model fl ies and may ❏ 1. Turn on the transmitter and receiver and center the determine whether or not your fi rst fl ight will be successful. -
Page 12: Balance The Model Laterally
Note: Do not rely upon the adhesive on the back of the We recommend these surface throws : lead weight to permanently hold it in place. Over time, the adhesive may softern and cause the weight to fall off. Use Standard ying #2 sheet metal screws, RTV silicone or epoxy to permanently hold the weight in place. -
Page 13: Balance Propellers
BALANCE PROPELLERS ❍ Keep your face and body as well as all spectators away from the plane of rotation of the propeller as you start and run the engine. ❍ Keep these items away from the prop: loose clothing, shirt sleeves, ties, scarfs, long hair or loose objects such as pencils or screwdrivers that may fall out of shirt or jacket pockets into the prop. -
Page 14: Check-List
❍ 13. Secure the pressure tap (if used) to the muffler with CHECK-LIST high temp RTV silicone, thread locking compound or During the last few moments of preparation your mind may J.B.Weld. be elsewhere anticipating the excitement of the first flight. ❍... - Page 15 PERSONAL NOTES...
- Page 16 www.hobbico.de Distributed by...
Need help?
Do you have a question about the PILATUS PC6-S and is the answer not in the manual?
Questions and answers