Table of Contents
Advertisement
Advertisement
Table of Contents

Related Manuals for DaytonAudio DAX66

Summary of Contents for DaytonAudio DAX66
- Page 1 6-SOURCE 6-ZONE DISTRIBUTED AUDIO SYSTEM Model: DAX66 User Manual...
- Page 2 • Be sure the installation of this product is stable, avoid unlevel surfaces as the product may fall and cause injury, property damage, electrocution and/or fire. • Note that when the unit is turned off, it is not completely disconnected from the AC power outlet. Do not open the cover. REFER ALL SERVICE TO A QUALIFIED SERVICE TECHNICIAN daytonaudio.com info@daytonaudio.com...
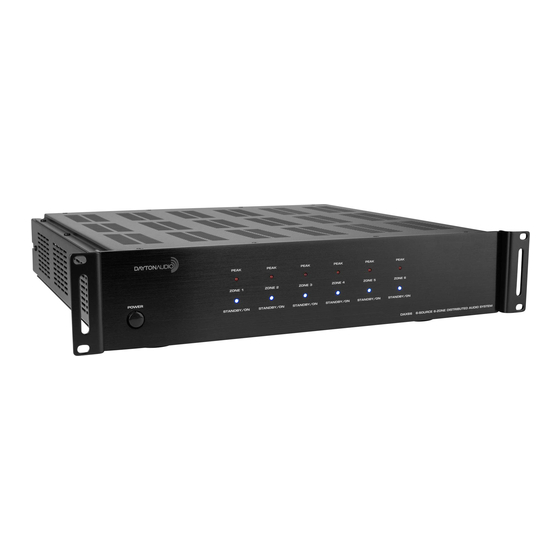
- Page 3 Congratulations on your purchase of the Dayton Audio DAX66 6-Source 6-Zone Distributed Audio System. You have chosen a unit that provides the ultimate audio control in six stereo zones (expandable to 18 stereo zones). The DAX66 is a true matrix audio system that delivers an extensive list of features for professional and residential installations.
- Page 4 50 watts @ 4 ohms in stereo mode and 1-global IR output brings low input levels 25 watts @ 8 ohms in stereo mode up to a pre-set level 100 watts @ 8 ohms in bridge mode 12Vdc MUTE trigger IN daytonaudio.com info@daytonaudio.com...
- Page 5 DAX66 KEYPAD FEATURES The DAX66 keypad is designed for ease of use with a maximum ability to control sound. Soft-touch backlit buttons and a backlit LED display provide convenient control of the zone; ON/OFF, source 1 ~ 6 selection, volume, treble, and bass. A built-in IR target or external IR target connected to the EXT-IR terminals on the rear of the keypad, relay commands to the DAX66 master controller.
- Page 6 DAX66 INFRARED REMOTE CONTROL FEATURES The DAXRC infrared remote control provides complete zone control through the IR receiver located on the DAX66 keypad. All keypad functions can be accessed using the DAXRC. In addition to the keypad functions, the DAXRC has a MUTE button to temporarily mute audio in the zone.
- Page 7 DAX66 INSTALLATION — OVERVIEW Install the DAX66 in a well-ventilated location; do not block the vents on the sides or top of the chassis, proper ventilation is required for normal operation. Do not expose the unit to excessive dust and do not allow dust to build up on the unit and block the vent holes in the chassis.
- Page 8 DAX66 INSTALLATION — KEYPADS INSTALLATION Keypads Use high quality Cat5e/6 cable between the controller/amplifier and the keypads. Proper installation techniques will guarantee that the keypads will work properly up to 600 feet from the controller/amplifier. The use of terminal blocks on the keypads and keypad hub ultimately reduces the frustration associated with terminating UTP cable with RJ45 plugs.
- Page 9 AC wires at least 10 inches apart. If you must cross AC wires, always cross at a 90 degree angle. The DAX66 amplifiers are capable of driving 4 ~ 8 ohm speaker loads in stereo mode, and 8 ohm loads in bridge mode. Never connect more than two 8 ohm speakers wired in parallel to a single amplifier channel in stereo mode.
- Page 10 Insert the speaker wires into the connector per the label below the output terminals and tighten the set screws. Repeat for the remaining zones. It is permissible to mix STEREO and Bridged MONO outputs on one DAX66. Set the MODE switch...
- Page 11 The DAX66 can be used as the master controller in large commercial audio systems with constant voltage 25/70V amplifiers connected to the PRE-AMP outputs.
- Page 12 Connecting Source Components to the DAX66 The DAX66 provides six source inputs that can be accessed by any zone. Inputs 1 ~ 4 are stereo, unbalanced, line level source inputs via RCA style female connectors. Input 5 provides a connection for a personal audio device or PC sound card via the 3.5mm stereo jack.
- Page 13 Using the DAX66 12VDC Trigger Inputs and Outputs The DAX66 provides six 12Vdc trigger outputs which correspond to the six DAX66 zones. When a zone is powered ON by the DAX66 keypad, the corresponding zone sends 12Vdc to the trigger output jack. When the zone is powered OFF, 12Vdc is disconnected from the trigger output.
- Page 14 Expanding the DAX66 to 18 zones The DAX66 can be expanded to 12 zones with one additional DAX66 kit and to 18 zones with two additional DAX66 kits. Stack three DAX66, one on top of another. Connect the included 18-pin ribbon cable to the EXPANSION OUTPUT terminal of the bottom unit and the other end of the ribbon cable to the EXPANSION INPUT terminal of the second and then third unit.
- Page 15 DAX66 RS-232 Serial Port Control The DAX66 provides an RS-232 serial port for connection to and control by automation systems. The DB-9 connector on the back of the unit supports bi-directional RS-232 communication for third party automation systems. An automation system can control all keypad and remote control functions for up to 18 zones (3 master controller units), linked together using the included 18 pin expansion cable.
- Page 16 DAX66 INSTALLATION — RS-232 CONTROL DAX66 RS-232 Serial Port Control continued. (Baud Rate 9600, 8, N, 1 , DB9 Connector Pin out, Tx, Rx, GND) Key in 1<********'CR' change S ource 1 N ame Bala n c e c ontrol sta t us h h : display;********needs to be 8 valid ASCII codes.
- Page 17 DAX66 INSTRUCTIONS — RS-232 CONTROL DAX66 RS-232 Serial Port Control continued (Baud Rate 9600, 8, N, 1 , DB9 Connector Pin out, Tx, Rx, GND) (00:disconnect 01:connected) : >xxPPuu'CR' (2) ?xxPP'CR' ;********needs to be 8 ASCII codes. stands for control object code 1<********'CR'...
- Page 18 DAX66 SPECIFICATIONS & WARRANTY RMS Power @ 8 ohms 25 watts x 12 Specifications are subject to change from time to time without notice. RMS Power @ 4 ohms 50 watts x 12 RMS Power @ 8 ohms Bridge 100 watts x 6...
Need help?
Do you have a question about the DAX66 and is the answer not in the manual?
Questions and answers