Table of Contents
Advertisement
Advertisement
Table of Contents

Related Manuals for Kaiser Baas HD MediaHub

Summary of Contents for Kaiser Baas HD MediaHub
- Page 1 USER GUIDE HD | MediaHub Watch movies, listen to music and view photos...
- Page 3 Languages English...
- Page 4 Community /kaiserbaas Register this product for 12 month warranty: www.kaiserbaas.com/register Get product updates: www.kaiserbaas.com/updates Tech support: e: helpdesk@kaiserbaas.com w: www.kaiserbaas.com/support p: Australia 1300 302 306 p: New Zealand 0800 302 306 (business hours, AEST)
-
Page 5: Table Of Contents
Contents Safety Precautions What’s in the Box Product Diagram HD MediaHub Remote Setting up the HD MediaHub Home Screen 1. File Manager 2. Movies 3. Photos 4. Music 5. Setup Setup options Frequently Asked Questions Contact Us... -
Page 6: Safety Precautions
• Do not attempt to open the unit or modify it in any way, as this will void your warranty. Maintenance and repairs should only be performed by Kaiser Baas. • Keep the HD MediaHub away from water and other liquids. Do not use wet hands when using the HD MediaHub+ as this may cause the unit to malfunction. -
Page 7: What's In The Box
What’s in the Box Please ensure the product package has all the following contents: User Guide HD MediaHub Quick Start Guide Power adapter 2 x AAA batteries Remote control HDMI cable Warranty Card... -
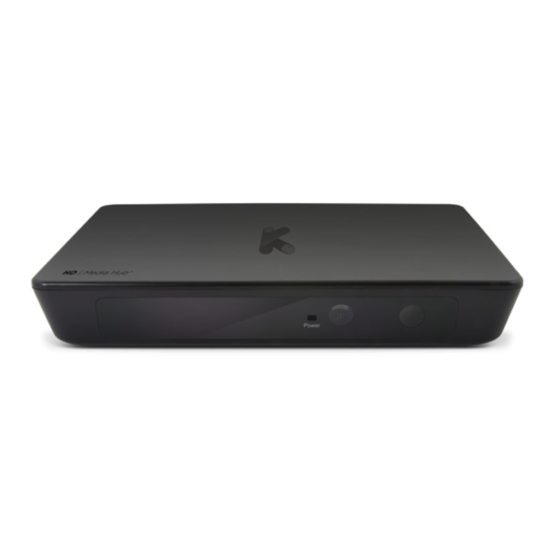
Page 8: Product Diagram
Product Diagram Warning: Before you connect unit to a power outlet, read this Quick Start Guide and the safety information in the User Manual Power Status AV Out Power status light turns blue Connects to analog Video when unit is on &... -
Page 9: Hd Mediahub + Remote
HD MediaHub Remote Power button Mute button TV System Eject A - B Zoom Setup Zoom Setup Menu system Menu Home button Back Arrow Keys/Navigation OK/Enter Volume up Volume down Rewind Play/Pause Fast Forward Slow motion Info Info Repeat Stop... -
Page 10: Setting Up The Hd Mediahub
Setting up the HD MediaHub Steps to Connect: Back of TV HDMI IN Coatial HDMI CVBS DC 5V Connecting HDMI cable • Connect one end of cable to the back of TV • Connect the other end to the ‘HDMI’... - Page 11 SD/MMC Card Reader Connecting External storage device • Connect your external HDD to a ‘USB’ port in the HD MediaHub • Turn on HDD (if required by the HDD) Turn HD MediaHub • Turn power on at power outlet • Press ‘ON/OFF button’ in front of unit...
- Page 12 Turn on TV • Select the proper HDMI source on your TV. Note: If there is no HDMI input on TV, you may need to use AV or component cables and select appropriate TV input source on TV depends on your connection (these cables are not provided).
-
Page 13: Home Screen
Home Screen The home screen is the first screen of information displayed when the HD MediaHub is started. The home screen can also be accessed at any time by pressing the HOME BUTTON ( )on the remote control. Home Screen Options The icons on this screen let you browse the media library and configure the media Player’s settings. -
Page 14: File Manager
1. File Manager The file manager allows you to browse and access the media files stored on the external storage device. Navigation: Use the arrow keys to navigate and OK button to confirm selection/open file. File Manager Screenshot 1.1. Accessing files through File Manager Go to File Manager from home screen. - Page 15 Folder view options Press the Menu button to display the following submenu. This menu is also available from the Movie library, Photo library and Music library. Folder View Options Screenshot Note: This menu cannot be accessed while playing movies. • Thumbnails – To view the folder contents as thumbnails • List –...
- Page 16 • Music - To display all the supported audio files in the current directory File Editing option Use this option to transfer file, rename and delete files. File Editing Screenshot Select the File/Folder that you want to edit Press green button on the remote to display the File Edit options.
- Page 17 File Transfer: To copy/move a file from one location to another choose the source file/folder, press the green button on the remote to bring the File Edit options > Select Copy or Move function. Press OK. Select the destination folder and press the Play/Pause ( ) button to confirm.
-
Page 18: Movies
2. Movies The Movie library will allow you to browse and play your video files. Movie Library Screenshot Note: Only supported video files will be listed under Movie library. (AVI/MKV/TS/TP/TRP/M2TS/MPG/MP4/M4V/MOV/VOB/ISO/IFO/ DAT/WMV/ASF/RM/RMVB/FLV) Navigation: Use the arrow keys to navigate and OK button to confirm selection/view movie. - Page 19 Video playback controls Eject Eject external storage device Edit File File transfer, rename or delete Aspect Choose between aspect Ratio ratios - 4:3, 16:9 or 16:10 Zoom Setup Menu A to B Select and loop a section system of video Zoom Zoom in the image. Menu Display or hide the option menu during playback.
- Page 20 Movie Playback Options: During the movie, press the Menu button to display the following submenu. Movie Playback Options Screenshot • Subtitle - Display subtitles if available • Audio – Change Audio track if available • Goto - Jump to a specific point on a title. Specify the point using Title, Chapter • Repeat title - movie repeats when complete • Repeat all - repeat movies in storage device or selected...
-
Page 21: Photos
3. Photos The Photo library will allow you to browse and play your image files. Photo Library Screenshot Note: Only supported image files will be listed under Photo library. - JPEG/BMP/GIF/TIF/PNG Navigation: Use the arrow keys to navigate and OK button to confirm selection/view photo or slideshow. - Page 22 Photo playback controls Zoom Zoom in the image. Menu Display or hide the option menu during playback. Prev / View the previous or next Next photo. Zoom Setup Menu system Up / Rotate a photo in any Down angle. Stop Stop playback.
- Page 23 Photo Playback Options During photo playback, press Menu button to display the following submenu. Photo Playback Options Screenshot Slide timing – To Select the slide transition time Slide transition – To Select the slide transition effect Repeat Off – Turn off repeat feature Repeat All –...
-
Page 24: Music
4. Music The Music library will allow you to browse and play your audio files. Music Library Screenshot Note: Only supported audio files will be listed under Music library (MP3/OGG/WMA/WAV/FLAC/APE) Navigation: Use the arrow keys to navigate and OK button to confirm selection/play music. - Page 25 Music playback controls Menu Display or hide the option menu during playback. VOL+/- Increase/Decrease the volume. Zoom Setup Menu system FR / FF Fast rewind or fast forward. Press repeatedly to select the speed. Play/Pause Begin/Pause playback. Prev / Next View the previous or next movie.
- Page 26 Music Playback options During Music playback, Press the Menu button to display the following playback submenu. Music Playback Options Screenshot Repeat Off – Turn off repeat feature Repeat one – Repeat the playing file Repeat All – Repeat all files in the directory Shuffle loop –...
-
Page 27: Setup
5. Setup The Setup menu on home screen allows you to personalize and configure the preferences for your player. Setup Options Screenshot To access setup menu, select the Setup icon on home screen using right/left arrow keys and press the OK button to confirm. -
Page 28: Setup Options
Setup options SYSTEM Use this menu to configure system settings. System Settings Screenshot • Language – To choose the OSD (On-Screen Display) language • Text Coding – To Select text encoding (Subtitle display) • Time – To select time zones. • Daylight Saving –... - Page 29 • Screensaver – To adjust the screen saver settings • Soft-keyboard Language – Onscreen Keyboard Language • Resume Playback – To continue watching movie from last stop • Format Storage – To erase and clean the external storage device • Auto Standby in 3hrs – Set Auto standby on/off • – (Consumer Electronic Control) A HDMI feature designed to allow user to control CEC enabled devices that are connected through HDMI.
- Page 30 AUDIO Use this menu to configure audio settings Audio Settings Screenshot • Night Mode – If the option is turned on, the audio output volume will be decreased • HDMI – HDMI LPCM (Media Player itself will decode the audio; preferred when connects to a TV through HDMI –...
- Page 31 S/PDIF output – Select LPCM or Raw – Set to LPCM by default • Surround Sound – Option to select 5.1 channels, HD audio or auto. • Lip Sync – Syncs audio with video playback – Select Auto, Manual or Off VIDEO Use this menu to configure audio settings.
- Page 32 • Aspect ratio – 4:3 - Display a wide picture with two black borders on the top and bottom of 4:3 screen. Select when a standard 4:3 TV is connected – 16:9 - Compress the image to convert the whole image. Select when a 16:9 TV is connected –...
- Page 33 USB upgrade – Select to update the firmware via a USB stick Download the firmware from Kaiser baas website, copy firmware file to the root directory of a USB stick, and connect it to the USB HOST port of the player. Go to USB upgrade option from the ‘Misc’...
- Page 34 4. Press and hold the reset button and continue holding while turning the HD MediaHub 5. Once firmware installation starts release reset button • Key Tone Volume – Select to set the Key Tone Volume on/off • Factory Default – Select to restore factory defaults.
-
Page 35: Frequently Asked Questions
ON/OFF. Q. I cannot see my HDD? A. It may take up to 5 minutes for the HD MediaHub scan your HDD and list it under the library. If that doesn’t work, turn the unit OFF, wait 5 seconds and turn it back Q. -
Page 36: Contact Us
Contact Us Having trouble setting your HD MediaHub Please contact us. No question too big or small and we are more than happy to help. Please visit: www.kaiserbaas.com/support Or email: helpdesk@kaiserbaas.com For further information please visit: www.kaiserbaas.com Tech support: e: helpdesk@kaiserbaas.com w: www.kaiserbaas.com/support...
Need help?
Do you have a question about the HD MediaHub and is the answer not in the manual?
Questions and answers