
Related Manuals for Kentrox RMX-3200


Summary of Contents for Kentrox RMX-3200
- Page 1 Remote RMX-3200 Intelligent Site Management Device Configuration Guide Version 5.2x Part Number 030-101824 © 2014 by Westell Technologies®. All rights reserved.
- Page 2 Remote RMX-3200 Version 5.2x Configuration Guide Copyright © 2014 by Westell, Inc. All Rights Reserved. Westell, Kentrox and Optima Management System are registered trademarks of Westell. All other names are trademarks of their respective owners. Information is correct at time of publication and is subject to change without notice.
-
Page 3: Table Of Contents
Accessing the CLI Using a Local Connection .............. 2-2 With Kentrox Kickstart ..................2-2 Without Kentrox Kickstart ................. 2-3 Setting Up the Initial Remote RMX-3200 Configuration ..........2-5 Accessing the CLI Using a Remote Connection ............2-8 Accessing the Web Interface ..................2-9 Chapter 3: Configuring Users in the CLI .......... - Page 4 Remote RMX-3200 Version 4.1x Configuration Guide Restoring Basic Network Settings ................4-5 Chapter 5: Configuring Network Setup Parameters .......5-1 Configuring the Domain Name, DNS Servers and IP Forwarding ....... 5-2 Configuring an IPv6 Address ..................5-4 Configuring NTP ......................5-5 Configuring System Clock Settings ................
- Page 5 Adding an IPv6 Static Route to the IP Routing Table ..........10-4 Adding a Default IPv6 Static Route to the IP Routing Table ........10-5 Chapter 11: Configuring a Wireless Network with Remote RMX-3200 11-1 Getting Started ......................11-2 Wireless Network Overview ................11-2 Required Components ...................
- Page 6 Remote RMX-3200 Version 4.1x Configuration Guide Chapter 14: Configuring Event Correlations ........14-1 Overview ........................14-2 Event Correlation Components ..............14-2 Correlation Expression Components ................. 14-3 Originator Types and States ................14-3 Operators ....................... 14-4 Expression Evaluation ..................14-4 Configuring a Time Period (Optional) ............. 14-5 Configuring an Event Correlation ................
- Page 7 Remote RMX-3200 Version 4.1x Configuration Guide Terminal Server User Access ................. 17-4 TACACS+ Configuration ................17-4 Configuring a TCP to Asynchronous Serial Connection ..........17-5 Configuring a Telnet to Asynchronous Serial Connection .......... 17-7 Configuring a SSH to Asynchronous Serial Connection ..........17-9 Configuring an Asynchronous Serial to Asynchronous Serial Connection ....
- Page 8 Remote RMX-3200 Version 4.1x Configuration Guide Configuring TBOS Polling Settings ................21-7 Configuring an Equipment Type for a TBOS Display ..........21-8 Configuring the TBOS “Points All” Method ............... 21-10 Manually Configuring TBOS Display Points ............. 21-11 Configuring Cut-Through Support ................21-13 Configuring a TBOS Control Response with an Event ..........
- Page 9 Expansion Unit Configurations ................... 25-9 Expansion Peripheral Unit Discovery ............... 25-10 Expansion Peripheral States ..................25-11 Configuring Remote RMX-3200 to Manage an Expansion Peripheral ..... 25-13 Configuring Discrete I/O Points on an Expansion Peripheral ........25-15 Configuring Alarms for an Expansion Peripheral ............. 25-17 Configuring a Serial Controller on an Expansion Peripheral ........
- Page 10 RTRV-ALM-OC3 .................... 28-9 RTRV-ALM-T1 ....................28-10 RTRV-HDR ....................28-11 Unsupported TL1 Commands .................. 28-12 Appendix A: Backing Up and Restoring the Remote RMX-3200 Configura- tion ......................A-1 Backing Up the Configuration ..................A-2 Restoring the Configuration ..................A-3 Appendix B: WAN Port Availability ............B-1 WAN Port Availability ....................B-2...
-
Page 11: Preface
Preface About this Document This document explains how to install, configure, and operate the Remote RMX-3200 intelligent site management device. Remote RMX-3200 system administrators should have a working knowledge of: Telecommunications networks, TCP/IP networking, including Telnet and FTP ... -
Page 12: Document Conventions
Remote RMX-3200 Version 5.2x Configuration Guide Preface: Document Conventions Table 1 describes the text conventions used in this document. Table 1 Document Conventions Convention Meaning This style indicates Kentrox configuration screen text, Screen Text, Menu Items, System menu items, system prompts, messages, and reports. - Page 13 Remote RMX-3200 Version 5.2x Configuration Guide Preface: Table 1 Document Conventions (Continued) Labels This style designates physical components on Kentrox products such as jumpers, switches, and cable connectors. Note messages emphasize or supplement important points of the main text.
-
Page 14: Cautions And Warnings
Do not ship or store cards near strong electrostatic, electromagnetic, or radioactive fields. Ground Caution CAUTION: For Kentrox equipment to operate safely and correctly, there must be a safety ground strap between the equipment ground bolts and the office ground. -
Page 15: Customer Assistance
All customers, partners, and resellers who have a valid Kentrox Support and Services Agreement have complete access to the technical support resources. Kentrox offers technical support from 8 a.m. to 8 p.m. Eastern time, Monday - Friday. Before you contact Kentrox for assistance, please have the following information available: ... - Page 16 24x7 Support and Services Agreement. Call the number above, option 3, and follow the prompts for after-hours service. Product Documentation You can also access and view the most current versions of Kentrox product documentation on our Web site at: http://www.kentrox.com...
-
Page 17: Chapter 1: Remote Rmx-3200 Product Overview
Remote RMX-3200 Product Overview This chapter provides a high level overview of the Remote product features and functionality. In addition, the hardware architecture and components of the Remote RMX-3200, including expansion units and peripherals, are described. Guide to this Chapter... -
Page 18: Remote Product Overview
The Kentrox Remote suite of products includes Remote RMX-3200, Remote RMM- 1400 and Remote RMX-3200. The Remote suite of products includes several models that provide various features and a number of peripheral units that provide additional functionality. In general, the Remote products are monitoring and control devices that provide IP management connectivity to remote sites, including environmentally hardened locations. -
Page 19: Summary Of Remote Functions
Mediation between OSS equipment and network elements Scripts designed for performing corrective actions on monitored equipment For smaller locations with space constraints and fewer interface requirements, Kentrox provides the Remote RMM-1400 and the Remote RMC-700. For details on those products, see their respective Configuration Guides. -
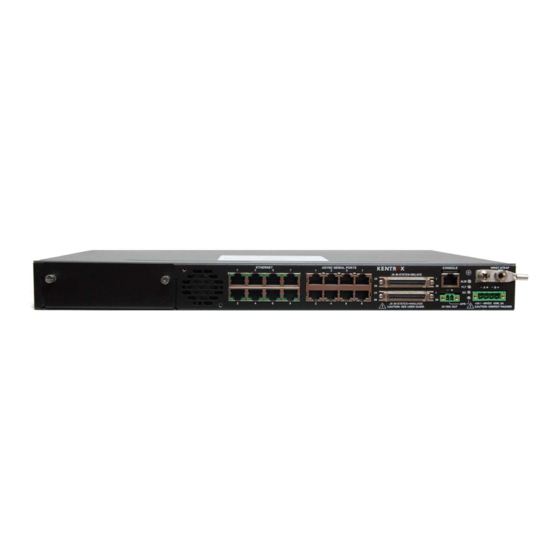
Page 20: Remote Rmx-3200 Hardware Configuration
8 Serial Ports 64 Discrete Ports Console Port Expansion Slot Figure 1-2 Remote RMX-3200 Base Unit Expansion Slot Remote RMX-3200 has no built-in WAN interfaces, but has a modular expansion slot for any one of the following RME-1000 or WAN peripherals. RME-1000 Peripherals ... - Page 21 Continue (DAC) in either T1 or E1 mode. Figure 1-3 shows an example of the Remote RMX-3200 with a WTE peripheral. For details on Remote RMX-3200 WAN peripherals and port assignments, see Appendix B : WAN Port Availability. WTE Peripheral...
-
Page 22: Expansion Units And Peripherals
16 analog inputs 8 digital outputs The Expand-D connects to Remote RMX-3200 via Ethernet. The unit has no intelligence; it is configured and controlled from the host Remote RMX-3200. For details on configuring the Expand-D expansion unit, see Expand-D Expansion Unit on page 25-2. -
Page 23: Rme-1000 Expansion Unit
For details on RME-1000 and the individual plug-in peripherals, see Chapter 25: Configuring the Peripheral Management Subsystem. Note: The RME-B64 peripheral replaces the Expand-FDCI; however, Kentrox will continue to support the FDCI peripheral at this time. FA Peripheral Available Slot FB64 Peripheral... -
Page 24: Rmb Peripheral Units
RMB Peripheral Units RMB-1 The RMB-1 peripheral unit (shown in Figure 1-6) can be connected to and powered from one of Remote RMX-3200’s PoE-capable Ethernet ports. RMB-1 adds the following connectors and counts: 64 digital bistate inputs Four relay outputs ... - Page 25 RMB-2’s digital bistate inputs support both wet and dry contacts, while RMB-1’s digital bistate inputs support dry contacts only. Figure 1-7 RMB-2 Peripheral Unit For technical specifications on RMB-1 and RMB-2 and for details on physically connecting to RMB terminals, see the Remote RMX-3200 Installation Guide.
-
Page 26: Remote Product Specification Summary
RME-E8** RMB-1 1*** RMB-2 1*** * Requires host Remote or Remote RMX-3200 **Requires host Remote or Remote RMX-3200. Requires RME-1000 chassis when not installed into expansion slot on Remote RMX-3200. *** Connection to Remote RMM-1400 or Remote RMX-3200 only 1-10... -
Page 27: Chapter 2: Getting Started
Getting Started This chapter provides information on getting started with Remote RMX-3200. Step-by-step scenarios describe how to access the CLI, set up the initial configuration and access the Web interface. Guide to this Chapter Accessing the CLI Using a Local Connection... -
Page 28: Accessing The Cli Using A Local Connection
(optional) Access help information Note: When a new Remote RMX-3200 is booted for the first time, it does not have a configured IP address. As a result, the initial configuration for Remote RMX-3200 must be performed onsite using the console port. For... -
Page 29: Without Kentrox Kickstart
Remote RMX-3200 allows you to log in only five times using the default password. On your sixth login, Remote RMX-3200 will prompt you to change the default password to a new password. The main CLI prompt displays. - Page 30 Remote RMX-3200 allows you to log in only five times using the default password. On your sixth login, Remote RMX-3200 will prompt you to change the default password to a new password. The main CLI prompt displays.
-
Page 31: Setting Up The Initial Remote Rmx-3200 Configuration
Remote RMX-3200 Version 5.2x Configuration Guide Getting Started: Setting Up the Initial Remote RMX-3200 Configuration Setting Up the Initial Remote RMX-3200 Configuration In this scenario, you will: Configure a new user with a supervisor profile Configure the login banner ... - Page 32 7. Configure the host name as config hostname Dub 8. Configure the IP address. Note: The Remote RMX-3200 supports IPv4 and IPv6 and provides the ability to configure both IP protocols at the same time. Refer to Chapter 5: for more information on how to configure an IPv6 address.
- Page 33 Remote RMX-3200 Version 5.2x Configuration Guide Getting Started: Setting Up the Initial Remote RMX-3200 Configuration 11. (optional) Verify that the user environment has been set up properly: running-config The command response displays similar to the following: (Dub)>running-config # Product: Remote RMX # Version: 3.30...
-
Page 34: Accessing The Cli Using A Remote Connection
To log into Remote RMX-3200 via SSH, you must execute command config remote-access ssh-sftp enable 3. Enter the IP address of the Remote RMX-3200 to which you want to connect. 4. At the login prompt, enter your user name: janedoe 5. -
Page 35: Accessing The Web Interface
Remote RMX-3200 Version 5.2x Configuration Guide Getting Started: Accessing the Web Interface Accessing the Web Interface From the Remote RMX-3200 Web interface, you can perform the following functions: Enable/disable alarm test mode Save, restore or erase system configuration ... - Page 36 The Web interface opens to the Home page, refer to Figure 2-1. 6. To display the system information, click the System button on the left side of the screen or click the System Info link. Figure 2-1 Remote RMX-3200 Web Interface Home Page 2-10...
-
Page 37: Chapter 3: Configuring Users In The Cli
Configuring Users in the CLI This chapter provides step-by-step scenarios on how to configure users. Guide to this Chapter Adding a New User Enabling the Strong Password Feature Changing a User Password Deleting a User Creating a Custom Profile... -
Page 38: Adding A New User
Remote RMX-3200 Version 5.2x Configuration Guide Configuring Users in the CLI: Adding a New User Adding a New User In this scenario, you will add a new user. To add a new user: 1. At the main prompt, add a new user with user name... -
Page 39: Enabling The Strong Password Feature
Remote RMX-3200 Version 5.2x Configuration Guide Configuring Users in the CLI: Enabling the Strong Password Feature Enabling the Strong Password Feature The strong password is an optional security feature that enforces additional validations on new or changed user passwords. The password validations apply to passwords entered for local users only. -
Page 40: Changing A User Password
Remote RMX-3200 Version 5.2x Configuration Guide Configuring Users in the CLI: Changing a User Password Changing a User Password In this scenario, you will change the password for an existing user. To change a user password: 1. At the main prompt, change the password for user... -
Page 41: Deleting A User
Remote RMX-3200 Version 5.2x Configuration Guide Configuring Users in the CLI: Deleting a User Deleting a User In this scenario, you will delete a user. To delete a user: 1. At the main prompt, delete user johndoe config users delete johndoe 2. -
Page 42: Creating A Custom Profile
Remote RMX-3200 Version 5.2x Configuration Guide Configuring Users in the CLI: Creating a Custom Profile Creating a Custom Profile In this scenario, you will: Create a custom user profile to include and exclude specific command sets (IDs) for that profile. -
Page 43: Chapter 4: Saving And Applying Configurations
Saving and Applying Configurations This chapter provides information on saving and applying configurations. Guide to this Chapter Saving the Running Configuration Applying Configuration Fragments to an Existing Configuration File Restoring Factory Defaults Restoring Basic Network Settings... -
Page 44: Saving The Running Configuration
Note: You should save the configuration each time you make a change that you want to keep. If you reset Remote RMX-3200 without first saving the configuration, any unsaved changes will be lost. To save the configuration, copy the running configuration to the startup configuration:... -
Page 45: Applying Configuration Fragments To An Existing Configuration File
This feature lets you apply a group of configuration commands without individually entering each one in the CLI. Patch files are transferred to their own directory on Remote RMX-3200 ) with an FTP utility. Once a patch file is in this directory, the /config/patches user can show, copy, or erase it using the existing CLI commands. -
Page 46: Restoring Factory Defaults
Saving and Applying Configurations: Restoring Factory Defaults Restoring Factory Defaults In this scenario, you will restore Remote RMX-3200’s factory default settings. Important: When you copy the factory configuration to the running configuration, all configured settings are removed. You need a console port connection to re-establish communications with Remote RMX-3200. -
Page 47: Restoring Basic Network Settings
Remote RMX-3200 Version 5.2x Configuration Guide Saving and Applying Configurations: Restoring Basic Network Settings Restoring Basic Network Settings In this scenario, you will restore Remote RMX-3200’s basic network settings. These settings are entered in the initsetup wizard. The file is now... - Page 48 Remote RMX-3200 Version 5.2x Configuration Guide Saving and Applying Configurations: Restoring Basic Network Settings...
-
Page 49: Chapter 5: Configuring Network Setup Parameters
Configuring Network Setup Parameters This chapter provides step-by-step scenarios on how to configure network setup parameters for Remote RMX-3200. Guide to this Chapter Configuring the Domain Name, DNS Servers and IP Forwarding Configuring an IPv6 Address Configuring NTP Configuring System Clock Settings... -
Page 50: Configuring The Domain Name, Dns Servers And Ip Forwarding
Remote RMX-3200 Version 5.2x Configuration Guide Configuring Network Setup Parameters: Configuring the Domain Name, DNS Servers and IP Forwarding Configuring the Domain Name, DNS Servers and IP Forwarding In this scenario, you will: Configure a domain name Configure a primary and secondary DNS server ... - Page 51 Remote RMX-3200 Version 5.2x Configuration Guide Configuring Network Setup Parameters: Configuring the Domain Name, DNS Servers and IP Forwarding 5. (optional) Verify that the IP settings have been configured properly: running-config The command response similar to the following displays: (Dub)>running-config # Product: Remote RMX # Version: 3.30...
-
Page 52: Configuring An Ipv6 Address
Note: If an IPv6 router is advertising itself on the network, and IPv6 is enabled on the interface, the Remote RMX-3200 may acquire an IPv6 address from the router in addition to the address configured. 2. (Optional) Verify that the interface bridge switch has been configured properly... -
Page 53: Configuring Ntp
Remote RMX-3200 Version 5.2x Configuration Guide Configuring Network Setup Parameters: Configuring NTP Configuring NTP In this scenario, you will: Configure a primary and secondary NTP server Configure a minimum and maximum NTP polling interval Enable NTP To configure system clock parameters using the common clock time maintained by the Remote RMX-3200 NTP server: 1. - Page 54 Remote RMX-3200 Version 5.2x Configuration Guide Configuring Network Setup Parameters: Configuring NTP 5. (optional) Verify that the clock parameters have been configured properly: running-config The command response similar to the following displays: (Dub)>running-config # Product: Remote RMX # Version: 3.30 # Created: 2010-11-22,12:32:11.0,-0800...
-
Page 55: Configuring System Clock Settings
Remote RMX-3200 Version 5.2x Configuration Guide Configuring Network Setup Parameters: Configuring System Clock Settings Configuring System Clock Settings Remote RMX-3200 lets you configure timezones and daylight savings rules for any location. Three methods are available for configuring timezone and daylight savings settings: ... -
Page 56: Configuring Custom System Clock Settings
Configure custom daylight savings time parameters Important: You must disable NTP before you can configure the Remote RMX-3200 system clock locally. To configure custom system clock settings: 1. At the prompt, configure the timezone as... - Page 57 Remote RMX-3200 Version 5.2x Configuration Guide Configuring Network Setup Parameters: Configuring System Clock Settings 2. Set the following custom daylight savings time parameters: (Dub)>config (Dub) config>clock (Dub) config clock>daylight-savings (Dub) config clock daylight-savings ->indicator EDT (Dub) config clock daylight-savings ->start-month march (Dub) config clock daylight-savings ->start-day 23...
-
Page 58: Configuring A Timezone Definition File
Remote RMX-3200 Version 5.2x Configuration Guide Configuring Network Setup Parameters: Configuring System Clock Settings Configuring a Timezone Definition File You can load and apply daylight savings rules to your system from a timezone definition file. A timezone definition file is derived from the public domain timezone database and consists of: ... -
Page 59: Configuring Ras Settings
Enable RAS accounting Configure the RAS authorization mode Configure the number of times Remote RMX-3200 attempts to connect to the RAS server Configure the RAS timeout period for a remote authentication attempt To configure RAS settings: 1. - Page 60 RAS server before failing: config ras retry 5 6. Configure how long Remote RMX-3200 waits for a response from the RAS server before falling back on local authentication: config ras timeout 30 7. (optional) Verify that the remote authentication settings have been configured...
-
Page 61: Configuring Snmp
aiSystemInv.mib aiRosetta.mib To access the available MIBs for Remote RMX-3200, go to: http://www3.kentrox.com/Support/Documentation-Library.aspx. To configure SNMP: 1. At the main prompt, configure an SNMP version 1 community string named and assign read-only access to objects in the MIB:... - Page 62 Remote RMX-3200 Version 5.2x Configuration Guide Configuring Network Setup Parameters: Configuring SNMP 3. Configure an IPv6 management station for version 2 inform requests: config snmp host fd10:39:0:0:200 162 public v2-inform 4. Enable the sending of authentication traps: config snmp auth-trap enable 5.
- Page 63 Remote RMX-3200 Version 5.2x Configuration Guide Configuring Network Setup Parameters: Configuring SNMP In this scenario, you will: Configure an SNMP version 3 user Configure an SNMP v3 community Configure an SNMP v3 host 1. At the main prompt, configure a v3 user (...
- Page 64 Remote RMX-3200 Version 5.2x Configuration Guide Configuring Network Setup Parameters: Configuring SNMP 5-16...
-
Page 65: Chapter 6: Understanding Controllers And Interfaces
Understanding Controllers and Interfaces This chapter provides information about controllers and interfaces and how they operate on Remote RMX-3200. Guide to this Chapter Controller Descriptions Interface Descriptions... -
Page 66: Controller Descriptions
Understanding Controllers and Interfaces: Controller Descriptions Controller Descriptions A controller is a software object on Remote RMX-3200 that serves as a destination for a data bit stream. It can be a physical device, such as a serial transceiver or a T1 framer, or the controller can be a virtual entity, such as a T1 channel group. -
Page 67: Openvpn Controllers
An OpenVPN controller in the client mode is used to establish a VPN connection between a Remote RMX-3200 client and the Connect SCS server. This VPN connection provides a secure link between remote sites and the protected customer management network. -
Page 68: Interface Descriptions
IP packets to the eight switched Ethernet ports and any bridged WAN port on Remote RMX-3200. The IP address assigned to the bridge interface is Remote RMX-3200’s primary IP address. Until this IP address is configured, Remote RMX-3200 cannot be managed remotely via Telnet or SNMP. -
Page 69: Serial Interfaces
Remote RMX-3200 Version 5.2x Configuration Guide Understanding Controllers and Interfaces: Interface Descriptions Serial Interfaces Interfaces are configurable for both asynchronous and WAN serial ports. T1 or E1 WAN interfaces support one or more channels as part of a single channel group called . - Page 70 Remote RMX-3200 Version 5.2x Configuration Guide Understanding Controllers and Interfaces: Interface Descriptions...
-
Page 71: Chapter 7: Configuring Controllers And Interfaces
Configuring Controllers and Interfaces This chapter provides step-by-step scenarios on how to configure the basic parameters for a T1/E1 serial controller and interface (known as IPCP); a T1/E1 controller as part of a bridge (known as BCP); PPPoE (Point-to-Point Protocol over Ethernet) encapsulation settings; and port based VLAN identifiers. -
Page 72: T1 And E1 Overview
Remote RMX-3200 Version 5.2x Configuration Guide Configuring Controllers and Interfaces: T1 and E1 Overview T1 and E1 Overview Remote RMX-3200 can support a single channel group (called ) of channelized group T1/E1 WAN links. The channel group includes any combination of timeslots 1 to 24 for T1 applications and timeslots 1 to 31 for E1 applications. -
Page 73: Configuring T1/E1 Line Settings
-7.5db Notes: On DAC Remote RMX-3200 models, serial wan/2 buildout is automatically configured based on the serial wan/1 buildout setting. This causes the sum of the line buildout for serial wan/1 and serial wan/2 to not exceed the maximum allowable buildout. - Page 74 Remote RMX-3200 Version 5.2x Configuration Guide Configuring Controllers and Interfaces: Configuring T1/E1 Line Settings 5. (Optional) Verify that controller has been configured properly: serial wan/1 show controller serial wan/1 The command response similar to the following displays (for a T1 controller): (Dub)>show controllers serial wan/1...
-
Page 75: Configuring T1/E1 Controller Channel Group Settings
Remote RMX-3200 Version 5.2x Configuration Guide Configuring Controllers and Interfaces: Configuring T1/E1 Controller Channel Group Settings Configuring T1/E1 Controller Channel Group Settings In this scenario, you will: Configure the controller speed Configure the DS0 channels to include in the channel group ... - Page 76 Remote RMX-3200 Version 5.2x Configuration Guide Configuring Controllers and Interfaces: Configuring T1/E1 Controller Channel Group Settings 4. (optional) Verify that controller has been configured properly: serial wan/1 show controllers serial wan/1 The command response similar to the following displays (for a T1 controller): (Dub)>show controllers serial wan/1...
-
Page 77: Configuring T1/E1 Line Encapsulation Settings
Remote RMX-3200 Version 5.2x Configuration Guide Configuring Controllers and Interfaces: Configuring T1/E1 Line Encapsulation Settings Configuring T1/E1 Line Encapsulation Settings In this scenario, you will: Configure PPP encapsulation for a T1/E1 serial controller (optional) Configure a default route for PPP encapsulation ... - Page 78 Remote RMX-3200 Version 5.2x Configuration Guide Configuring Controllers and Interfaces: Configuring T1/E1 Line Encapsulation Settings 6. Configure maximum number of data bytes that can be transmitted ( ) in a single PPP frame as on controller 5400 serial wan/1 config controller serial wan/1 channel-group group encapsulation ppp mtu 5400 7.
- Page 79 (Dub)> 12. (optional) Configure HDLC encapsulation for controller serial wan/2 config controller serial wan/2 channel-group group encapsulation hdlc Note: Remote RMX-3200 does not support HDLC bridging.
- Page 80 Remote RMX-3200 Version 5.2x Configuration Guide Configuring Controllers and Interfaces: Configuring T1/E1 Line Encapsulation Settings 13. (optional) Verify that the encapsulation settings on controller have serial wan/2 been configured properly: show controllers serial wan/2 The command response similar to the following displays (for a T1 controller): (Dub)>show controllers serial wan/2...
-
Page 81: Configuring T1/E1 Interface Settings
Remote RMX-3200 Version 5.2x Configuration Guide Configuring Controllers and Interfaces: Configuring T1/E1 Interface Settings Configuring T1/E1 Interface Settings This scenario configures an IP interface for static routing of packets to and from T1/E1 link . You will: serial wan/1 ... -
Page 82: Pppoe Overview
PPPoE configuration. Figure 7-1 PPPoE High Level Configuration To create a PPPoE scenario on Remote RMX-3200, you need to first remove an Ethernet controller from the bridge, configure it to have encapsulation for PPP and then configure the associated PPP parameters for the link. -
Page 83: Configuring Pppoe Encapsulation Settings
Remote RMX-3200 Version 5.2x Configuration Guide Configuring Controllers and Interfaces: Configuring PPPoE Encapsulation Settings Configuring PPPoE Encapsulation Settings This scenario establishes PPPoE encapsulation on an Ethernet controller and configures the associated settings. You will: Remove Ethernet controller from the bridge ... - Page 84 Remote RMX-3200 Version 5.2x Configuration Guide Configuring Controllers and Interfaces: Configuring PPPoE Encapsulation Settings 7. (optional) Verify that the Ethernet controller for PPPoE has been configured properly: show controller ethernet 4 The command response similar to the following displays: (Dub)>show controller ethernet 4...
-
Page 85: Port Vlan Overview
VLANs. Networks A, B and C are located on either side of a Connect and a Remote RMX-3200. The traffic on each network is segregated from the other networks, then bundled and sent over a common link between Connect and Remote RMX-3200. -
Page 86: Port Capabilities
Remote RMX-3200 Version 5.2x Configuration Guide Configuring Controllers and Interfaces: Port VLAN Overview Port VLAN Mode Port VLANs are contained within the bridge controller to provide the ability to group ports into separate networks. A port which is a part of a port VLAN uses an 802.1Q tag to identify the VLAN. Traffic received by the port that does not have an 802.1Q tag has the VLAN tag added... -
Page 87: Configuring A Port Vlan
Remote RMX-3200 Version 5.2x Configuration Guide Configuring Controllers and Interfaces: Configuring a Port VLAN Configuring a Port VLAN In this scenario you will configure the mode and the associated port port-vlan VLAN identifier for an Ethernet controller. Note: To configure a VLAN identifier for an Ethernet controller: 1. - Page 88 Remote RMX-3200 Version 5.2x Configuration Guide Configuring Controllers and Interfaces: Configuring a Port VLAN 7-18...
-
Page 89: Chapter 8: Configuring A Site Vpn Connection
This chapter provides a detailed site VPN configuration example. Also included in this chapter are step-by-step scenarios on how to configure the site LAN, the site VPN and how to establish the VPN from the client using the Remote RMX-3200. Guide to this Chapter... -
Page 90: Getting Started
Configuring a Site VPN Connection: Getting Started Getting Started A major feature of the Remote RMX-3200 is the ability to provide secure remote access to site network elements. A site VPN connection can be temporarily established between a client and the Remote RMX-3200. -
Page 91: Configuration Example
In the following example, both Client 1 and Remote RMX-3200 are connected to the Intranet. Redirect on Client 1 uses the IP address of the Remote RMX-3200 on the Intranet to establish the site VPN connection to access Site NE 1 and Site NE 2. - Page 92 The Remote RMX-3200 must be configured with the IP address, protocol and port number that will be used when making connections from the clients to the site network elements. All other traffic will be blocked by the firewall on the Remote RMX-3200.
-
Page 93: Configuring The Site Lan
Remote RMX-3200 Version 5.2x Configuration Guide Configuring a Site VPN Connection: Configuring the Site LAN Configuring the Site LAN Note: The type of interface to be used for the site LAN must be decided upon before a site VPN connection can be configured. In the following scenario, ethernet interface is used. -
Page 94: Configuring The Site Vpn
443 udp 161 config controller openvpn allow-access 192.168.111.101 tcp 20-80 tcp 443 udp 161 Notes: By default, the Remote RMX-3200 blocks all traffic to the site LAN. ICMP ping requests and replies are automatically allowed for each IP address specified. - Page 95 Remote RMX-3200 Version 5.2x Configuration Guide Configuring a Site VPN Connection: Configuring the Site VPN 5. Verify the configuration: show controllers openvpn site The command response similar to the following displays: (Dub)>show controllers openvpn site openvpn site system-name=ovpn_site status=enabled link-state=up...
-
Page 96: Verifying The Vpn Connection From The Client
Verify the number of clients that are connected Note: A connection from the client to the Remote RMX-3200 using Optima or Redirect must first be opened before performing the following procedure. To verify that a client is connected:... -
Page 97: Chapter 9: Configuring The Bridge Group
Configuring the Bridge Group This chapter provides information on how to configure controllers for bridging and how to configure STP on the bridge. Guide to this Chapter Overview Configuring Controllers for Bridging Configuring STP on the Bridge Group... -
Page 98: Overview
Remote RMX-3200 Version 5.2x Configuration Guide Configuring the Bridge Group: Overview Overview Bridging is the forwarding of Ethernet frames. On Remote RMX-3200, there is a single bridge group referred to as . Serial WAN controllers can be added to switch and removed from the bridge group. -
Page 99: Configuring Controllers For Bridging
Remote RMX-3200 Version 5.2x Configuration Guide Configuring the Bridge Group: Configuring Controllers for Bridging Configuring Controllers for Bridging In this scenario, you will: Configure an Ethernet controller as part of the bridge group with a cost priority level ... - Page 100 Remote RMX-3200 Version 5.2x Configuration Guide Configuring the Bridge Group: Configuring Controllers for Bridging 4. (optional) Verify that the controllers on bridge group have been configured switch properly: show controllers bridge switch The command response similar to the following displays: (Dub)>show controllers bridge switch...
-
Page 101: Configuring Stp On The Bridge Group
Remote RMX-3200 Version 5.2x Configuration Guide Configuring the Bridge Group: Configuring STP on the Bridge Group Configuring STP on the Bridge Group In this scenario, you will configure STP settings for the bridge group. To configure STP on the bridge group: 1. - Page 102 Remote RMX-3200 Version 5.2x Configuration Guide Configuring the Bridge Group: Configuring STP on the Bridge Group...
-
Page 103: Chapter 10: Configuring Static Routes
Configuring Static Routes This chapter provides step-by-step scenarios on how to configure static routes in the IP routing table. Guide to this Chapter Adding an IPv4 Static Route to the IP Routing Table Adding a Default IPv4 Static Route to the IP Routing Table Adding an IPv6 Static Route to the IP Routing Table Adding a Default IPv6 Static Route to the IP Routing Table 10-1... -
Page 104: Adding An Ipv4 Static Route To The Ip Routing Table
Remote RMX-3200 Version 5.2x Configuration Guide Configuring Static Routes: Adding an IPv4 Static Route to the IP Routing Table Adding an IPv4 Static Route to the IP Routing Table In this scenario, you will add an IPv4 static route to the IP routing table. -
Page 105: Adding A Default Ipv4 Static Route To The Ip Routing Table
Remote RMX-3200 Version 5.2x Configuration Guide Configuring Static Routes: Adding a Default IPv4 Static Route to the IP Routing Table Adding a Default IPv4 Static Route to the IP Routing Table In this scenario, you will add a default IPv4 static route to the IP routing table. -
Page 106: Adding An Ipv6 Static Route To The Ip Routing Table
Remote RMX-3200 Version 5.2x Configuration Guide Configuring Static Routes: Adding an IPv6 Static Route to the IP Routing Table Adding an IPv6 Static Route to the IP Routing Table In this scenario, you will add an IPv6 static route to the IP routing table. -
Page 107: Adding A Default Ipv6 Static Route To The Ip Routing Table
Note: If an IPv6 router is advertising itself on the network and IPv6 is enabled on the interface, the Remote RMX-3200 route table may include a route which uses the router’s link-local IPV6 address as the default IPv6 static route. - Page 108 Remote RMX-3200 Version 5.2x Configuration Guide Configuring Static Routes: Adding a Default IPv6 Static Route to the IP Routing Table 10-6...
-
Page 109: Chapter 11: Configuring A Wireless Network With Remote Rmx-3200
Configuring a Wireless Network with Remote RMX-3200 This chapter provides information about configuring a wireless network with Remote RMX-3200. Guide to this Chapter Getting Started Sample Configuration Configuring the Wireless Modem Configuring the VPN 11-1... -
Page 110: Getting Started
When operating in a wireless network, Remote RMX-3200 works in conjunction with the following Kentrox products: Connect SCS Connect SCS acts as the VPN server for Remote RMX-3200. For more information about Connect SCS, refer to the Connect SCS Configuration Guide. 11-2... -
Page 111: Initial Setup
Keep-alive packets are sent by both the Remote RMX-3200 and Connect SCS to detect connection failures and to keep an active firewall state. Initial Setup Users must set up the following configurations for Remote RMX-3200 to operate in a wireless network. To set up the initial configurations: 1. - Page 112 Generate a new token Save the token as a file on the laptop Use a local Ethernet connection to the Remote RMX-3200 bridge to transfer the token via FTP/SFTP to file /config/openvpn/bundle/bundle.cfg the Remote RMX-3200 5. Verify that Remote RMX-3200 is connected to the management network.
-
Page 113: Sample Configuration
Configuring a Wireless Network with Remote RMX-3200: Sample Configuration Sample Configuration Figure 11-1 shows Remote RMX-3200 being used in a wireless network with Connect SCS. The SCS acts as the VPN server and Director that manages the VPN client and server. -
Page 114: Configuring The Wireless Modem
Note: The user must upload the chat file to directory on Remote /config/chat RMX-3200 before it is entered as the connect string in the CLI. This is not required if using the initsetup wizard. 3. Assign controller as a resource:... - Page 115 Remote RMX-3200 Version 5.2x Configuration Guide Configuring a Wireless Network with Remote RMX-3200: Configuring the Wireless Modem 4. Configure the following encapsulation settings: Remote method Remote username and password isp@providerx.com PROVIDER1 A default route that uses the same subnet as the corresponding interface ...
- Page 116 Remote RMX-3200 Version 5.2x Configuration Guide Configuring a Wireless Network with Remote RMX-3200: Configuring the Wireless Modem 7. (optional) Verify that the UMTS serial interface has been configured properly: show interfaces serial wan/1 The command response similar to the following displays: (Dub)>show interface serial wan/1...
-
Page 117: Configuring The Vpn
Important: Most users will use the Director SCD extension to either configure the VPN, or to send a configuration bundle (containing the VPN configuration) to Remote RMX-3200. If one of these methods are used to configure the VPN, do not need to do this procedure. - Page 118 Remote RMX-3200 Version 5.2x Configuration Guide Configuring a Wireless Network with Remote RMX-3200: Configuring the VPN 5. Configure IP address and subnet mask length for OpenVPN 192.168.100.80 interface client config interface openvpn client ip address 192.168.100.80/24 The command response similar to the following displays: (Dub)>show interfaces openvpn...
-
Page 119: Chapter 12: Configuring Actions, Events And Responses
Configuring Actions, Events and Responses This chapter provides information about actions, events and responses. Guide to this Chapter Overview Event Components Response Components Action Components Configuring an Event, Response and Action 12-1... -
Page 120: Overview
Configuring Actions, Events and Responses: Overview Overview Actions are rules in Remote RMX-3200 that provide a flexible mechanism for managing system mediation by letting users associate events and responses. Actions provide the ability to configure an extensive range of behavior in response to external or internal events. - Page 121 MyActions’s event (MyEvent) occurs. Figure 12-1 Sequence of Events Note: Several commands exist in the Remote RMX-3200 CLI that display diagnostic information related to actions: show actions show events show...
-
Page 122: Event Components
An event type, which is a system occurrence that signifies the event. Options for the event type vary based on the event originator. Note: For more information about event configuration commands and parameters, refer to the Remote RMX-3200 Command Reference Guide. 12-4... -
Page 123: Response Components
A response type, which defines what the response does when the associated event occurs. Options for the response type vary based on the responder. Note: For more information about response configuration commands and parameters, refer to the Remote RMX-3200 Command Reference Guide. 12-5... -
Page 124: Action Components
An event name, which is a previously user-defined name of an event. The response name, which is a previously user-defined name of a response. Note: For more information about this command, refer to the Remote RMX-3200 Command Reference Guide. 12-6... -
Page 125: Configuring An Event, Response And Action
0/3 open config response Output0_3 content output 0/3 open Note: For information about specific responders and response types, refer to the response configuration commands in the Remote RMX-3200 Command Reference Guide. 3. Configure action with event and response... - Page 126 Remote RMX-3200 Version 5.2x Configuration Guide Configuring Actions, Events and Responses: Configuring an Event, Response and Action 4. (optional) Verify that the action has been configured properly: show actions Chassis_Temp_High The command response similar to the following displays: (Dub)>show actions Chassis_Temp_High...
-
Page 127: Chapter 13: Configuring Technician Laptop Access For Remote Rmx-3200
Configuring Technician Laptop Access for Remote RMX-3200 This chapter provides information on configuring Remote RMX-3200 network access to locally- connected technician laptops. Guide to this Chapter Configuration Overview Assigning IP Addresses to Technician Laptops Configuring IPTables for Network Address Translation... -
Page 128: Configuration Overview
Remote RMX-3200 Version 5.2x Configuration Guide Configuring Technician Laptop Access for Remote RMX-3200: Configuration Overview Configuration Overview Figure 13-1 displays what happens when a technician’s laptop accesses the network by connecting to Remote RMX-3200. 64.152.3.27 (Public Address) IP Network Server... - Page 129 Configuring Technician Laptop Access for Remote RMX-3200: Configuration Overview When the technician’s laptop is connected to one of the Ethernet ports on Remote RMX-3200, the DHCP server automatically assigns an IP address to the laptop. IP addresses that may be assigned to the technician’s laptop are configured using DHCP server configuration commands in the Remote RMX-3200 CLI.
-
Page 130: Assigning Ip Addresses To Technician Laptops
Remote RMX-3200 Version 5.2x Configuration Guide Configuring Technician Laptop Access for Remote RMX-3200: Assigning IP Addresses to Technician Laptops Assigning IP Addresses to Technician Laptops Remote RMX-3200 uses the DHCP server to assign IP addresses to network devices. CLI commands are entered to specify valid ranges of IP addresses that may be assigned. - Page 131 Remote RMX-3200 Version 5.2x Configuration Guide Configuring Technician Laptop Access for Remote RMX-3200: Assigning IP Addresses to Technician Laptops 6. Configure the DHCP server IP address range as 10.10.10.7 10.10.10.12 config dhcp-server subnet 10.10.10.0/24 range 10.10.10.7 10.10.10.12 Note: When the DHCP server assigns IP addresses to network devices, it automatically starts with the highest value IP address in the range.
-
Page 132: Configuring Iptables For Network Address Translation
Remote RMX-3200 Version 5.2x Configuration Guide Configuring Technician Laptop Access for Remote RMX-3200: Configuring IPTables for Network Address Translation Configuring IPTables for Network Address Translation IPTables rules must be configured to enable network address translation for laptops on the private network. Without NAT, devices with private addresses cannot send packets to devices outside the LAN. - Page 133 Remote RMX-3200 Version 5.2x Configuration Guide Configuring Technician Laptop Access for Remote RMX-3200: Configuring IPTables for Network Address Translation 4. Configure a rule in the chain that masquerades all packets from POSTROUTING source subnet 10.10.10.0/24 config iptables -t nat -A POSTROUTING -s 10.10.10.0/24 -p tcp -j MASQUERADE 5.
- Page 134 Remote RMX-3200 Version 5.2x Configuration Guide Configuring Technician Laptop Access for Remote RMX-3200: Configuring IPTables for Network Address Translation 13-8...
-
Page 135: Chapter 14: Configuring Event Correlations
Configuring Event Correlations This chapter provides information about configuring event correlations. Guide to this Chapter Overview Correlation Expression Components Configuring an Event Correlation 14-1... -
Page 136: Overview
Event correlation is the ability to identify a unique condition by comparing the states of multiple events and aggregating into a single event. The goals of Remote RMX-3200 event correlation are to: Report the correlated condition to a network management system ... -
Page 137: Correlation Expression Components
A Term in a correlation expression is used to test the current state of an originator. The Term consists collectively of the following elements: Originator Type, which is one of the Remote RMX-3200 event originator types. The type can also be , which refers to other event correlations. -
Page 138: Operators
Remote RMX-3200 Version 5.2x Configuration Guide Configuring Event Correlations: Correlation Expression Components Examples Examples of these components combined are shown below: analog 12/1 high correlation examplecorr false measurement ExtTemp1 > 90 Operators The valid operators that can be used in a correlation expression are listed in the following table, along with possible usages and example results for each. -
Page 139: Configuring A Time Period (Optional)
Remote RMX-3200 Version 5.2x Configuration Guide Configuring Event Correlations: Correlation Expression Components Example Expressions The examples below show various forms of Terms in nested expressions. all input 0/1-4 open and ( analog 0/1 loss-of-signal or analog 0/1 low ) ... -
Page 140: Configuring An Event Correlation
Remote RMX-3200 Version 5.2x Configuration Guide Configuring Event Correlations: Configuring an Event Correlation Configuring an Event Correlation In this scenario, you will: Configure a correlation expression for two open door alarm events Configure the time (duration) for which the expression must remain true or false before the correlation matches the expression’s state... - Page 141 Remote RMX-3200 Version 5.2x Configuration Guide Configuring Event Correlations: Configuring an Event Correlation To configure the alarm table entry for the open door correlation: 1. At the main prompt, configure the alarm entry name dooropen config alarm-entry dooropen 2. Configure the alarm entry...
- Page 142 Remote RMX-3200 Version 5.2x Configuration Guide Configuring Event Correlations: Configuring an Event Correlation 14-8...
-
Page 143: Chapter 15: Configuring Alarm Entries In The Central Alarm Table
Configuring Alarm Entries in the Central Alarm Table This chapter provides an overview of the central alarm table along with step-by-step scenarios for configuring and using alarm entries in the central alarm table. Guide to this Chapter Overview Alarm Protocol Formats Configuring an Alarm Entry for a Temperature Sensor Configuring an Alarm Entry for a Discrete Input Configuring an Alarm Entry for Ethernet Interface MAC Security Violations... -
Page 144: Overview
Configuring Alarm Entries in the Central Alarm Table: Overview Overview The central alarm table collects and communicates the state of all alarms reported by Remote RMX-3200. It is a table of alarm entries that contains information for each attainable severity level and has the following features: ... -
Page 145: Alarm Protocol Formats
The central alarm table supports raw alarm output that can be used for alarm formats that are not directly supported by Remote RMX-3200. A script or application can take the alarm information from the raw output and translate it into any type of alarm message. -
Page 146: Configuring An Alarm Entry For A Temperature Sensor
Remote RMX-3200 Version 5.2x Configuration Guide Configuring Alarm Entries in the Central Alarm Table: Configuring an Alarm Entry for a Temperature Sensor Configuring an Alarm Entry for a Temperature Sensor In this scenario, you will: Configure an alarm entry description ... - Page 147 Remote RMX-3200 Version 5.2x Configuration Guide Configuring Alarm Entries in the Central Alarm Table: Configuring an Alarm Entry for a Temperature Sensor 7. Configure an event for alarm entry with the following settings: tempSensor Event originator analog 0/1 ...
-
Page 148: Configuring Analog Input Values
Remote RMX-3200 Version 5.2x Configuration Guide Configuring Alarm Entries in the Central Alarm Table: Configuring an Alarm Entry for a Temperature Sensor 10. (optional) Verify that the alarm entry has been configured properly: show alarm-entries name tempSensor The command response appears similar to the following: (Dub)>show alarm-entries name tempSensor... - Page 149 Remote RMX-3200 Version 5.2x Configuration Guide Configuring Alarm Entries in the Central Alarm Table: Configuring an Alarm Entry for a Temperature Sensor Table 15-1 Analog Averaging Values Measurement Value Description Example Provides the most averaging, but provides Temperature/Humidity high slower response to rapid changes in the measured value.
-
Page 150: Configuring An Alarm Entry For A Discrete Input
Remote RMX-3200 Version 5.2x Configuration Guide Configuring Alarm Entries in the Central Alarm Table: Configuring an Alarm Entry for a Discrete Input Configuring an Alarm Entry for a Discrete Input In this scenario, you will: Configure an alarm entry description ... - Page 151 Remote RMX-3200 Version 5.2x Configuration Guide Configuring Alarm Entries in the Central Alarm Table: Configuring an Alarm Entry for a Discrete Input 4. Configure an event for alarm entry with the following settings: input0_1 Event originator input 0/1 ...
-
Page 152: Configuring An Alarm Entry For Ethernet Interface Mac Security Violations
Remote RMX-3200 Version 5.2x Configuration Guide Configuring Alarm Entries in the Central Alarm Table: Configuring an Alarm Entry for Ethernet Interface MAC Security Violations Configuring an Alarm Entry for Ethernet Interface MAC Security Violations In this scenario, you will: ... - Page 153 Remote RMX-3200 Version 5.2x Configuration Guide Configuring Alarm Entries in the Central Alarm Table: Configuring an Alarm Entry for Ethernet Interface MAC Security Violations 6. (optional) Verify that the alarm entry has been configured properly: show alarm-entries name MACviolation The command response appears similar to the following: (Dub)>show alarm-entries name MACviolation...
-
Page 154: Configuring An Alarm Entry For A Serial Connection Failure
Remote RMX-3200 Version 5.2x Configuration Guide Configuring Alarm Entries in the Central Alarm Table: Configuring an Alarm Entry for a Serial Connection Failure Configuring an Alarm Entry for a Serial Connection Failure In this scenario, you will: Configure an alarm entry description ... - Page 155 Remote RMX-3200 Version 5.2x Configuration Guide Configuring Alarm Entries in the Central Alarm Table: Configuring an Alarm Entry for a Serial Connection Failure 4. (optional) Verify that the alarm entry has been configured properly: show alarm-entries name SerConnFail The command response appears similar to the following: (Dub)>show alarm-entries name SerConnFail...
-
Page 156: Configuring An Alarm Entry For A Power Supply Failure
Remote RMX-3200 Version 5.2x Configuration Guide Configuring Alarm Entries in the Central Alarm Table: Configuring an Alarm Entry for a Power Supply Failure Configuring an Alarm Entry for a Power Supply Failure In this scenario, you will: Configure an alarm entry description ... - Page 157 Remote RMX-3200 Version 5.2x Configuration Guide Configuring Alarm Entries in the Central Alarm Table: Configuring an Alarm Entry for a Power Supply Failure 4. (optional) Verify that the alarm entry has been configured properly: show alarm-entries name powerFail5 The command response appears similar to the following: (Dub)>show alarm-entries name powerFail5...
-
Page 158: Configuring An Alarm Entry For A Tcp Connection That Goes Down
Remote RMX-3200 Version 5.2x Configuration Guide Configuring Alarm Entries in the Central Alarm Table: Configuring an Alarm Entry for a TCP Connection that Goes Down Configuring an Alarm Entry for a TCP Connection that Goes Down In this scenario, you will: ... - Page 159 Remote RMX-3200 Version 5.2x Configuration Guide Configuring Alarm Entries in the Central Alarm Table: Configuring an Alarm Entry for a TCP Connection that Goes Down 4. (optional) Verify that the alarm entry has been configured properly: show alarm-entries name TCPConnDown The command response appears similar to the following: (Dub)>show alarm-entries name TCPConnDown...
-
Page 160: Configuring An Alarm Entry For A Telnet Connection That Comes Up
Remote RMX-3200 Version 5.2x Configuration Guide Configuring Alarm Entries in the Central Alarm Table: Configuring an Alarm Entry for a Telnet Connection that Comes Up Configuring an Alarm Entry for a Telnet Connection that Comes Up In this scenario, you will: ... - Page 161 Remote RMX-3200 Version 5.2x Configuration Guide Configuring Alarm Entries in the Central Alarm Table: Configuring an Alarm Entry for a Telnet Connection that Comes Up 4. (optional) Verify that the alarm entry has been configured properly: show alarm-entries name TelnetConnUp The command response appears similar to the following: (Dub)>show alarm-entries name TelnetConnUp...
-
Page 162: Testing Alarm Table Configurations
Remote RMX-3200 Version 5.2x Configuration Guide Configuring Alarm Entries in the Central Alarm Table: Testing Alarm Table Configurations Testing Alarm Table Configurations After you configure alarm table entries, you can simulate test traps from the alarm table to test your alarm table configurations before actual alarm traps are sent. Test mode traps are sent to the management station. -
Page 163: Chapter 16: Configuring Measurements And The Measurement Table
Configuring Measurements and the Measurement Table This chapter provides an overview of the Remote RMX-3200’s measurement table and step-by- step scenarios for configuring a measurement table entry, an alarm entry for a measurement and an event correlation for a measurement. -
Page 164: Overview
Optima. These measurement values can be sourced from one of the Remote RMX-3200’s analog inputs, from a script running on the Remote RMX-3200 that monitors an attached network element, or via SNMP from a network element that is monitored by SNMP proxy. -
Page 165: Use For Measuring State Transitions And Durations
Use with Alarm Table Entries Measurement table entries can be used in connection with Remote RMX-3200’s alarm table. You can set up alarm entries with different events that are triggered in response to fluctuations in the current state of a measurement. -
Page 166: Use With Proxied Snmp Nes
Remote RMX-3200 Version 5.2x Configuration Guide Configuring Measurements and the Measurement Table: Overview Use with Proxied SNMP NEs Chapter 22: Configuring the SNMP Proxy for information on how to use the measurement table with proxied SNMP NEs. Relevant topics include... -
Page 167: Configuring A Measurement Table Entry For A Temperature Sensor
Remote RMX-3200 Version 5.2x Configuration Guide Configuring Measurements and the Measurement Table: Configuring a Measurement Table Entry for a Temperature Sensor Configuring a Measurement Table Entry for a Temperature Sensor In this scenario, you will: Configure a measurement table entry with name and description ... -
Page 168: Sample Configuration For Sitebus Temperature Sensor
Remote RMX-3200 Version 5.2x Configuration Guide Configuring Measurements and the Measurement Table: Configuring a Measurement Table Entry for a Temperature Sensor 10. (optional) Verify that the measurement table entry has been configured properly: show meas-table entries ExtTemp1 The command response similar to the following displays: (Dub)>show meas-table entries ExtTemp1... -
Page 169: Configuring An Alarm Entry For A Measurement
Remote RMX-3200 Version 5.2x Configuration Guide Configuring Measurements and the Measurement Table: Configuring an Alarm Entry for a Measurement Configuring an Alarm Entry for a Measurement In this scenario, you will: Configure an alarm entry description and category ... - Page 170 Remote RMX-3200 Version 5.2x Configuration Guide Configuring Measurements and the Measurement Table: Configuring an Alarm Entry for a Measurement 6. Configure an event for alarm entry with the following settings: ExtTemp Event originator measurement ExtTemp1 Event trigger ...
- Page 171 Remote RMX-3200 Version 5.2x Configuration Guide Configuring Measurements and the Measurement Table: Configuring an Alarm Entry for a Measurement 10. (optional) Verify that the alarm entry has been configured properly: show alarm-entries name ExtTemp The command response similar to the following displays: (Dub)>show alarm-entries name ExtTemp...
-
Page 172: Configuring A Measurement Table Entry For State Transitions And Durations
Remote RMX-3200 Version 5.2x Configuration Guide Configuring Measurements and the Measurement Table: Configuring a Measurement Table Entry for State Transitions and Durations Configuring a Measurement Table Entry for State Transitions and Durations In this scenario, you will: Configure a measurement table entry with name and description ... - Page 173 Remote RMX-3200 Version 5.2x Configuration Guide Configuring Measurements and the Measurement Table: Configuring a Measurement Table Entry for State Transitions and Durations The command response similar to the following displays: (Dub)>show meas-table entries ExtTemp1_Transitions Name – ExtTemp1_Transitions (static) State – in-band Originator - @state-transitions ( alarm-entry ExtTemp1 , major ) Description –...
-
Page 174: Configuring An Event Correlation For A Measurement
Remote RMX-3200 Version 5.2x Configuration Guide Configuring Measurements and the Measurement Table: Configuring an Event Correlation for a Measurement Configuring an Event Correlation for a Measurement In this scenario, you will: Configure a correlation expression for fire danger, when a measurement from a... - Page 175 Remote RMX-3200 Version 5.2x Configuration Guide Configuring Measurements and the Measurement Table: Configuring an Event Correlation for a Measurement To configure the alarm table entry for the fire danger correlation: 1. At the main prompt, configure the alarm entry name...
- Page 176 Remote RMX-3200 Version 5.2x Configuration Guide Configuring Measurements and the Measurement Table: Configuring an Event Correlation for a Measurement 16-14...
-
Page 177: Chapter 17: Configuring Mediation Connections
Configuring Mediation Connections This chapter provides information about how to configure mediation connections, events, responses and actions. Guide to this Chapter Overview Secure Terminal Server Access Configuring a TCP to Asynchronous Serial Connection Configuring a Telnet to Asynchronous Serial Connection Configuring a SSH to Asynchronous Serial Connection Configuring an Asynchronous Serial to Asynchronous Serial Connection Configuring an Asynchronous Serial to TCP Connection... -
Page 178: Overview
Remote RMX-3200 Version 5.2x Configuration Guide Configuring Mediation Connections: Overview Overview Mediation connections allow you to connect different protocols. Examples of mediation connections include: Asynchronous to TCP connections and TCP to asynchronous connections Asynchronous to asynchronous connections ... -
Page 179: Secure Terminal Server Access
The secure terminal server access feature provides a layer of encryption and authentication, creating a secure connection from a workstation to Remote RMX-3200 to access a connected NE. The connection from Remote RMX-3200 to the NEs is not secure. The Secure Shell Protocol (SSH) is used to provide the secure connection and is suitable for both an interactive user session via a client like PuTTY or through any available SSH client library. -
Page 180: Terminal Server User Access
FTP. TACACS+ Configuration If your Remote RMX-3200 is configured for TACACS+, authorization and accounting of the secure terminal server login is performed according to your Remote RMX- 3200’s configuration. -
Page 181: Configuring A Tcp To Asynchronous Serial Connection
Remote RMX-3200 Version 5.2x Configuration Guide Configuring Mediation Connections: Configuring a TCP to Asynchronous Serial Connection Configuring a TCP to Asynchronous Serial Connection In this scenario, you will configure a mediation connection between a TCP port and an asynchronous serial controller. You will set up an action, event and response that cause the TCP port and controller to connect. - Page 182 Remote RMX-3200 Version 5.2x Configuration Guide Configuring Mediation Connections: Configuring a TCP to Asynchronous Serial Connection 5. Configure controller to connect and disconnect as goes active and serial 4 inactive: config controller serial 4 connect mode dcd config controller serial 4 disconnect mode dcd 6.
-
Page 183: Configuring A Telnet To Asynchronous Serial Connection
Remote RMX-3200 Version 5.2x Configuration Guide Configuring Mediation Connections: Configuring a Telnet to Asynchronous Serial Connection Configuring a Telnet to Asynchronous Serial Connection In this scenario, you will configure a mediation connection between a Telnet port and an asynchronous serial controller. You will set up an action, event and response that cause the Telnet port and controller to connect. - Page 184 Remote RMX-3200 Version 5.2x Configuration Guide Configuring Mediation Connections: Configuring a Telnet to Asynchronous Serial Connection 5. (optional) Verify that the Telnet to asynchronous connection has been configured properly: show actions telnetToSerial The command response similar to the following displays: (Dub)>show actions telnetToSerial...
-
Page 185: Configuring A Ssh To Asynchronous Serial Connection
Remote RMX-3200 Version 5.2x Configuration Guide Configuring Mediation Connections: Configuring a SSH to Asynchronous Serial Connection Configuring a SSH to Asynchronous Serial Connection In this scenario, you will configure a mediation connection between an SSH port and an asynchronous serial controller. You will set up an action, event and response that cause the SSH port and controller to connect. - Page 186 Remote RMX-3200 Version 5.2x Configuration Guide Configuring Mediation Connections: Configuring a SSH to Asynchronous Serial Connection 5. Configure controller to connect and disconnect as goes active and serial 6 inactive: config controller serial 6 connect mode dcd config controller serial 6 disconnect mode dcd 6.
-
Page 187: Configuring An Asynchronous Serial To Asynchronous Serial Connection
Remote RMX-3200 Version 5.2x Configuration Guide Configuring Mediation Connections: Configuring an Asynchronous Serial to Asynchronous Serial Connection Configuring an Asynchronous Serial to Asynchronous Serial Connection In this scenario, you will configure a mediation connection between two asynchronous serial controllers. You will set up an action,... - Page 188 Remote RMX-3200 Version 5.2x Configuration Guide Configuring Mediation Connections: Configuring an Asynchronous Serial to Asynchronous Serial Connection 5. (optional) At the main prompt, configure controller with application serial 1 mode destination config controller serial 1 application destination Note: By default, asynchronous serial controllers are configured to act as both sources and destinations for connections, which makes configuration of this command optional.
- Page 189 Remote RMX-3200 Version 5.2x Configuration Guide Configuring Mediation Connections: Configuring an Asynchronous Serial to Asynchronous Serial Connection 9. (optional) Verify that the serial controllers have been configured properly: show controllers serial 1 The command response similar to the following displays: (Dub)>show controllers serial 1...
-
Page 190: Configuring An Asynchronous Serial To Tcp Connection
Remote RMX-3200 Version 5.2x Configuration Guide Configuring Mediation Connections: Configuring an Asynchronous Serial to TCP Connection Configuring an Asynchronous Serial to TCP Connection In this scenario, you will configure a mediation connection between an asynchronous serial controller and a TCP port. You will set up an action, event and response that cause the controller and TCP port to connect. - Page 191 Remote RMX-3200 Version 5.2x Configuration Guide Configuring Mediation Connections: Configuring an Asynchronous Serial to TCP Connection 6. (optional) Verify that a connection is established: show connections The command response similar to the following displays: (Dub)>show connections serial 3 -> tcp 10.40.57.5:5001 (Dub)>...
- Page 192 Remote RMX-3200 Version 5.2x Configuration Guide Configuring Mediation Connections: Configuring an Asynchronous Serial to TCP Connection 17-16...
-
Page 193: Chapter 18: Configuring And Connecting Tl1 Infrastructure
Configuring and Connecting TL1 Infrastructure This chapter provides information about how to configure a TL1 multiplexer and a virtual TL1 NE. This chapter also provides step-by-step scenarios on how to configure a meditation connection from a TL1 multiplexer to an NE with a TCP or asynchronous connection and how to configure a virtual TL1 NE to establish a meditation connection to a TL1 multiplexer. -
Page 194: Overview
The TL1 infrastructure on Remote RMX-3200 consists of TL1 multiplexers and virtual TL1 NEs (VNEs). A TL1 multiplexer is a software component that uses TIDs to multiplex several TL1 data streams onto a single TCP connection. It can be configured to connect to varbinds, real TL1 NEs and scripts that generate TL1. -
Page 195: Configuring A Tl1 Multiplexer
Remote RMX-3200 Version 5.2x Configuration Guide Configuring and Connecting TL1 Infrastructure: Configuring a TL1 Multiplexer Configuring a TL1 Multiplexer In this scenario, you will: Configure a mediation connection from the TL1 multiplexer to a Varbind (VNE) Configure a TCP mediation connection from the TL1 multiplexer to a real NE ... -
Page 196: Configuring A Virtual Tl1 Ne
Remote RMX-3200 Version 5.2x Configuration Guide Configuring and Connecting TL1 Infrastructure: Configuring a Virtual TL1 NE Configuring a Virtual TL1 NE In this scenario, you will configure the login information, and message settings for a virtual TL1 NE. Note: A virtual NE listens for a connection from a... -
Page 197: Configuring The Tcp Port For A Tl1 Multiplexer
Configure an action that associates the event with the response. When Remote RMX-3200 receives the incoming TCP connection, the action connects it to the TL1 multiplexer. To configure an incoming TCP connection to connect to a TL1 multiplexer using events, responses and actions: 1. -
Page 198: Configuring A Telnet Connection To A Tl1 Multiplexer
Remote RMX-3200 Version 5.2x Configuration Guide Configuring and Connecting TL1 Infrastructure: Configuring a Telnet Connection to a TL1 Multiplexer Configuring a Telnet Connection to a TL1 Multiplexer In this scenario, you will: Configure an event to signal that an incoming Telnet connection request has been received on a port ... -
Page 199: Configuring A Telnet Connection To A Virtual Tl1 Ne
Remote RMX-3200 Version 5.2x Configuration Guide Configuring and Connecting TL1 Infrastructure: Configuring a Telnet Connection to a Virtual TL1 NE Configuring a Telnet Connection to a Virtual TL1 NE In this scenario, you will: Configure an event to signal that an incoming Telnet connection request has been received on a port ... - Page 200 Remote RMX-3200 Version 5.2x Configuration Guide Configuring and Connecting TL1 Infrastructure: Configuring a Telnet Connection to a Virtual TL1 NE 18-8...
-
Page 201: Chapter 19: Configuring Dhcp
Configuring DHCP This chapter provides information on configuring the DHCP server with an associated host and subnet and configuring DHCP client support. Guide to this Chapter DHCP Server Overview Configuring a DHCP Server Configuring a DHCP Server Subnet Configuring a Host on a DHCP Server Configuring BOOTP/DHCP Relay Configuring DHCP Client Support 19-1... -
Page 202: Dhcp Server Overview
This reduces the amount of configuration required from the user to gain network access to a Remote RMX-3200 and centralizes the control of IP address to a single DHCP server. With the DHCP client enabled on an interface, Remote RMX-3200 has the ability to dynamically configure an interface's IP address, DNS server information, domain name information and NTP server information. -
Page 203: Configuring A Dhcp Server
Remote RMX-3200 Version 5.2x Configuration Guide Configuring DHCP: Configuring a DHCP Server Configuring a DHCP Server In this scenario, you will: Enable DHCP authority mode Enable DHCP broadcast mode Configure the DHCP server to use a configuration file ... - Page 204 (Dub)> 6. Save the configuration. Tip: Remote RMX-3200 lets you specify a DHCP server configuration file. This file overrides any DHCP server settings configured in the Remote RMX-3200 CLI. If you do not specify the correct DHCP server configuration file, Remote RMX- 3200 generates an error.
-
Page 205: Configuring A Dhcp Server Subnet
Remote RMX-3200 Version 5.2x Configuration Guide Configuring DHCP: Configuring a DHCP Server Subnet Configuring a DHCP Server Subnet In this scenario, you will set up the following items for a DHCP server subnet: Configure a maximum lease time ... - Page 206 Remote RMX-3200 Version 5.2x Configuration Guide Configuring DHCP: Configuring a DHCP Server Subnet 6. (optional) Verify that the DHCP server has been configured properly: show dhcp-server The command response similar to the following displays: (Dub)>show dhcp-server Admin State: disabled Broadcast:...
-
Page 207: Configuring A Host On A Dhcp Server
Remote RMX-3200 Version 5.2x Configuration Guide Configuring DHCP: Configuring a Host on a DHCP Server Configuring a Host on a DHCP Server In this scenario, you will: Configure a DHCP server host Configure a host hardware address ... -
Page 208: Configuring Bootp/Dhcp Relay
Configuring BOOTP/DHCP Relay In this scenario, you will configure the BOOTP/DHCP server and enable BOOTP/DHCP relay. When BOOTP/DHCP relay is enabled, Remote RMX-3200 acts as a BOOTP/DHCP relay agent; it passes BOOTP/DHCP configuration information between BOOTP/DHCP clients and servers. To configure and enable BOOTP/DHCP relay: 1. -
Page 209: Configuring Dhcp Client Support
Configuring DHCP: Configuring DHCP Client Support Configuring DHCP Client Support In this scenario, you will enable DHCP client support and configure a ten-minute interval for Remote RMX-3200 to retry contacting the DHCP server. Note: DHCP client support cannot be enabled on the bridge group... - Page 210 Remote RMX-3200 Version 5.2x Configuration Guide Configuring DHCP: Configuring DHCP Client Support 19-10...
-
Page 211: Chapter 20: Configuring Relay Outputs
Configuring Relay Outputs This chapter provides information about how to configure relay outputs. Guide to this Chapter Overview Configuring the Mediation TL1 Command Configuring TL1 Commands to Control a Relay Output Configuring SNMP to Operate a Relay Output Directly Controlling a Relay Output 20-1... -
Page 212: Overview
Remote RMX-3200 Version 5.2x Configuration Guide Configuring Relay Outputs: Overview Overview In this chapter, you will complete a scenario that activates a relay output using a TL1 command. You will configure a Varbind (VNE) to generate an event when it receives a specific command. -
Page 213: Configuring The Mediation Tl1 Command
In this scenario, you will configure a fan control application that supports configured TL1 commands OPR-EXT-CONT and RLS-EXT-CONT. Note: For information about valid default Remote RMX-3200 TL1 commands, refer Chapter 28: Remote RMX-3200 TL1 Commands. All available TL1 commands are documented in the Telcordia GR 833-CORE documentation. -
Page 214: Configuring Tl1 Commands To Control A Relay Output
Remote RMX-3200 Version 5.2x Configuration Guide Configuring Relay Outputs: Configuring TL1 Commands to Control a Relay Output Configuring TL1 Commands to Control a Relay Output In this scenario, you will: Configure events that occur when specific TL1 commands are received on a virtual TL1 NE ... - Page 215 Remote RMX-3200 Version 5.2x Configuration Guide Configuring Relay Outputs: Configuring TL1 Commands to Control a Relay Output 8. (optional) Verify that action has been configured properly: fanOnAction show actions fanOnAction The command response similar to the following displays: (Dub)>show actions fanOnAction...
-
Page 216: Configuring Snmp To Operate A Relay Output
Remote RMX-3200 Version 5.2x Configuration Guide Configuring Relay Outputs: Configuring SNMP to Operate a Relay Output Configuring SNMP to Operate a Relay Output In this scenario, you will: Configure SNMP events to generate manager sets Configure relay output close and open responses ... - Page 217 Remote RMX-3200 Version 5.2x Configuration Guide Configuring Relay Outputs: Configuring SNMP to Operate a Relay Output 7. (optional) Verify that action has been configured properly: snmpOutputClose show actions snmpOutputClose The command response similar to the following displays: (Dub)>show actions snmpOutputClose...
-
Page 218: Directly Controlling A Relay Output
The command response similar to the following displays: (Dub)>show discrete outputs 0/4 - 0/4 Description Resource State - unassigned Value - open (Dub)> Note: For details on the operation of the output relays for Remote RMX-3200, see the Remote RMX-3200 Installation Guide. 20-8... -
Page 219: Chapter 21: Configuring Tbos Settings
Configuring TBOS Settings This chapter provides background information and examples to assist users when configuring TBOS on Remote RMX-3200. Guide to this Chapter Overview Loading a TBOS Definition File Configuring TBOS Polling Settings Configuring an Equipment Type for a TBOS Display Configuring the TBOS “Points All”... -
Page 220: Overview
Remote RMX-3200 Version 5.2x Configuration Guide Configuring TBOS Settings: Overview Overview The following TBOS features are implemented on Remote RMX-3200: TBOS Alarm/Status Point Management TBOS Control Point Management TBOS Definition File Support Central Alarm Table Support ... -
Page 221: Tbos Definition File Support
A TBOS definition file can contain multiple TBOS equipment type definitions, which can each define up to 64 total alarm and control points. After the TBOS definition file has been loaded onto Remote RMX-3200 (on directory ), the /config/tbos equipment type definitions listed in the file can be applied to TBOS displays. -
Page 222: Central Alarm Table Support
To apply TBOS equipment types, you have to load the TBOS definition file into Remote RMX-3200 memory from either the Remote RMX-3200 file system or from a server file system. When you reboot Remote RMX-3200, the TBOS definition file is erased from memory. You must reload it before you reapply TBOS equipment types to displays. -
Page 223: Aid And Tl1 Ne Support
TBOS TL1 definition file. For more information on this feature, refer to section Manually Configuring TBOS Display Points on page 21-11 and command config tbos port serial display in the Remote RMX-3200 Command Reference Guide. points 21-5... -
Page 224: Loading A Tbos Definition File
Configuring TBOS Settings: Loading a TBOS Definition File Loading a TBOS Definition File A user can load a definition file either by transferring the file to Remote RMX-3200’s TBOS configuration directory ( ) and loading the file, or by loading the /config/tbos file from a central server. -
Page 225: Configuring Tbos Polling Settings
Note: The entered poll delay time is in tenths of seconds. 2. Set to seconds the amount of time Remote RMX-3200 waits for a response before moving on to the next poll: config tbos port serial 1 response-timeout 120 ... -
Page 226: Configuring An Equipment Type For A Tbos Display
Remote RMX-3200 Version 5.2x Configuration Guide Configuring TBOS Settings: Configuring an Equipment Type for a TBOS Display Configuring an Equipment Type for a TBOS Display In this scenario, you will: Configure a TBOS port description for a TBOS serial port. - Page 227 Remote RMX-3200 Version 5.2x Configuration Guide Configuring TBOS Settings: Configuring an Equipment Type for a TBOS Display 4. Enable polling on display 1 serial 1 config tbos port serial 1 display 1 enable config tbos port serial 1 enable 5. Enable SNMP traps in the central alarm table: config alarm-entry * trap enable 6.
-
Page 228: Configuring The Tbos "Points All" Method
Remote RMX-3200 Version 5.2x Configuration Guide Configuring TBOS Settings: Configuring the TBOS “Points All” Method Configuring the TBOS “Points All” Method In this scenario, you will configure the TBOS “points all” method for a display. The “points all” method configures generic default values for all points on a TBOS display, as well as all corresponding alarm entries. -
Page 229: Manually Configuring Tbos Display Points
Remote RMX-3200 Version 5.2x Configuration Guide Configuring TBOS Settings: Manually Configuring TBOS Display Points Manually Configuring TBOS Display Points Note: Manually configuring TBOS points is not a common procedure. Generally, TBOS points are configured using equipment types from a TBOS definition file. - Page 230 Remote RMX-3200 Version 5.2x Configuration Guide Configuring TBOS Settings: Manually Configuring TBOS Display Points 7. (optional) Verify that the TBOS display point has been configured properly: show tbos port serial 5 display 2 point 6 The command response similar to the following displays: (Dub)>show tbos port serial 5 display 2 point 6...
-
Page 231: Configuring Cut-Through Support
Remote RMX-3200 Version 5.2x Configuration Guide Configuring TBOS Settings: Configuring Cut-Through Support Configuring Cut-Through Support In this scenario, you will configure cut-through support from a TBOS serial port to a TCP port. To configure cut-through support: 1. Configure cut-through from TBOS serial port... -
Page 232: Configuring A Tbos Control Response With An Event
Remote RMX-3200 Version 5.2x Configuration Guide Configuring TBOS Settings: Configuring a TBOS Control Response with an Event Configuring a TBOS Control Response with an Event In this scenario, you will: Configure an event to occur when an input closes. - Page 233 Remote RMX-3200 Version 5.2x Configuration Guide Configuring TBOS Settings: Configuring a TBOS Control Response with an Event 6. (optional) Verify that the action has been configured properly: show actions systemPower The command response similar to the following displays: (Dub)>show actions systemPower...
- Page 234 Remote RMX-3200 Version 5.2x Configuration Guide Configuring TBOS Settings: Configuring a TBOS Control Response with an Event 21-16...
-
Page 235: Chapter 22: Configuring The Snmp Proxy
Configuring the SNMP Proxy This chapter provides information about how to configure the Remote RMX-3200 SNMP Proxy feature. Guide to this Chapter SNMP Proxy Feature Overview SNMP Proxy Configuration Information Configuring a Mediation SNMP Event Template Configuring a Mediation SNMP Point Template... -
Page 236: Snmp Proxy Feature Overview
The Remote RMX-3200 SNMP Proxy feature allows for virtual network elements (NEs) to represent devices which are subtended from Remote RMX-3200. Remote RMX-3200 acts as the SNMP manager for the real NE. This means that an NE can be “hidden” on the network, yet still monitored by Remote RMX-3200. -
Page 237: Snmp Proxy Configuration Information
Event Template Events are simple stateless mappings between an SNMP trap and a mediation event. Events are not mapped to the Remote RMX-3200 alarm table. An event template consists, at a minimum, of a trap-oid and a message parameter. NE Template The NE template contains device model definitions for a proxied SNMP network element. -
Page 238: Snmp Ne
Remote RMX-3200 Version 5.2x Configuration Guide Configuring the SNMP Proxy: SNMP Proxy Configuration Information The predefined variables that are available for use in these templates are described in Table 22-1. Table 22-1 Predefined Template Variables Variable Description $(point) Contains the name of the point configured on the... -
Page 239: Configuring A Mediation Snmp Event Template
, which creates a reboot event for the proxied NE. coldStartDef Note that not all possible parameters are used in this example. See the Remote RMX-3200 Command Reference Guide for details on each parameter. To configure a mediation SNMP event template: 1. Configure event template name... -
Page 240: Configuring A Mediation Snmp Point Template
Remote RMX-3200 Version 5.2x Configuration Guide Configuring the SNMP Proxy: Configuring a Mediation SNMP Point Template Configuring a Mediation SNMP Point Template In this scenario, you will configure a mediation SNMP point template named , which is a template for a row in the interface table on the proxied NE. - Page 241 Remote RMX-3200 Version 5.2x Configuration Guide Configuring the SNMP Proxy: Configuring a Mediation SNMP Point Template 6. Configure the poll value of for the state: config mediation snmp event-template ifEntryDef state up poll- value 1 7. Configure the trap oid...
- Page 242 Remote RMX-3200 Version 5.2x Configuration Guide Configuring the SNMP Proxy: Configuring a Mediation SNMP Point Template 17. Configure the default polling state for points in this template as config mediation snmp point-template ifEntryDef poll-default-state 18. (optional) Verify that the point template has been configured properly:...
-
Page 243: Configuring A Mediation Snmp Ne Template
Remote RMX-3200 Version 5.2x Configuration Guide Configuring the SNMP Proxy: Configuring a Mediation SNMP NE Template Configuring a Mediation SNMP NE Template In this scenario, you will configure a mediation SNMP NE template, which is a template containing device model definitions for a proxied SNMP network element. - Page 244 Remote RMX-3200 Version 5.2x Configuration Guide Configuring the SNMP Proxy: Configuring a Mediation SNMP NE Template 5. Configure NE template with the following settings: alarm1 NE template (existing) alarms parameter value config mediation snmp ne-template Template1 ne-template alarm1 alarms num 1 6.
-
Page 245: Configuring A Mediation Snmp Measurement Template
Remote RMX-3200 Version 5.2x Configuration Guide Configuring the SNMP Proxy: Configuring a Mediation SNMP Measurement Template Configuring a Mediation SNMP Measurement Template In this scenario, you will configure a mediation SNMP measurement template, which defines the way a mediation SNMP NE obtains the value for a point on a proxied SNMP network element. - Page 246 Remote RMX-3200 Version 5.2x Configuration Guide Configuring the SNMP Proxy: Configuring a Mediation SNMP Measurement Template 6. Configure the varbind-match for the .1.3.6.1.4.1.539.42.2.2.1.1 critical state; that is, the OID to use to retrieve the value of $alIndex config mediation snmp measurement-template alDef trap critical varbind-match .1.3.6.1.4.1.539.42.2.2.1.1 $alIndex...
- Page 247 Remote RMX-3200 Version 5.2x Configuration Guide Configuring the SNMP Proxy: Configuring a Mediation SNMP Measurement Template 3. Configure the dynamic poll table with the following settings: table OID .1.3.6.1.4.1.539.42.2.2 match column (number) match value (for specified column) config mediation snmp measurement-template alTableDef poll-table .1.3.6.1.4.1.539.42.2.2 7 5...
- Page 248 Remote RMX-3200 Version 5.2x Configuration Guide Configuring the SNMP Proxy: Configuring a Mediation SNMP Measurement Template 9. (optional) Verify that the point template has been configured properly: show mediation snmp measurement-template alTableDef The command response similar to the following displays: (Dub)>show mediation snmp measurement-templates alTableDef...
-
Page 249: Configuring A Mediation Snmp Network Element
Remote RMX-3200 Version 5.2x Configuration Guide Configuring the SNMP Proxy: Configuring a Mediation SNMP Network Element Configuring a Mediation SNMP Network Element In this scenario, you will configure information specific to a mediation SNMP NE including: The host parameters ... - Page 250 Remote RMX-3200 Version 5.2x Configuration Guide Configuring the SNMP Proxy: Configuring a Mediation SNMP Network Element 8. Configure a measurement named , with a link to the previously defined analog measurement template: alTableDef config mediation snmpne ProxyNE measurement analog alTableDef 9.
-
Page 251: Configuration Results
Remote RMX-3200 Version 5.2x Configuration Guide Configuring the SNMP Proxy: Configuration Results Configuration Results The following is a partial example of a , which shows the results of running-config the template points and events used to construct a mediation SNMP NE containing a port with two states (up and down), Ethernet ports 1 and 2 and a reboot notification. - Page 252 Remote RMX-3200 Version 5.2x Configuration Guide Configuring the SNMP Proxy: Configuration Results Note: Alarms, events, actions and responses for SNMP proxy will not display in as they are implicitly added to the configuration. Only if the running-config user makes a change to one of the entities will these four items display in .
-
Page 253: Chapter 23: Configuring Jobs
Configuring Jobs This chapter includes scenarios that contain step-by-step procedures on how to configure jobs for Remote RMX-3200. Guide to this Chapter Job Configuration Overview Configuring Access to a Central FTP Package Server Creating and Installing a Script Package Configuring a Job with a Script Package and Script... -
Page 254: Job Configuration Overview
Remote Web interface. See Accessing the Web Interface on page 2-9 for details. Script Package Components Before you configure a job on Remote RMX-3200, you must first create a script package. A script package (.pkg file) contains two basic components: Python modules ... - Page 255 After you transfer the script package, you can install it onto Remote RMX-3200. When a script package is installed on Remote RMX-3200, it is stored in a database for executing jobs. A job must refer to a script package and a script in order for it to execute properly.
-
Page 256: Configuring Access To A Central Ftp Package Server
Configure the server user name and password Enable remote access to the central FTP package server To configure the central FTP package server: 1. At the main prompt, configure Remote RMX-3200 to use an FTP server with IP address and the default port number: 11.8.77.3 config pkgs server address 11.8.77.3... -
Page 257: Creating And Installing A Script Package
Create a script package Use an FTP utility to transfer the script package to the Remote RMX-3200 staging area or to the configured central FTP package server Tip: For more information on how to configure a central FTP package server,... - Page 258 Configuring Jobs: Creating and Installing a Script Package 6. Using an FTP utility, do one of the following: Transfer from the local workstation to the exampleScript-1.0.0.pkg directory on Remote RMX-3200. Continue to step 7. pkgstage Transfer to the central FTP package server exampleScript-1.0.0.pkg default directory of , which contains all script packages.
-
Page 259: Configuring A Job With A Script Package And Script
Remote RMX-3200 Version 5.2x Configuration Guide Configuring Jobs: Configuring a Job with a Script Package and Script Configuring a Job with a Script Package and Script Important: This procedure assumes that files named captureScript.py have been echoScript.py PackageManifest.xml __init__.py authored on a local workstation and the procedure,... -
Page 260: Configuring A Job With A Job Property
Hello World in the job’s data directory on Remote RMX-3200. 3. (optional) Verify that the job has been configured with the proper job property: show jobs name printlog properties The command response similar to the following displays: (Dub)>show jobs name printlog properties... - Page 261 2008/11/03 22:35:32 2008/11/03 22:35:33 normal (Dub) show jobs name printlog> 7. (optional) FTP to Remote RMX-3200 to verify that the output of the job has been recorded to the stdout.log and stderr.log files located in the job’s data directory jobdata/printlog 23-9...
-
Page 262: Configuring A Job With A Job Task
Remote RMX-3200 Version 5.2x Configuration Guide Configuring Jobs: Configuring a Job with a Job Task Configuring a Job with a Job Task Important: This procedure assumes that the captureScript.py echoScript.py files have been authored on a PackageManifest.xml __init__.py local workstation and the procedure,... - Page 263 Remote RMX-3200 Version 5.2x Configuration Guide Configuring Jobs: Configuring a Job with a Job Task 7. Assign the task property port 50008 ifconfig new_ip type STREAM to task listen server_sock config jobs name echodata task server_sock property port 50008 config jobs name echodata task server_sock property ifconfig...
-
Page 264: Configuring Job Start Times
Remote RMX-3200 Version 5.2x Configuration Guide Configuring Jobs: Configuring Job Start Times Configuring Job Start Times In this scenario, you will configure a to start on August 7 and to run through September 30 at 12:30 p.m., 5:30 p.m. and 7:30 p.m. every Monday, Wednesday and Friday. -
Page 265: Configuring Dynamic Memory For A Job
In this scenario, you will configure the amount of dynamic memory that Remote RMX-3200 can use while running printlog To configure dynamic memory for a job: 1. At the main prompt, configure Remote RMX-3200 to use kilobytes of 2024 dynamic memory while running job... - Page 266 Remote RMX-3200 Version 5.2x Configuration Guide Configuring Jobs: Configuring Dynamic Memory for a Job 23-14...
-
Page 267: Chapter 24: Configuring Modules
Configuring Modules This chapter includes scenarios that contain step-by-step procedures on how to configure modules for Remote RMX-3200. Guide to this Chapter Module Configuration Overview Configuring Modules Using Command Line Interface Configuring Modules Using Web Interface 24-1... -
Page 268: Module Configuration Overview
Remote RMX-3200 Version 5.2x Configuration Guide Configuring Modules: Module Configuration Overview Module Configuration Overview A module is a pre-packaged, turn-key solution built to address a specific area of site management, such as Power Management or Environmental/HVAC Monitoring and Control. Each module is composed of individual applications that provide a slice of functionality and equipment (alarms, measurements, sensors, etc.) used to address a... -
Page 269: Configuring Modules Using Command Line Interface
Configuring Modules: Configuring Modules Using Command Line Interface Configuring Modules Using Command Line Interface Installing Modules In this scenario, you will: Use an FTP/SFTP utility to transfer the module to the Remote RMX-3200 staging area Install the module ... -
Page 270: Enabling An Optional Application
Remote RMX-3200 Version 5.2x Configuration Guide Configuring Modules: Configuring Modules Using Command Line Interface Enabling an Optional Application In this scenario, you will: Display applications available in an installed module. Enable an application in the Tower module. 1. Display the applications and details from the module Tower:... -
Page 271: Realizing And Configuring Network Elements
Remote RMX-3200 Version 5.2x Configuration Guide Configuring Modules: Configuring Modules Using Command Line Interface The command line response “State” column shall display that Environmental Monitoring has been enabled. 4. Applications can be disabled by using the above command with “disable” instead of “enable.”... - Page 272 Remote RMX-3200 Version 5.2x Configuration Guide Configuring Modules: Configuring Modules Using Command Line Interface 6. Verify that the network elements are in the ‘online’ state: show site network-elements The command response similar to the following displays: (Dub)>show site network-elements Network Element...
-
Page 273: Configuring An Ne Set
Remote RMX-3200 Version 5.2x Configuration Guide Configuring Modules: Configuring Modules Using Command Line Interface Configuring an NE Set In this scenario, you will: Configure two NEs (instances) in a network element set. Configure a description for each NE (instance). -
Page 274: Initiating A Control Action
Remote RMX-3200 Version 5.2x Configuration Guide Configuring Modules: Configuring Modules Using Command Line Interface config site network-element-set TenantPowerMeter instance Tenant2Power description This is Tenant2Power. 6. Configure display name for NE (instance) Tenant2PowerMeter Tenant2Power NE set TenantPowerMeter config site network-element-set TenantPowerMeter instance Tenant2Power display-name Tenant2PowerMeter 7. - Page 275 Remote RMX-3200 Version 5.2x Configuration Guide Configuring Modules: Configuring Modules Using Command Line Interface network element is “online” and all the control’s required parameters that do not have default values have been configured. To initiate a control action: 1. Select the...
-
Page 276: Configuring Modules Using Web Interface
Configuring Modules Using Web Interface Installing Modules In this scenario, you will: Use an FTP/SFTP utility to transfer the module to the Remote RMX-3200 staging area Log into the web interface and navigate to the modules home page ... - Page 277 Remote RMX-3200 Version 5.2x Configuration Guide Configuring Modules: Configuring Modules Using Web Interface Figure 24-1 The screen displays RMX-3200 Web Interface Modules Home page 3. From Modules Home page, click the Modules icon. The Modules page will be displayed. See Figure 24-2.
- Page 278 Remote RMX-3200 Version 5.2x Configuration Guide Configuring Modules: Configuring Modules Using Web Interface 4. The available modules list will show the SYSTEM and TOWER-1.6.7.tgz modules that were transferred to the staging area. Click on Install All Modules. 5. A list of installed modules will appear in the upper panel as shown in Figure 24-3.
- Page 279 Remote RMX-3200 Version 5.2x Configuration Guide Configuring Modules: Configuring Modules Using Web Interface Figure 24-4 The Applications page shows all applications and their state. 8. Click the checkmark box for EnvironmentalMonitoring in the “Enabled” column and click “Save” to enable the application. The checkmark will remain and the...
-
Page 280: Realizing And Configuring Network Elements
Remote RMX-3200 Version 5.2x Configuration Guide Configuring Modules: Configuring Modules Using Web Interface Figure 24-5 The Applications page shows EnvironmentalMonitoring enabled. Realizing and Configuring Network Elements In this scenario, you will: Realize the indoorTemperature Network Element (NE) and configure several parameter values ... - Page 281 Remote RMX-3200 Version 5.2x Configuration Guide Configuring Modules: Configuring Modules Using Web Interface Figure 24-6 Screen display of Network Elements with the Temperature Sensor category expanded to show its component NEs. 3. Move the cursor into the Display column, highlight “indoorTemperature” and click on it.
- Page 282 Remote RMX-3200 Version 5.2x Configuration Guide Configuring Modules: Configuring Modules Using Web Interface 4. Select RMB Temperature from the Type pull-down menu and click the Save button at lower right. The parameters of this NE will display as shown in Figure 24-8.
-
Page 283: Configuring An Ne Set
Remote RMX-3200 Version 5.2x Configuration Guide Configuring Modules: Configuring Modules Using Web Interface Figure 24-9 The screen display of parameters from Indoor Temperature Sensor type RMB Temperature after the peripheralNumber value was changed to 2 in Step 5. 6. Using the same methods described in step 5, click on highTemperature, set the value at 100, and click Save. - Page 284 Remote RMX-3200 Version 5.2x Configuration Guide Configuring Modules: Configuring Modules Using Web Interface 2. Expand TenantPowerMeter and click the Add button below the display column. The box “Add NE” will appear.Type Tenant1Power in the Name box. See Figure 24-10. Figure 24-10 The Add NE window prompts the user for a name, display, and description of the NE being added.
-
Page 285: Chapter 25: Configuring The Peripheral Management Subsystem
Management Subsystem This chapter provides information on the expansion peripheral management subsystem and gives examples of how to configure expansion peripherals. This subsystem provides communication, coordination, auto-discovery and state maintenance for Remote RMX-3200 peripheral management. Guide to this Chapter Peripheral Management Subsystem Overview... -
Page 286: Peripheral Management Subsystem Overview
Peripheral Management Subsystem Overview The peripheral management subsystem lets Remote RMX-3200 manage up to 12 discrete expansion units and peripherals. Expand peripherals provide additional alarm and port capacity that is easily managed through the Remote RMX-3200 Command Line Interface. Expand-D Expansion Unit Expand-D expansion units allow the user to add digital inputs, analog inputs and relay outputs to Remote RMX-3200. - Page 287 Expand-D Connections The following characteristics apply to Expand-D units connected to Remote RMX- 3200: All connections from Remote RMX-3200 to Expand-D are via Ethernet. Two external switched Ethernet ports are available for connections. User devices can connect to the open Ethernet port on Expand-D.
-
Page 288: Rmb-1 Peripheral Unit
Configuring the Peripheral Management Subsystem: Peripheral Management Subsystem Overview RMB-1 Peripheral Unit The RMB-1 peripheral unit (refer to Figure 25-1) is powered via PoE from Remote RMX-3200. RMB-1 contains the following inputs and outputs: Sixty-four digital bistate inputs Four relay outputs ... -
Page 289: Rme-1000 Unit
Remote RMX-3200 Version 5.2x Configuration Guide Configuring the Peripheral Management Subsystem: Peripheral Management Subsystem Overview RMB-2 Peripheral Unit The RMB-2 peripheral unit (refer to Figure 25-3) offers similar capabilities to RMB-1 in a chassis that is sized to be easily mounted in a standard 19-inch, 21-inch, or 23-inch rack. -
Page 290: Remote Rmx-3200 Expansion Slot
RME-1000 units in an environment where Ethernet switching loops can exist. Remote RMX-3200 Expansion Slot Remote RMX-3200 also consists of an expansion slot, which can contain any one of the RME-1000 peripherals. Figure 25-5 shows the Remote RMX-3200 with an empty... -
Page 291: Rme-S8
25-8, has 64 discrete inputs, 16 analog inputs and 4 control outputs. It has a processor and memory subsystem and runs software similar to Expand-D. It can be used as a plug-in to the Remote RMX-3200 expansion slot or the RME-1000 chassis. -
Page 292: Rme-E8
25-9, contains eight Ethernet switch ports. It has a processor and memory subsystem and runs software similar to Expand-D. It can be used as a plug-in to the Remote RMX-3200 expansion slot or the RME-1000 chassis. Important: RME-E8 does not run the... -
Page 293: Expansion Unit Configurations
Remote RMX-3200 Version 5.2x Configuration Guide Configuring the Peripheral Management Subsystem: Expansion Unit Configurations Expansion Unit Configurations Expansion units can be connected to Remote RMX-3200 in several different configurations: By daisy-chaining them together By connecting them to individual Remote RMX-3200 Ethernet ports ... -
Page 294: Expansion Peripheral Unit Discovery
When Remote RMX-3200 discovers an expansion unit, it is made available for association with a unit number by user command. The unit number configuration settings are applied to the unit, which puts the unit under Remote RMX-3200’s management control. For more information on setting up unit number/peripheral... -
Page 295: Expansion Peripheral States
Table 25-1 Potential Expansion Peripheral Administrative States Administrative Description State Indicates that Remote RMX-3200 is ready to actively manage Managed the peripheral. This state goes into effect when the user issues command for the specified config peripheral manage peripheral. - Page 296 Specifies that Remote RMX-3200 has successfully set Managed up and initialized a management connection to the peripheral. Specifies that the peripheral is fully operational. Remote Online RMX-3200 has established a management connection to it and it is fully functioning as part of Remote RMX-3200. 25-12...
-
Page 297: Configuring Remote Rmx-3200 To Manage An Expansion Peripheral
Configured through the Remote RMX-3200 Connected to the Remote RMX-3200 Capable of operating as an extension of the Remote RMX-3200’s discrete I/O subsystem. Management of a peripheral by Remote RMX-3200 requires peripheral type and peripheral name configuration. In this scenario, you will: ... - Page 298 Remote RMX-3200 Version 5.2x Configuration Guide Configuring the Peripheral Management Subsystem: Configuring Remote RMX-3200 to Manage an Expansion Peripheral 3. (optional) Verify that the expansion peripheral has been configured properly: show peripherals unit 2 The output will look similar to the following: (Dub) show>peripherals unit 2...
-
Page 299: Configuring Discrete I/O Points On An Expansion Peripheral
Configuring Discrete I/O Points on an Expansion Peripheral Display points on an expansion peripheral are configured using the same commands that configure and display Remote RMX-3200’s on-board I/O points. In this scenario, you will: Configure a default alarm entry for a discrete input point on a peripheral unit ... - Page 300 Remote RMX-3200 Version 5.2x Configuration Guide Configuring the Peripheral Management Subsystem: Configuring Discrete I/O Points on an Expansion Peripheral The display will look similar to the following for the discrete output: (Dub)>show discrete outputs 2/12 - 2/12 Description - Output 12...
-
Page 301: Configuring Alarms For An Expansion Peripheral
Configuring the Peripheral Management Subsystem: Configuring Alarms for an Expansion Peripheral Configuring Alarms for an Expansion Peripheral Alarms configured for expansion peripheral I/O points are set up the same way as alarms configured for on-board Remote RMX-3200 I/O points—the same commands are used. In this scenario, you will: ... - Page 302 Remote RMX-3200 Version 5.2x Configuration Guide Configuring the Peripheral Management Subsystem: Configuring Alarms for an Expansion Peripheral 3. (optional) Verify that the alarm entries have been configured properly: show alarm-entries name serConnDown The display will look similar to the following for alarm entry serConnDown (Dub)>show alarm-entries name serConnDown...
-
Page 303: Configuring A Serial Controller On An Expansion Peripheral
Configuring a Serial Controller on an Expansion Peripheral Serial controllers configured on RME-S8 ports are set up the same way as serial controllers configured on on-board Remote RMX-3200 serial ports—the same commands are used. In this scenario, you will configure a serial controller on an RME-S8 port. -
Page 304: Configuring Sitebus Devices For An Expansion Peripheral
Connect a device to a SiteBus terminal and discover its hexadecimal ID Configure a SiteBus device for management by Remote RMX-3200 To configure a SiteBus device: 1. Power down the RMB peripheral by disconnecting its Ethernet connection to Remote RMX-3200. - Page 305 Note: The device type determines how data from the device will be interpreted and what points will be created for the device. The only SiteBus device type supported for Remote RMX-3200 version 5.2x is , which sbTemp includes points for Celsius and Fahrenheit temperatures. The device in...
-
Page 306: Disconnecting A Managed Expansion Peripheral
Configuring the Peripheral Management Subsystem: Disconnecting a Managed Expansion Peripheral Disconnecting a Managed Expansion Peripheral When Remote RMX-3200 is disconnected from a managed peripheral, a trap is generated. Remote RMX-3200 notices physical disconnections 20 to 30 seconds after they occur. -
Page 307: Chapter 26: Using Configuration Wizards
Using Configuration Wizards This chapter provides information on the three available configuration wizards. Guide to this Chapter Configuration Wizard Overview Using the initsetup Wizard Using the bistate-alarms Wizard Using the serial-port Wizard 26-1... -
Page 308: Configuration Wizard Overview
Remote RMX-3200 Version 5.2x Configuration Guide Using Configuration Wizards: Configuration Wizard Overview Configuration Wizard Overview configuration wizard is a script or program accessed from the CLI that prompts you for configuration information, then generates and applies the associated commands in running the configuration. -
Page 309: Using The Initsetup Wizard
Remote RMX-3200 Version 5.2x Configuration Guide Using Configuration Wizards: Using the initsetup Wizard Using the initsetup Wizard In this scenario, you will configure the initial setup for Remote RMX-3200 using the initsetup wizard. The wizard prompts you for all of the required and optional information. - Page 310 Remote RMX-3200 Version 5.2x Configuration Guide Using Configuration Wizards: Using the initsetup Wizard 5. (optional) Select (y/N) to add login accounts. If yes, select whether or not to require strong passwords. Enter the desired login name and password. If strong passwords are required, the password must be from 8 to 20 characters and contain at one upper-case, lower-case and special punctuation character.
- Page 311 Remote RMX-3200 Version 5.2x Configuration Guide Using Configuration Wizards: Using the initsetup Wizard 11. (optional) Enter the desired SNMP v3 user settings when prompted. The following settings are configurable: User name Authentication protocol Authentication pass phrase ...
-
Page 312: Using The Bistate-Alarms Wizard
Using Configuration Wizards: Using the bistate-alarms Wizard Using the bistate-alarms Wizard In this scenario, you will configure a bi-state point on Remote RMX-3200 with the bistate-alarms wizard. The wizard prompts you for all of the required and optional configuration information ... - Page 313 Remote RMX-3200 Version 5.2x Configuration Guide Using Configuration Wizards: Using the bistate-alarms Wizard 8. Enter a new normal state message or accept the default normal state message when prompted. 9. (optional) Enter the desired nagging interval when prompted. 10. (optional) Enter the desired network element name for the alarm entry when prompted.
-
Page 314: Using The Serial-Port Wizard
Remote RMX-3200 Version 5.2x Configuration Guide Using Configuration Wizards: Using the serial-port Wizard Using the serial-port Wizard In this scenario, you will configure an Remote RMX-3200 serial port with the serial- port wizard. To configure an Remote RMX-3200 serial port: 1. - Page 315 Remote RMX-3200 Version 5.2x Configuration Guide Using Configuration Wizards: Using the serial-port Wizard 5. (optional) Enter the desired line settings. The following settings are configurable: The line mode The baud rate The parity The number of databits ...
- Page 316 Remote RMX-3200 Version 5.2x Configuration Guide Using Configuration Wizards: Using the serial-port Wizard 26-10...
-
Page 317: Chapter 27: Drop And Continue Functionality
Drop and Continue Functionality This chapter provides information about Remote RMX-3200 drop and continue (DAC) capabilities and functionality. Guide to this Chapter Description Functional Specifications Failover 27-1... -
Page 318: Description
Drop and Continue Functionality: Description Description Remote RMX-3200 DAC provides a way to share the bandwidth of a single T1 or E1 link among multiple devices. Devices with DAC capabilities can do this because they require only one path for connecting to multiple devices. Networks of single-WAN devices without DAC capability require a separate physical path for each device. -
Page 319: Functional Specifications
Functional Specifications Alarm Behavior Remote RMX-3200 generally sends Remote Alarm Indications (RAIs) back in the direction of a received alarm and sends Alarm Indication Signals (AISs) when there is no other valid data to send. RAIs are usually referred to as Yellow Alarms and AISs are usually referred to as Blue Alarms. -
Page 320: Configuration
This command does not exist for DAC Remote RMX-3200 models. Data from channels on serial wan/2 in a DAC model cannot be routed to Remote RMX-3200's CPU. To do this, you must access a router or bridge with serial wan/1. -
Page 321: Failover
There is no down time while Remote RMX- 3200 boots because it keeps itself out of the data path. The length of the interruption when Remote RMX-3200 cuts back in is the same as the amount of time it takes the relays to switch. - Page 322 Remote RMX-3200 Version 5.2x Configuration Guide Drop and Continue Functionality: Failover 27-6...
- Page 323 Remote RMX-3200 TL1 Commands This chapter lists the default TL1 commands that are supported by Remote RMX-3200’s Virtual Network Elements (VNEs). Guide to this Chapter Overview Default TL1 VNE Commands Unsupported TL1 Commands 28-1...
-
Page 324: Chapter 28: Remote Rmx-3200 Tl1 Commands
Recognizing the failure messages associated with TL1 commands that aren’t supported by Remote RMX-3200. You should be familiar with Remote RMX-3200 actions and TL1 on Remote RMX- 3200 before reading this chapter. For more information on these topics, refer to... -
Page 325: Default Tl1 Vne Commands
Remote RMX-3200 Version 5.2x Configuration Guide Remote RMX-3200 TL1 Commands: Default TL1 VNE Commands Default TL1 VNE Commands The default TL1 commands supported by Remote RMX-3200 are a small subset of all available TL1 commands. The following default commands are supported: ... -
Page 326: Alw-Msg-All
This command causes Remote RMX-3200 to resume transmission of automatic messages after being in the inhibit message mode. Note: Remote RMX-3200 does not currently support the inhibit message TL1 command. Because of this, Remote RMX-3200 is always in ALW-MSG-ALL mode. -
Page 327: Canc-User
Remote RMX-3200 Version 5.2x Configuration Guide Remote RMX-3200 TL1 Commands: Default TL1 VNE Commands CANC-USER Description This command lets the connected user log out of the VNE on Remote RMX-3200. Format CANC-USER:tid:aid:ctag; Parameters Defines the target identifier for a VNE on Remote RMX-3200. -
Page 328: Rtrv-Alm-Ds3
"INPUT0_19,ENV:CR,MISC,NSA,09-27,09-48-45,,,:\"INPUT 0/19 CLOSE\",:," RTRV-ALM-DS3 Description This command causes Remote RMX-3200 to return all alarms designated with the DS3 modifier during Remote RMX-3200 configuration. Points associated with class DS3, which transmits digital signals at 44.736 Mbps over a T-3 facility, are generally programmed with this modifier. -
Page 329: Rtrv-Alm-Ec1
"INPUT0_1,DS3:CR,MISC,NSA,09-18,12-36-34,,,:\"INPUT 0/1 CLOSE\",:," RTRV-ALM-EC1 Description This command causes Remote RMX-3200 to return all alarms designated with the EC1 modifier during Remote RMX-3200 configuration. Points associated with class EC1, which is a facility with electrical levels at 51.84 Mbps, are generally programmed with this modifier. -
Page 330: Rtrv-Alm-Env
Remote RMX-3200 TL1 Commands: Default TL1 VNE Commands RTRV-ALM-ENV Description This command causes Remote RMX-3200 to return all alarms for points designated with environment modifiers during Remote RMX-3200 configuration. Points associated with environmental alarms, such as high temperature, are generally programmed with this modifier. -
Page 331: Rtrv-Alm-Oc3
"INPUT0_4,EQPT:CR,MISC,NSA,09-18,13-27-06,,,:\"INPUT 0/4 CLOSE\",:," RTRV-ALM-OC3 Description This command causes Remote RMX-3200 to return all alarms designated with the OC3 modifier during Remote RMX-3200 configuration. Points associated with class OC3, which is an optical fiber line that carries 155mbps, are generally programmed with this modifier. -
Page 332: Rtrv-Alm-T1
"INPUT0_3,OC3:CR,MISC,NSA,09-18,13-15-29,,,:\"INPUT 0/3 CLOSE\",:," RTRV-ALM-T1 Description This command causes Remote RMX-3200 to return all alarms designated with the T1 modifier during Remote RMX-3200 configuration. Points associated with class T1, which is a digital transmission link with a capacity of 1.544 Mbps, are generally programmed with this modifier. -
Page 333: Rtrv-Hdr
Remote RMX-3200 TL1 Commands: Default TL1 VNE Commands RTRV-HDR Description This command causes Remote RMX-3200 to send its TL1 System Identifier (SID) header to the OSS. The SID is used primarily to check the status of the communications link. Format RTRV-HDR:tid::ctag;... -
Page 334: Unsupported Tl1 Commands
Remote RMX-3200 TL1 Commands: Unsupported TL1 Commands Unsupported TL1 Commands Remote RMX-3200 TL1 VNE’s only take action when default or configured TL1 commands are entered. A failure message occurs when an invalid command is entered, which causes Remote RMX-3200 to give a deny response. Responses include a ctag that is identical to the invalid command. -
Page 335: Appendix A: Backing Up And Restoring The Remote Rmx-3200 Configura- Tion
Backing Up and Restoring the Remote RMX-3200 Configuration This appendix provides step-by-step scenarios on how to back up and restore the Remote RMX- 3200 configuration. Guide to this Appendix Backing Up the Configuration Restoring the Configuration... -
Page 336: Backing Up The Configuration
RMX-3200. The configuration file is copied to the working directory on your workstation. Note: The running-config file is an ASCII file—it should only be transferred with an ASCII mode FTP. 5. Close the FTP connection to Remote RMX-3200 and exit the FTP utility. -
Page 337: Restoring The Configuration
3. Locate the Remote RMX-3200 configuration file (primary.cnf or running-config) file in the working directory. 4. Change from the current directory to the config directory on Remote RMX-3200. 5. Using ASCII mode, put the configuration file in the config directory. - Page 338 Remote RMX-3200 Version 5.2x Configuration Guide Backing Up and Restoring the Remote RMX-3200 Configuration: Restoring the Configuration...
-
Page 339: Appendix B: Wan Port Availability
WAN Port Availability This appendix provides information about WAN port availability on Remote RMX-3200. Guide to this Appendix WAN Port Availability Remote RMX-3200 Models and Ports... -
Page 340: Wan Port Availability
Remote RMX-3200 Version 5.2x Configuration Guide WAN Port Availability: WAN Port Availability WAN Port Availability Table 1 describes the expansion cards that support Remote RMX-3200 WAN ports. Table 1 WAN Expansion Peripherals WAN Peripheral Description RMX WTE A single card (shown in... -
Page 341: Remote Rmx-3200 Models And Ports
Remote RMX-3200 Version 5.2x Configuration Guide WAN Port Availability: Remote RMX-3200 Models and Ports Remote RMX-3200 Models and Ports Table 2 displays all available Remote RMX-3200 modules, along with: Associated WAN ports Valid port number values as used in the CLI for corresponding WAN port types... - Page 342 Remote RMX-3200 Version 5.2x Configuration Guide WAN Port Availability: Remote RMX-3200 Models and Ports...
-
Page 343: Appendix C: Command Identifications
The IDs are contained in the supervisor command tree. For information on configuring user-defined profiles, see Creating a Custom Profile on page 3-6. The following table contains some of the valid command identifications for the Remote RMX-3200: Commands Identifications config /config config action... - Page 344 Remote RMX-3200 Version 5.2x Configuration Guide Command Identifications: Commands Identifications (Continued) config controller ethernet /config/controller/eth/hwaddr hardware-address config controller ethernet mac-security /config/controller/eth/mac-security config controller ethernet proxy-arp /config/controller/eth/proxy-arp config controller ethernet speed /config/controller/eth/speed config controller ethernet unassign /config/controller/eth/unassign config controller openvpn /config/controller/openvpn/...
- Page 345 Remote RMX-3200 Version 5.2x Configuration Guide Command Identifications: Commands Identifications (Continued) config ip name-server /config/ip/name-server config ip route /config/ip/route config route-v6 /config/ip/route-v6 config iptables /config/iptables config jobs /config/jobs config meas-table /config/meas-table config mediation /config/mediation config ntp /config/ntp config ntp disable...
- Page 346 Remote RMX-3200 Version 5.2x Configuration Guide Command Identifications: Commands Identifications (Continued) config remote-access /config/remote-access config response /config/response config snmp /config/snmp config site control /config/site/control config site module /config/site/module config site network-element /config/site/network-element config site network-element-set /config/site/network-element-set config site network-elements /config/site/network-element/status-...
- Page 347 Remote RMX-3200 Version 5.2x Configuration Guide Command Identifications: Commands Identifications (Continued) debug level /debug/level debug mediation /debug/mediation debug serial /debug/serial/ diag /diag diag break /diag/break diag clear /diag/clear diag controller /diag/controller diag fan /diag/fan diag ip route show /diag/ip/route/show diag ip route-v6 show...
- Page 348 Remote RMX-3200 Version 5.2x Configuration Guide Command Identifications: Commands Identifications (Continued) exec site uninstall /exec/site/uninstall exec-job /exec-job exit /exit halt /halt help /help password /password ping /ping reload /reload running-config /running-config show /show show actions /show/actions show alarm-entries /show/alarm-entries show audit...
- Page 349 Remote RMX-3200 Version 5.2x Configuration Guide Command Identifications: Commands Identifications (Continued) show expansion-images /show/expansion-images show interfaces /show/interfaces show inventory /show/inventory show ip /show/ip show iptables /show/iptables show jobs /show/jobs show licenses /show/licenses show listeners /show/listeners show log-file /show/log-file show meas-table...
- Page 350 Remote RMX-3200 Version 5.2x Configuration Guide Command Identifications: Commands Identifications (Continued) show site network-elements /show/site/network-elements/status- status points points show site params /show/site/params show snmp /show/snmp show tbos /show/tbos show test /show/test show timeout /show/timeout show users /show/users show version /show/version...
-
Page 351: Glossary
An action is a correlation between an event and response that controls system alarming, logging, and connection behavior on Remote RMX-3200. AID is an acronym for access-identifier. It identifies the NE system component to which the TL1 alarm applies. -
Page 352: Alarm Message
Remote RMX-3200 Version 5.2x Configuration Guide alarm class An alarm class is a designation of a TL1 alarm as environmental or equipment-related. TL1 alarms designated as environmental signal the occurrence of events such as temperature or pressure changes. TL1 alarms designated as equipment-related signal the occurrence of events such as device failures or malfunctions. -
Page 353: Baud Rate
The band sets the high and low threshold values for analog input event generation. banner The banner is the initial text that appears when the user logs into Remote RMX-3200. baud rate The baud rate is the speed of a connection in bits per second. - Page 354 CDMA is available in 800 megahertz or 1900 megahertz frequencies. central alarm table The central alarm table is a table that maintains the state of all alarms on Remote RMX-3200. It can be configured to communicate alarm state changes in a variety of management protocols. Glossary-4...
- Page 355 A chat file contains the connection initialization string for ports that are configured for PPP encapsulation. It is stored in the /config/chat directory on Remote RMX-3200. The user must FTP the chat file to the /config/chat directory on Remote RMX-3200 prior to configuring the file as the connection initialization string.
- Page 356 A controller is a concept that is applied throughout the CLI. It is a software object on Remote RMX-3200 that sends and receives a stream of bytes. A controller can be a physical device, such as an Ethernet transceiver or a T1 framer, or it can be a virtual entity, such as a T1 channel group.
-
Page 357: Data Bits
Remote RMX-3200 Version 5.2x Configuration Guide data bits Data bits are the number of bits per character transmitted or received by an asynchronous serial controller. daylight savings Daylight savings time is when clocks are set ahead one hour the first Sunday in April and back one hour the last Sunday in October to provide an extra hour of daylight during summer. -
Page 358: Dhcp Server
Digital inputs generate two events that reflect the state of the input: open and close. disconnect mode The disconnect mode is a handshake from a device attached to Remote RMX-3200 that terminates or accepts termination of an asynchronous connection. discrete alarm Digital discrete alarms are basic open or closed circuits where no data communication is involved. -
Page 359: Domain Name
These additional I/O points are managed through Remote RMX-3200. discrete peripheral unit The discrete peripheral unit is a space on Remote RMX-3200 that holds the I/O configuration information for a discrete peripheral. Units are numbered 0 to 4, with 0 representing the on-board discrete I/O subsystem. -
Page 360: Event Type
Remote RMX-3200 Version 5.2x Configuration Guide equipment type TBOS equipment type definition. EvDO EvDO (Evolution-Data Only) is an upgraded version of the cdma2000 system. The 1xEvDO system uses the bandwidth of one or more 1.23 MHz radio channels as the existing cdma2000 system. - Page 361 Framing is an error control procedure with multiplexed digital channels, such as T1, where bits are inserted so that the receiver can identify the timeslots that are allocated to each subchannel. Refer to the Remote RMX-3200 Command Reference Guide for information on the framing formats Remote RMX-3200 utilizes.
- Page 362 Remote RMX-3200 Version 5.2x Configuration Guide gateway address The gateway address is the IP address of the next node location in a route. GPRS GPRS (General Packet Radio Service) is a packet-switched mobile datacom service that is widely expected to be the next major step forward in the evolution of GSM technology.
- Page 363 Remote RMX-3200 Version 5.2x Configuration Guide HTTPS HTTPS (Hyper Text Transfer Protocol Secure) provides the necessary security to protect sensitive data. On Remote RMX-3200, HTTPS is implemented by incorporating an SSL layer that encrypts the HTTP packets between the web server and client/browser.
- Page 364 Remote RMX-3200. job property A job property is a runtime parameter for a job on Remote RMX-3200. These properties are used within a Python script. job task A job task is an optional initialization step for a job before it runs a script. Tasks are used when a super user is required for job configuration, since scripts cannot be run by a privileged user on Remote RMX-3200.
- Page 365 Remote RMX-3200 Version 5.2x Configuration Guide keep-alive inactivity time The keep-alive inactivity time defines the number of seconds that a session must be inactive before a ping packet is transmitted. Valid values are 5 to 60. keep-alive packets Keep-alive packets are sent from both the client and server when no user data is being transmitted.
-
Page 366: Mac Address
CHAP and PAP authentication on a point-to-point connection. local method The local method specifies the protocol Remote RMX-3200 uses to authenticate a peer device on a serial controller PPP link. The two available methods are challenge handshake authentication protocol (CHAP) and password authentication protocol (PAP). -
Page 367: Mac Address Table
MAC address table A MAC address table is a list containing the MAC addresses of all the devices that are permitted access to Remote RMX-3200 through an Ethernet controller. A MAC address table can contain a maximum of 32 MAC addresses. -
Page 368: Network Address Translation
Remote RMX-3200 Version 5.2x Configuration Guide The MTU sets the maximum number of data bytes that can be transmitted in a single PPP frame on a WAN port. nagging Nagging is the process of repeatedly generating an alarm message at fixed intervals even in the absence of an alarm state change. -
Page 369: Ntp Server
OID (Object Identifier) points to a specific parameter in the SNMP agent. offset When configuring the timezone for Remote RMX-3200, offset is the number of hours and minutes difference between the desired time zone and the default time zone, which is standard GMT +0.00. - Page 370 UDP port for all connected client network elements. originator An originator is a physical and visible component within Remote RMX-3200 that generates the event, such as an analog input or digital input, serial controller, TL1 multiplexer, or an Ethernet controller.
- Page 371 Remote RMX-3200 Version 5.2x Configuration Guide peripheral device A peripheral device is a system component that expands Remote RMX-3200’s functionality. The only peripheral device currently available for Remote RMX-3200 is the discrete expansion peripheral, which adds additional I/O points that are controlled by Remote RMX-3200.
- Page 372 RMX-3200 and matches it up with the correct profile. profile A profile gives a user designated permissions for operating commands in Remote RMX-3200. User profiles can be status, management, supervisor, or restricted. Python package A Python package is a directory used to store Python modules. The package can contain subpackages, resulting in a hierarchical directory structure.
- Page 373 TACACS+ remote authentication is configured. Access can be granted based on command level or privilege level. Command level authorization requires Remote RMX-3200 to contact the TACACS+ server for each command the user runs. Individual commands are then allowed or denied. Privilege level authorization configures the TACACS+ authorization method based on the privilege returned from the TACACS+ server.
- Page 374 XML, which are needed to run a job. responder A responder is a visible component within Remote RMX-3200, such as a serial or Ethernet controller, that implements responses. response A response is an executed result associated with a system event by configuration of an action rule on Remote RMX-3200.
- Page 375 Remote RMX-3200 Version 5.2x Configuration Guide restart attempts The number of times Remote RMX-3200 will attempt to restart a job if it stops abnormally. RTS signal The RTS signal is a control signal that may be used as part of the connect and disconnect handshake or for hardware flow control.
-
Page 376: Snmp Management System
TL1 alarm. SNMP Simple Network Management Protocol (SNMP) is a standard specification for exchanging information between Remote RMX-3200 and a monitoring system. SNMP management station Management stations are used to oversee network activity generated by SNMP agents, which are hardware and/or software processes that report on each network device. -
Page 377: Snmp Trap
The SNMP trap queue saves SNMP traps when network connectivity is lost. When the network comes back up, the SNMP traps are sent. This feature accommodates wireless connections on Remote RMX-3200, which are less reliable than regular connections. When trap queuing is enabled, pings are sent to SNMP hosts before traps are sent. - Page 378 TACACS+ is a protocol that provides remote user authentication. task position A task position is the order in which a task will be executed within Remote RMX-3200. The position indicates where in the list a task should appear. Unless a user specifies a new position for a task, Remote RMX-3200 adds new tasks to the end of the list.
- Page 379 Remote RMX-3200 Version 5.2x Configuration Guide TBOS display A TBOS display is a component on a TBOS port that contains 8 characters. Each character contains 8 points, which gives the TBOS display a total of 64 points. TBOS equipment type definition...
- Page 380 Remote RMX-3200 Version 5.2x Configuration Guide trap A trap is an SNMP alarm message. The UID is the TL1 user name. UMTS UMTS (Universal Mobile Telecommunications System) is one of the third-generation (3G) cell phone technologies, which is also being developed into a 4G technology.
- Page 381 Wireless backhaul is the wireless connection from an individual base station (tower) to the central network (backbone). The Kentrox wireless backhaul solution layers a VPN on top of the wireless network. The VPN network is a logical extension of the overall private management network.
- Page 382 Remote RMX-3200 Version 5.2x Configuration Guide Glossary-32...
-
Page 383: Index
Index excluding 3-6 ppp encapsulation settings 11-7 identifications 1-1 remote access protocol 2-6 accessing including 3-6, 1-1 script package 23-5 CLI locally 2-2 configuration serial port using wizard 26-8 help 2-2 backing up 1-2 session timeout 2-6 web interface 2-9 factory 4-4 SiteBus devices 25-20 accessing the CLI... - Page 384 Remote RMX-3200 Version 4.1x Configuration Guide configuring start times 23-12 management configuration 25-13 commands 27-4 configuring with a job property 23-8 operation states 25-11 safeguards 27-5 configuring with a job task 23-10 overview 1-6, 25-2 DHCP client 19-9 description 23-2...
- Page 385 Remote RMX-3200 Version 4.1x Configuration Guide SNMP event template 22-5 manager 22-4 dual model 27-4, 27-5 measurement template 22-11 interfaces 19-2 mediation event originator 22-4 line bit-level encoding 7-3 NE template 22-9 line buildout 7-3 network element 22-15 line framing format 7-3...
- Page 386 Remote RMX-3200 Version 4.1x Configuration Guide...
- Page 387 The source for the GPL portions of the software is available at www.westell.com/support. TRADEMARKS: Kentrox, the Kentrox logo, and other names are intellectual property of Westell, Inc. Linux is a registered trademark of Linus Torvalds. All other trademarks or registered trademarks appearing in this publication are property of their respective companies.
- Page 388 Remote RMX-3200 Version 5.1x Configuration Guide Copyrights-2...
Need help?
Do you have a question about the RMX-3200 and is the answer not in the manual?
Questions and answers