
Subscribe to Our Youtube Channel
Related Manuals for Bushnell Aggressor 119774C


Summary of Contents for Bushnell Aggressor 119774C
- Page 1 I N S T R U C T I O N M A N U A L 01-15 Model#s: 119774C / 119775C / 119776C / 119777C...
-
Page 4: Important Note
Congratulations on your purchase of one of the best trail cameras on the market! Bushnell is very proud of this little unit and we are sure you will be pleased with it as well. We appreciate your business and want to earn your trust. - Page 5 INTRODUCTION About the Trophy Cam HD Aggressor The Bushnell Trophy Cam HD Aggressor is a digital scouting camera. It can be triggered by any movement of game in a location, detected by a highly sensitive Passive Infra-Red (PIR) motion sensor, and then take high quality pictures (up to 14MP still photos), or video clips.
-
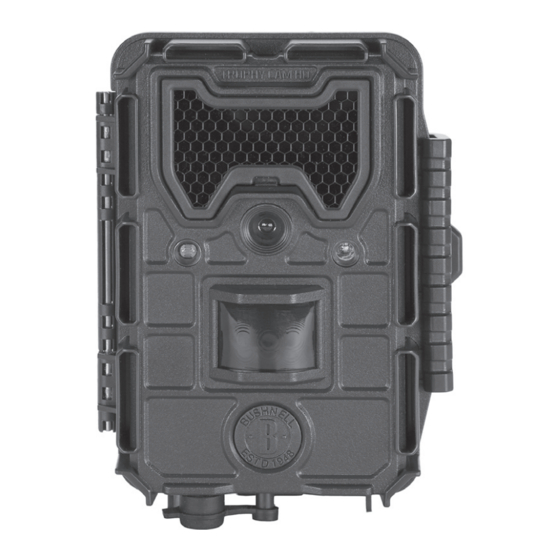
Page 6: Parts And Controls
Cam HD Aggressors to monitor large or widely separated areas. • Multi Flash Mode (LED Control)- prevents overexposed flash photos in close range applications • Hybrid Capture Mode-allows both still photos and videos to be captured at each trigger, up to highest resolution settings for each. •... - Page 7 Video Mic LED IR Lens Flash Motion/ Low Battery Indicator Light DC in Sensor Lock Cover Plug Hole Tripod Socket Latch Sensor Fig. 1: Connections SD Card Slot USB Port FRONT VIEW Video Mic DC In INSIDE VIEW Cable to Battery Compartment LCD Screen UP/Video...
-
Page 8: Installing The Batteries And Sd Card
You can also connect an optional Solar Panel accessory (model# 119756C -please visit www.bushnell.com for more information) to the “DC In” jack at the bottom of the Trophy Cam HD Aggressor (other external power supplies should not be used, as the camera and/or display may not function correctly). -
Page 9: Inserting The Sd Card
Inserting the SD Card The Trophy Cam HD Aggressor has 32MB of internal memory, which can hold only about 18 photos (@ 8MP resolution). This is handy for testing and getting familiar with the camera, but you will no doubt want to leave the camera unattended for longer than a day, so using an SD card is recommended for all models. -
Page 10: The Off, On, And Setup Modes
USING THE Trophy Cam HD Aggressor Once you’ve prepared your Trophy Cam HD Aggressor by properly installing batteries and an SD card, you could simply take it outside, strap it to a tree, switch it on and leave-and you might get some great photos that are exactly what you wanted. However, we highly recommend that you first spend some additional time indoors with this manual and your camera until you know a bit more about what the 3-way switch and those control keys do. -
Page 11: Setup Mode Shortcut Keys/Functions
to its current parameter settings) when it is triggered by the PIR sensor’s detection of activity in the area it covers. You can either move the power switch directly from OFF to ON mode, or stop at the SETUP position first to change one or more settings, then move the switch to ON after you have finished doing so. -
Page 12: Video Mode
Fig. 3: SETUP Information Screen Camera (Still Photo) Mode SD Card Status Image Size (Resolution) Still Photo Mode Battery Level Date:Month-Day- Y ear Time Stamp Time Field Scan On Hour:Minute:Second # of Photos Taken Remaining Photo Capacity Video Mode Video Resolution Video Sound On Video Mode Available Video Recording Time... -
Page 13: Using The Setup Menu To Change Settings
USING THE SETUP MENU TO CHANGE SETTINGS The main purpose of the SETUP mode is to allow you to change the settings of the camera’s parameters (19 different ones are available!) so your Trophy Cam HD Aggressor operates exactly the way you want it to. You will do this by entering the SETUP Menu and pressing the keys below the LCD display, which will show you each parameter and its setting. -
Page 14: Press Menu
Fig. 4: Selecting Parameter Settings Press MENU (4a) Press DOWN (4b) Press OK... - Page 15 EXAMPLES-Changing the Settings of Some Common Parameters Following this page, you will find tables listing all of the parameters found in the SETUP Menu, along with their possible settings (or range of settings), and a detailed description of what the parameter controls and what the settings do. If you read the previous section detailing how to select parameters and change their settings, you should be able to dive right in, find the parameter(s) you want, and setup the camera to suit your preferences.
- Page 16 Field Scan 2x with Live Trigger Feature Field Scan is a revolutionary new feature for the Bushnell Trophy Cam HD Aggressor, which allows you to monitor your food plots or field edges with time lapse images or video. When set to “On”, the Trophy Cam HD Aggressor will take a photo...
- Page 17 of time by pressing the DOWN key to select "B" (Step 4), then press OK and follow the same process to set Start and Stop times for Field Scan block "B" (Step 5). As an example of how you might use these two available time blocks, you could setup Field Scan time block "A"...
- Page 18 minutes during the block(s) of time. If an animal triggers the camera “in between” the 15 minute intervals, it will be recorded. Note: Field Scan settings of frequent intervals and/or long periods between start and stop time can reduce battery life. (Step 1)-set Field select Field set Field...
- Page 19 The SETUP Menu – Parameters and Settings List w/Descriptions Parameter Description Settings (Bold=default) Camera, Video, Selects whether still photos or video clips Mode Hybrid are captured when the camera is triggered. Hybrid mode combines both Camera and Video, so a still photo and a video clip are both captured for each trigger.
-
Page 20: Parameter Settings
Parameter Description Settings (Bold=default) Low, Medium, Controls how many LED lamps fire when LED Control (Multi-Flash High images are taken in low light. “High”= feature) all LEDs fire (36 or 48, depending on the model), which is the default setting. Set to Medium or Low if you are getting overexposed flash photos or will place the camera at very close range to the subject you... - Page 21 Parameter Description Settings (Bold=default) Interval Selects the length of time that the camera 10S (second) will “wait” until it responds to any additional default, with a triggers from the PIR after an animal is first 60M (minute) detected and remains within the sensor’s to1S (second) range of settings range.
- Page 22 Parameter Description Settings (Bold=default) High, Medium, Affects the shutter speed during Night Vision NV (Night Vision) Shutter operation. High will freeze motion better, but photos may be darker. A Low shutter speed setting will produce brighter photos, but rapid motion may be blurred. Medium is a good compromise.
- Page 23 Parameter Description Settings (Bold=default) Set Clock (Set) Press OK and use the UP/DOWN keys (to change the setting) and LEFT/RIGHT keys ( to move to the next field) to set the hour (24- hr format only, “00”=midnight, “12”=noon) and minute, and then (on the lower row), the year, month and date.
- Page 24 Parameter Description Settings (Bold=default) Coordinate Off, On Allows the user to input latitude and Input longitude coordinates for the camera’s See "Using the location. This data will be embedded Setup Menu in the files saved on the camera’s SD Input Screens" card (if “On”...
- Page 25 USING THE SETUP MENU INPUT SCREENS Camera Name Input After selecting the Camera Name parameter (the only setting is "Input"), press OK. If necessary, delete the previous or default name by pressing the RIGHT key until the backspace symbol ( ) (located between letters "A"...
-
Page 26: Mounting And Positioning
MOUNTING and POSITIONING the Trophy Cam HD Aggressor Mounting After you’ve set up the camera’s parameters to your personal preferences at home or in your truck, you’re ready to take it outside and slide the power switch to “ON”. When setting up the Trophy Cam HD Aggressor for scouting game or other outdoor applications, you must be sure to mount it in place correctly and securely. -
Page 27: Sensing Angle And Distance Test
Two optional mounting accessories, a “Bear Safe” Metal Box (model#119757C) and Deluxe Tree Bracket (model#119652C) are available-please see your Bushnell dealer or website for more details. Note: an accessory solar panel supplemental power source (#119756C) is also available - please visit www.bushnell.com for more information. -
Page 28: Reviewing Images Directly From The Sd Card
environment and your subject, the farther the possible sensing distance. The average sensing distance is about 45 ft. Before leaving the camera unattended, please check for the following: • Are the batteries or DC power supply inserted/connected with correct polarity and is the power level is sufficient? •... -
Page 29: Reviewing Images By Connecting The Camera To A Computer
Reviewing Images by Connecting the Camera to a Computer You can always unmount the entire camera from the tree and connect its USB port to a computer-it will be recognized as a “removable disk”, without the need to install any drivers or software. When using a PC (or Mac*) to view photos (or video clips*), first connect the device to the computer with the supplied USB cable. -
Page 30: Downloading The Photos/Videos
DOWNLOADING THE PHOTOS/VIDEOS To download your photos/videos to a PC or Mac*, first make sure the Trophy Cam HD Aggressor power switch is in the OFF position. Connect the supplied cable to the camera’s USB port, then directly to a main USB port on your computer-do not use front panel/keyboard USB ports or unpowered “hubs”. -
Page 31: Troubleshooting (Faq)
Typically, the Trophy Cam HD Aggressor will be able to capture several thousand images before the batteries die. 2. Check to make sure you have used new alkaline or lithium batteries. Bushnell recommends using a full set of Energizer Lithium AA batteries in your ®... - Page 32 3. Make sure that the camera power switch is in the “On” position and not in the “Off” or “Setup” modes. 4. Make sure that you are using a good quality SD card in your camera. Bushnell recommends SanDisk ® SD Cards up to 32GB (Ultra...
- Page 33 If this is seen on a consistent basis, then the sensor may need servicing. Please contact Bushnell customer service. 7. Short video clips—not recording to the length set a. Check to make sure that the SD card is not full.
-
Page 34: Photos Do Not Capture Subject Of Interest
b. Make sure that the camera has good batteries in it. Near the end of the battery life, the camera may choose to record shorter video clips to conserve power. c. When LED Control is set to "High" and camera is in Video mode, the maximum available video length is 15 seconds to avoid potential overheating of batteries and/or electronic components. - Page 35 2. LCD screen shows a faint black line after turning from “Setup” to “On”. The LCD will turn off when you slide the switch to the “On” position. In some cases, this black line will appear and then fade in about 1 second. This is normal and the camera will function properly.
-
Page 36: Technical Specifications
TECHNICAL SPECIFICATIONS Maximum Pixel Size 4416 x 3312 (14 MP) Lens F = 3.1; FOV=45°; Auto IR-Cut-Remove (at night) Selectable (Low/Med/High), up to 100ft/30m IR-Flash Range (119774C/119775C) or 80ft/24m (119776C/119777C) max. Display Screen Monochrome Display: 21x30mm(1.5”) SD or SDHC Card, Maximum capacity 32GB (Class 6 or higher Memory Card for 1280x720 or 1920x1080 HD video) Internal RAM... -
Page 37: One-Year Limited Warranty
ONE YEAR LIMITED WARRANTY Your Bushnell® product is warranted to be free of defects in materials and workmanship for one year after the date of purchase. In the event of a defect under this warranty, we will, at our option, repair or replace the product, provided that you return the product postage prepaid. -
Page 38: Fcc Compliance Statement
The device does not contain any user-serviceable parts. Repairs should only be made by an Authorized Bushnell repair center. Unauthorized repairs or modifications could result in permanent damage to the equipment, and will void your warranty and your authority to operate this device under Part 15 regulations. - Page 40 For further questions or additional information please contact: Bushnell Outdoor Products 9200 Cody, Overland Park, Kansas 66214 (800) 423-3537 • www.bushnell.com ©2014 Bushnell Outdoor Products...
Need help?
Do you have a question about the Aggressor 119774C and is the answer not in the manual?
Questions and answers