Table of Contents
Advertisement
Advertisement
Table of Contents

Subscribe to Our Youtube Channel
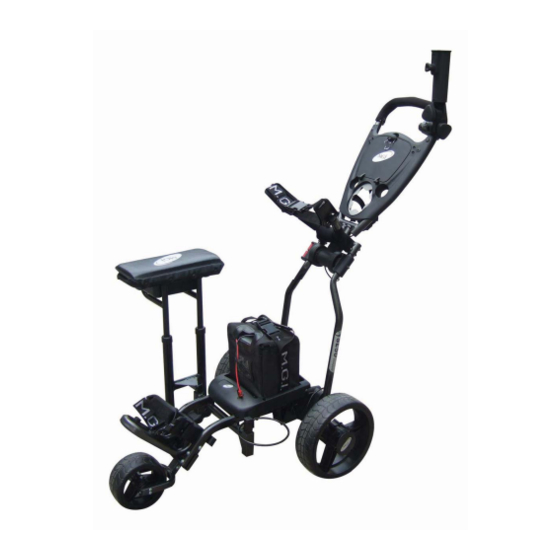
Summary of Contents for MGI No Limit SL50 Compact
- Page 1 SL50 Compact MAINTENANCE/SERVICE MANUAL INSTRUCTION MANUAL...
-
Page 2: Table Of Contents
Rear Wheel Axles Clutches Upper & Lower Bag Straps Correcting the Alignment of Your SL50 MGI Service Schedule: SL50 Compact Service Record: SL50 Compact INSTRUCTION MANUAL Most Important points to read prior to using Charging and care of the Battery... -
Page 3: Foreword
New Motorised Buggy Warranty Policy MGI warrants in respect of each new MGI SL50 motorised buggy sold, that for a period of twelve months, from the date of purchase, MGI or an authorised dealer will repair or replace free of... -
Page 4: Warranty Exclusions
If the work to be carried out is part of warranty, MGI will bear the cost. Cleaning Your SL50 Compact [See Maintenance Schedule] For years of good operation, your buggy requires care and attention. -
Page 5: Rear Wheel Axles
Rear Wheel Axles [See Maintenance Schedule] The rear wheel stub axles need to be lubricated regularly. Remove the rear wheels by depressing the spring clip and at the same time pull off the wheel. Apply Petroleum Jelly or light grease to the stub axles. -
Page 6: Mgi Service Schedule: Sl50 Compact
It is the owner’s responsibility to ensure that all periodical checks, necessary adjustments and services are carried out. If in doubt please contact the MGI service centre on 1300 644 523. Any work performed on your buggy should be recorded on your service record (see page 7) regardless of the work. -
Page 7: Service Record: Sl50 Compact
Service Record: SL50 Compact DATE: SERVICED BY: SIX MONTH INSPECTION INVOICE NO: SIGNATURE: DATE: SERVICED BY: ONE YEAR INSPECTION INVOICE NO: SIGNATURE: DATE: SERVICED BY: 1½ YEAR INSPECTION INVOICE NO: SIGNATURE: DATE: SERVICED BY: TWO YEAR INSPECTION INVOICE NO: SIGNATURE: DATE: SERVICED BY: 2½... -
Page 8: Most Important Points To Read Prior To Using
INSTRUCTION MANUAL Most Important points to read prior to using a. Register your buggy either on line – www.mgikaddy.com – or by completing the enclosed warranty card b. Charge the battery c. Assemble the buggy placing the rear wheels on their correct side Charging and care of the battery a. -
Page 9: Fitting The Battery
Fitting the battery Once charged, the battery can be fitted to the buggy. The battery comes with a battery cover, carry handle and battery leads. a. Place your battery in the tray with the leads facing to the front of the buggy. b. -
Page 10: Attaching / Removing Wheels
Attaching / Removing Wheels If your buggy comes with the rear wheels off, they should be placed in position prior to unfolding. You will need to put the rear wheels on the correct sides. The rear wheels are marked ‘L’ and ‘R’ on the inside of the hub. - Page 11 Folding / unfolding your buggy Practice unfolding and folding the buggy using the steps below. This means when you go to play golf you will be somewhat familiar with this task. 1. Release the handle locking mechanism in the centre of the handle 2.
-
Page 12: Fitting Your Golf Bag
Fitting your Golf Bag 1. Separate the clip located on the top and bottom bag supports. 2. Expand the strap to be enough to fit around the golf bag. 3. Place your golf bag on the buggy. 4. Clip the top and bottom bag support straps in place. 5. -
Page 13: Positioning The Seat
MOST IMPORTANT: DEPRESS THE SEAT WITH YOUR HAND BEFORE SITTING. DO NOT USE THE SEAT ON UNEVEN SURFACES. Please note MGI does not warrant any seat support brackets that are damaged or bent. Assembling the Umbrella Holder Your buggy comes with an umbrella holder. The umbrella holder needs to be bolted into position. -
Page 14: Sand Bucket Loop
Sand Bucket Loop The SL50 comes with two seat positions, one of either side of the buggy. Choose which ever side suits you and place the sand bucket loop into its position in the spare position on the opposite side. Top Handle Features a. -
Page 15: Frequently Asked Questions
In the Melbourne & Sydney areas, there are mobile service vans that attend most golf courses and retailers. MGI invests large amounts of capital into advancing the mechanical and electronic features of its range of buggies. Should you have any positive feedback or suggestion, which would further enhance the performance of our buggies, we would welcome your correspondence.
Need help?
Do you have a question about the No Limit SL50 Compact and is the answer not in the manual?
Questions and answers