
Related Manuals for Zip'r Roo


Summary of Contents for Zip'r Roo
- Page 1 zip’r Mobility Scooter Operation Manual Zip’r™ Mobility LLC North Bend, WA “Simplicity in Mobility” (800) 760-9107 www.zipr.com...
-
Page 2: Table Of Contents
TABLE OF CONTENTS I. INTRODUCTION…………………………............3 II. SPECIFICATIONS AND STRUCTURE………………………………....4-6 III. INITIAL ASSEMBLY................7-8 IV. DISASSEMBLY..................9 V. COMFORT ADJUSTMENTS..............10 VI. OPERATION..................11-12 VII. BATTERY AND CHARGING............13-15 VIII. CARE AND MAINTENANCE............16-17 IX. SAFETY ..................18-22 X. ELECTROMAGNETIC INTERFERENCE...........23 XI. TROUBLESHOOTING .................24 XII. WARRANTY INFORMATION............25 ZIP’R MOBILITY CONTACT INFORMATION (800) 760-9107 www.zipr.com MY AUTHORIZED DEALER:... -
Page 3: Introduction
INTRODUCTION Congratulations on your purchase of the Zip’r Roo travel scooter. Many important safety, operating, and maintenance instructions are included in this operation’s manual. We urge you to read the entire manual carefully before you attempt to operate your scooter. These instructions were compiled for your benefit. -
Page 4: Specifications And Structure
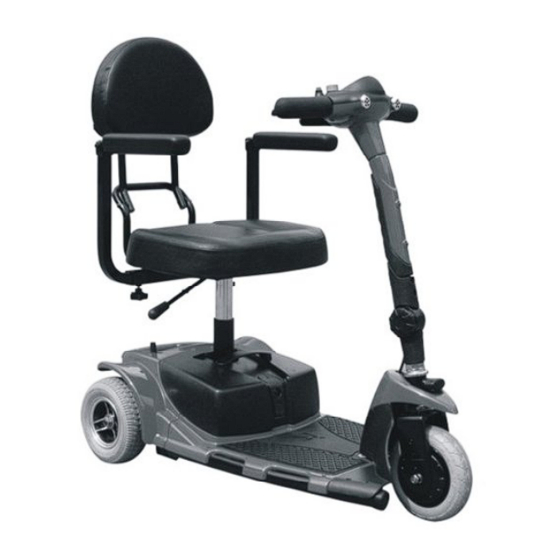
II. SPECIFICATIONS AND STRUCTURE SPECIFICATIONS DRIVE WHEEL 7.3" (186mm) solid foam filled FRONT WHEEL 7.16" (182mm) solid foam filled ANTI-TIP WHEEL 2.2" (56mm) solid SPEED MAXIMUM Fwd = 3.5 mph / Reverse = 2.2 mph BRAKING SYSTEM Intelligent brake GROUND CLEARANCE 2"... - Page 5 II. SPECIFICATIONS AND STRUCTURE Your scooter mainly consists of four parts: The front section, rear section, seat, and battery case. The tiller console, handle bars, and footplate are located on the front section. The motor, brake system and controller are located in the rear section. See Figure 1.
-
Page 6: Ii. Specifications And Structure
II. SPECIFICATIONS AND STRUCTURE TILLER CONSOLE (Figure 2) CHARGING SYSTEM (Figure 3) -
Page 7: Initial Assembly
III. INITIAL ASSEMBLY In order to avoid shipping damage, the batteries and the seat unit are not separately packaged, so you will need to assemble them onto the main frame of your scooter. OPENING THE PACKING BOX Open the packing box of your new scooter and remove all of the protective materials, then carefully remove the scooter and separated components from the box. -
Page 8: Iii. Initial Assembly
III. INITIAL ASSEMBLY ASSEMBLING BATTERY UNIT (Figure 6. & 6.1) • Lower the battery case into the trough and ensure that the electrode terminals are aligned. • Loosen safety locking knob located directly behind the black seat post, turn the locking cap such that it is centered over each side of the battery case, and then retighten the locking knob. -
Page 9: Disassembly
IV. DISASSEMBLY Your Zip’r Roo scooter has been designed to easily disassemble and transport. You can easily disassemble the scooter into four pieces, the front section, the rear section, the seat unit and the battery case (Figure 9). DISASSEMBLY • Lift the seat off of the scooter seat post. -
Page 10: Comfort Adjustments
V. COMFORT ADJUSTMENTS Before operating the scooter, you may find the need to make some adjustments to increase your comfort, such as the seat height, armrest width, and tiller angle. WARNING! Remove the key from the key switch before adjustments. Never attempt to do adjustments while the scooter is in motion. -
Page 11: Vi. Operation
VI. OPERATION TILLER CONSOLE The tiller console houses all of the tools needed to operate your scooter, including the key switch, the speed adjustment knob, throttle control lever, battery condition indicator, horn button and the headlight button. KEY SWITCH (Figure 2.) •... -
Page 12: Vi. Operation
VI. OPERATION OFF-BOARD CHARGER (see fig. 3) Lift the cover on the battery case, so that you can use the off-board charger to charge your batteries through a 3-pin charger power receptacle in the middle of the scooter.(see VII, Batteries and Charging) LOAD PROTECTOR (see fig. -
Page 13: Battery And Charging
VII. BATTERY AND CHARGING Your scooter uses two long lasting, 12-volt deep cycle batteries. These batteries are sealed and maintenance free. Since they are sealed, there is no need to check the electrolyte (fluid) level. Deep cycle batteries are designed to handle a longer and deeper discharge. Though they are similar in appearance to automotive batteries, they are not interchangeable. - Page 14 VII. BATTERY AND CHARGING FREQUENTLY ASKED QUESTIONS (FAQs) QUESTION: Why is my charger warm? ANSWER: The battery charger takes the standard wall outlet voltage(alternating current) and converts it to 12V DC(direct current). This scooter’s batteries use direct current to run your scooter. When the battery voltage is low, the charger sends more current to the batteries so that the charger has a higher temperature, this is normal.
-
Page 15: Vii. Battery And Charging
VII. BATTERY AND CHARGING Deep-cycle batteries employ a much different chemical technology than that used in car batteries, nickel-cadmium, or in other common battery types. Deep-cycle batteries are specifically designed to provide power, drain down their charge, and then accept a relatively quick recharge. AGM and gel-cell batteries should be charged as often as possible. -
Page 16: Care And Maintenance
VIII. CARE AND MAINTENANCE Your scooter, like any motorized vehicle requires a routine maintenance check. Preventative maintenance is very important. You can perform some of these regular checks by yourself. If you follow the maintenance checks in this section as scheduled, you can help ensure that your scooter gives you years of trouble-free operation. -
Page 17: Viii. Care And Maintenance
VIII. CARE AND MAINTENANCE DAILY CHECK • With the power off, check the throttle control lever. Make sure it returns to the primary position when you release it. • Check the right/left lock-nuts on the low end of the tiller. Make sure it is fastened to the tiller. Make sure the battery lock knob is engaged. -
Page 18: Safety
IX. SAFETY PRE-RIDE SAFETY CHECK A safety check is recommended before each use to make sure your scooter operates smoothly and safely. Perform the following procedures prior to using your scooter: • Check all electrical connections. Make sure they are tight and not corroded. •... - Page 19 IX. SAFETY The maximum safe incline angle is 8 degrees for your scooter. If a slope is less than this angle, it is safe for your scooter to climb or descend. BRAKING INFORMATION Your scooter is equipped with two powerful brake systems •...
- Page 20 IX. SAFETY DOOR OBSTACLE • Determine in advance if the door opens towards or away from you. • Use your hand to turn the knob or push/pull the door open. • Drive your scooter gently and slowly forward to push the door open. Or drive your scooter gently and slowly backward to pull the door open.
- Page 21 IX. SAFETY SCOOTER TRANSPORT There are no standards approved for tie-down systems in a moving vehicle of any type to transport a person while seated in a scooter. Anyone traveling in a motor vehicle should be properly secured in the motor vehicle with safety belts fastened securely.
-
Page 22: Ix. Safety
IX. SAFETY WARNING! Position yourself centered and upright in the scooter seat to prevent the scooter from tipping over and causing injury. WARNING! Avoid using your armrests and tiller for weight bearing purposes. Such use may cause your scooter to tip over and cause you injury. -
Page 23: Electromagnetic Interference
X. ELECTROMAGNETIC INTERFERENCE (EMI/RFI) EMI/RFI WARNINGS Radio waves are a form of electromagnetic energy, and can cause unintended motion of electric mobility vehicles. When electromagnetic energy adversely affects the operation of an electrical device, that adverse effect is called “Electromagnetic Interference” or EMI, or “Radio Frequency Interference” or RFI. -
Page 24: Troubleshooting
XI. TROUBLESHOOTING Any electromechanical device may require some troubleshooting. However, most of the problems that may arise can usually be solved with a bit of thought and common sense. Many of these problems occur because the batteries are not fully charged or because the batteries are worn down and can no longer hold a charge. -
Page 25: Warranty Information
XII. WARRANTY INFORMATION THREE MONTH LIMITED WARRANTY The batteries are covered by a three month limited warranty. WARRANTY EXCLUSIONS Transaxle: In cases where there is an increase in the operational noise level, the warranty does not apply. (The increase in operational noise level usually occurs due to abusive and excessive strain on the scooter).
Need help?
Do you have a question about the Roo and is the answer not in the manual?
Questions and answers
Roo 4 will not start