Table of Contents
Advertisement
Advertisement
Table of Contents

Related Manuals for Medeli DD504D

Summary of Contents for Medeli DD504D
- Page 2 INFORMATION FOR YOUR SAFETY! THE FCC REGULATION WARNING (for USA) PRECAUTIONS This equipment has been tested and found to comply with PLEASE READ CAREFULLY BEFORE PROCEEDING the limits for a Class B digital device, pursuant to Part 15 of the FCC Rules. Please keep this manual in a safe place for future reference.
-
Page 3: Table Of Contents
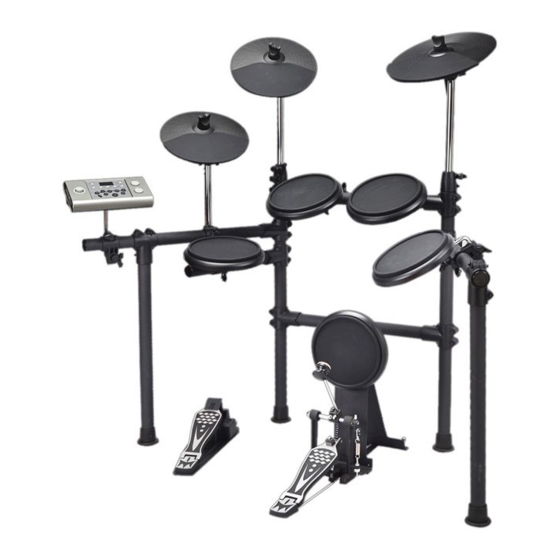
Contents Panel Controls Front Panel................................4 Rear Panel................................5 Side Panel.................................5 Setup Connect the Pads and the Pedal........................6 Connect a MIDI Device.............................7 Connect a Audio Equipment..........................7 Connect a CD player, etc.(Aux in jack)......................7 Connect Headphones............................7 Connect the Power Supply Jack........................7 Functions Switch the Power ON............................8 Set the Main Volume............................8 Select a Drum Kit..............................8 Play with a Metronome............................8... -
Page 4: Panel Controls
Panel Controls Front Panel 1. Volume knob 8. [drum off] button and indicator Control the volume of phone and line output. This button is used to turn on or turn off theper Turn it clockwise to increase the volume and cussion of song. -
Page 5: Rear Panel
Panel Controls Rear Panel 14. MIDI out jack 17. Aux.in jack Connect with external sound module. Connect with external sound source. 15. Trigger input jacks 18. Power supply jack ( DC in 9V) Connect with pads, cymbals, hi-hat control, Connect an AC adaptor to this jack. kick trigger. -
Page 6: Setup
Setup Caution! To prevent electric shock and damage to the device, make sure the power is switched OFF on the drum and all related device before making any connection. Connect the Pads and the Pedals Using the provided cables, connect each Trigger input jack on the rear panel of the module, and make sure eachpad is connected to its corresponding Trigger input jack. -
Page 7: Connect A Midi Device
Setup MIDI device Connect a MIDI Device This is for you want to use an external sound module or MIDI sequencer. Transmit MIDI Data Use a MIDI cable to connect the MIDI OUT jack on the drum module with the MIDI IN jack on the external MIDI device. MIDI OUT MIDI IN This drum will output all the MIDI codes generated by pads hitting or... -
Page 8: Functions
Functions Switch the Power ON After confirming all connection have been completed, rotate thevolume knob to the left ( minimum volume level) beforeswitching the power on. Set the power switch to "on" position to switch on the power. Display shows the song's number and its indicator lights up. Song indicator Set the Main Volume While hitting a pad, gradually rotate the volume knob until acomfortable... -
Page 9: Play A Song
Play a Song Select a Song This drum module has a total of 60 preset songs. Note: Song indicator The preset song setting is 001 after you slide on power. Press [ song / volume ] button. The song indicator lights and the current song's number appears. Press [ + ] or [ - ] buttons to select one of the song and listen to it. -
Page 10: Mute A Drum Part
Play a Song Drum off indicator Drum off indicator Mute a Drum Part Press [ drum off ] button. The drum off indicator lights. The drum mute function is active. Press [ start/stop ] button to playback the song. The drum part in the song will be muted. -
Page 11: Create A User Drum Kit
Create a User Drum Kit Set a Drum Voice Voice indicator The unit comes with 335 high quality percussion sounds that youcan assign to any of the drum pad, 3 cymbals, hi-hat control andbass drum. This way you can create your own drum kit thatconsists of the voice you want. -
Page 12: Save Your Drum Kit Voices
Create a User Drum Kit Save Your Drum Kit Voices Once completing to your own drum kit, you have to savethem in the unit; otherwise your drum kit will be erased whenyou turn off the unit. Press [ save ] button. The kit number 025 appears and is flashing. -
Page 13: Setting
Setting Adjust the Pad Sensitivity You can adjust the sensitivity(gain) of the inputs from pads. Hold down [ kit ] and press [ voice / volume ] buttons. Display shows: "EXX", the pad sensitivity value is indicated. (XX=gain level value, 00 to 15.) Press [ pad ] button or hit the pad you want to set. -
Page 14: Reverb
Setting Reverb This function sets the reverb effect of the drum. In " kit mode", press the [ kit ] button, display shows the current reverb setting. Press [ + ] or [ - ] buttons to turn on or turn off the reverb. Tuning This function sets the pitch of each drum pad voice. -
Page 15: Making The Settings For Midi
Making the Settings for MIDI About MIDI MIDI (Musical Instrument Digital Interface) is a standard that allows performance data and other information to be exchanged among electronic musical instruments and computers. MIDI Connection MIDI OUT: This terminal transmits data from the digital drum to other MIDI devices. Connecting with an External Sound Device The digital drum transmission channel for the drum kit is fixed to Channel 10. -
Page 16: Voice List
Voice List Drum off indicator Drum off indicator Name Classic Snare 2 Electronic Snare 7 Kick Classic Snare Rim 2 Electronic Snare 8 Standard Kick 1 Acoustic Snare Standard Kick 2 Acoustic Snare Rim Classic Tom 1 Classic Kick 1 Rock Snare 1 Classic Tom 2 Classic Kick 2... - Page 17 Voice List HipHop Tom 1 Standard Crash 1 Conga Slap High HipHop Tom 2 Standard Crash 2 Conga Slap Mid HipHop Tom 3 Standard Crash 3 Conga Low Conga Slap HipHop Tom 4 Rock Crash 1 Cowbell HipHop Tom 5 Rock Crash 2 Timbale High HipHop Tom 6...
-
Page 18: Preset Kit List
Preset Kit List Name Acoustic Acoustic Standard 1 Standard 2 Funk 1 Funk 2 Fusion Camco Brush Room Rock Pop Rock Jazz Jazz Brush Timpani Songo 1971's Latin Electronic Disco TR606 HipHop Electronic 1 Electronic 2 Teckno 1 User Acoustic Standard 1 Standard 2 Funk 1... -
Page 19: Song List
Song List Name LCD Name Name LCD Name Drum Intro DrumInt 3\4Pop Jazz2 Drum Main A Drum A Reggae2 Drum Main B Drum B Jazz2 Reggae3 Electronic&Funk Blues&Fk Reggae2 Ltin Rk2 Ballad1 Ballad1 Reggae3 3/4Pop Fusion1 Fusion1 Latin Rock2 Dance1 Dance1 BigBand1 BigBand1... -
Page 20: Gm Drum Voice List
GM Drum Voice List Standard 1 (bank 0) Standard 2 (bank 4) Room (bank 8) Rock (bank 16) 27 D#1 High Q <- <- <- 28 E1 Slap <- <- <- 29 F1 Scratch Push <- <- <- 30 F#1 Scratch Pull <- <-... - Page 21 GM Drum Voice List Funk (bank 17) Electronic (bank 24) 808 (bank 25) House (bank 28) 27 D#1 <- <- <- <- 28 E1 <- <- <- <- 29 F1 <- <- <- <- 30 F#1 <- <- <- <- 31 G1 <- <-...
- Page 22 GM Drum Voice List Jazz (bank 32) Brush (bank 40) Orchestra (bank 48) 27 D#1 <- <- Concert Hi-hat Close 28 E1 <- <- Concert Hi-hat Pedal 29 F1 <- <- Concert Hi-hat Open 30 F#1 <- <- Concert Ride 31 G1 <- <-...
-
Page 23: Midi Implementation Chart
MIDI Implementation Chart O : YES X : NO... - Page 24 DD504D_G01...
Need help?
Do you have a question about the DD504D and is the answer not in the manual?
Questions and answers