Table of Contents
Advertisement
Garden Treasures® is a registered trademark
of LF, LLC. All Rights Reserved.
ATTACH YOUR RECEIPT HERE
Serial Number
Questions, problems, missing parts? Before returning to your retailer, call our customer
service department at 1-800-643-0067, 8 a.m. - 8 p.m., EST, Monday - Friday.
AB141026
Purchase Date
1
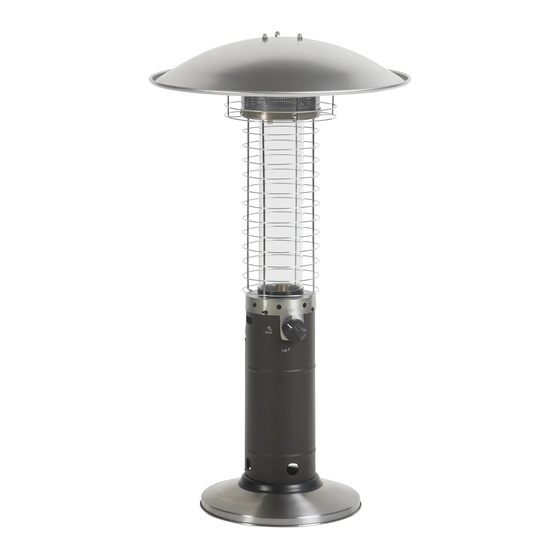
ITEM #0574422
TABLETOP GAS
PATIO HEATER
MODEL #PG169T-A
Français p. 17
Español p. 34
Advertisement
Table of Contents

Related Manuals for Garden Treasures Living PG169T-A


Summary of Contents for Garden Treasures Living PG169T-A
- Page 1 ITEM #0574422 TABLETOP GAS PATIO HEATER MODEL #PG169T-A Français p. 17 Garden Treasures® is a registered trademark of LF, LLC. All Rights Reserved. Español p. 34 ATTACH YOUR RECEIPT HERE Serial Number Purchase Date Questions, problems, missing parts? Before returning to your retailer, call our customer service department at 1-800-643-0067, 8 a.m.
-
Page 2: Table Of Contents
TABLE OF CONTENTS Product Specifications…….....................3 Package Contents……......................4 Hardware Contents……......................5 Preparation……..……….......................5 Safety Information……......................5 Assembly Instructions…….....................8 Operating Instructions……....................11 Care and Maintenance……....................13 Troubleshooting……......................14 Warranty……........................15 Replacement Parts List……....................16 DANGER WARNING FOR YOUR SAFETY Do not store or use gasoline or other If you smell gas: flammable vapors and liquids in the 1. -
Page 3: Product Specifications
PRODUCT SPECIFICATIONS Certification Height Overall 37 inches Reflector Diameter 20.4 inches Rated Heat Input 11,000 BTU/HR Fuel Propane-LP Gas Supply 1-Lb LP-Gas Cylinder Manifold Pressure 11 inches W.C. Injector Size (Diameter) 0.98 mm Safety Features Tilt Switch & Thermocouple Gas Supply Pressure Max 150 PSI, Min 5 PSI... -
Page 4: Package Contents
PACKAGE CONTENTS PART DESCRIPTION QUANTITY PART DESCRIPTION QUANTITY Reflector Black Silicone Ring Top Wire Guard Housing Assembly Emitter Assembly Plastic Ring Glass Cap Base Wire Guard Assembly Cover Glass Tube... -
Page 5: Hardware Contents
HARDWARE CONTENTS Acorn Nut Long Bolt Washer Short Bolt Qty. 3 Qty. 4 Qty. 4 Qty. 4 Qty. 8 Nut Removal Tool Qty. 1 PREPARATION Before beginning assembly of product, make sure all parts are present. Compare parts with package contents list and hardware contents list. - Page 6 SAFETY INFORMATION (b) Within a partial enclosure that includes overhead cover and no more than two walls. These walls may be parallel, or at right angles to each other. (c) Within a partial enclosure that includes overhead cover and no more than two walls. The following shall apply: (i) One wall that is equivalent to at least 25% of the total wall area is completely open.
- Page 7 SAFETY INFORMATION Materials or items when stored under the heater will be subjected to intense heat and could be seriously damaged. Clothing or other flammable materials should not be hung on the heater, or placed on, under or near the heater. Children and adults should be alerted to the hazards of high surface temperatures and should stay away from the item to avoid burns or clothing ignition.
-
Page 8: Assembly Instructions
ASSEMBLY INSTRUCTIONS 1. Remove the door from the housing assembly (I) by lifting the door off the hinges. Insert the bottom of the housing assembly (I) into the top of the plastic ring (J) and attach to base (K) with short bolts (EE). - Page 9 ASSEMBLY INSTRUCTIONS 4. Insert black silicone ring (G) onto shroud cover from inside of wire guard assembly (E). Open the gauge preassembled on the top of wire guard assembly (E), then carefully place glass tube (F) onto black silicone ring (G). Close snap gauges. 5.
- Page 10 ASSEMBLY INSTRUCTIONS 7. Open the door on the housing assembly (E), turning the connection end of the preassembled regulator to face outward. Attach LP-gas tank (sold separately) to regulator. Then, turn the regulator until the tank is in an upright position.
-
Page 11: Operating Instructions
OPERATING INSTRUCTIONS Before Lighting The item was designed and approved for OUTDOOR USE ONLY. DO NOT use it inside a building, garage or any other enclosed area. Make sure surrounding areas are free of combustible materials, gasoline and other flammable vapors or liquids. - Page 12 OPERATING INSTRUCTIONS CAUTION Avoid inhaling fumes emitted from the heater’s first use. Smoke and odor from the burning of oils used in manufacturing will appear. Both smoke and odor will dissipate after approximately 30 minutes. The heater should NOT produce thick black smoke. Re-lighting Note: For your safety, control knob cannot be turned on without first depressing control knob in off position and then rotating to on.
-
Page 13: Care And Maintenance
CARE AND MAINTENANCE Abrasive cleaners will damage this product. Never use oven cleaner to clean any part of heater Do not clean any heater part in a self-cleaning oven. The extreme heat will damage the finish. More frequent cleaning may be required as necessary. It is imperative that control compartment, burners and circulating air passageways of the heater be kept clean. -
Page 14: Troubleshooting
CARE AND MAINTENANCE Storage Between uses or during periods of extended inactivity: 1. Turn Control Knob OFF. 2. Disconnect LP cylinder and move to a secure, well-location outdoors. 3. Store heater upright in an area sheltered from direct contact with inclement weather (such as rain, sleet, hail, snow, dust and debris). -
Page 15: Warranty
WARRANTY The appliance has been manufactured under the highest standards of quality and workmanship. We warrant to the original consumer/purchaser that all aspects of this product will be free of defects in material and workmanship for one (1) year from the date of purchase. A replacement for any defective part will be supplied free of charge for installation by the consumer. -
Page 16: Replacement Parts List
REPLACEMENT PARTS LIST For replacement parts, call our customer service department at 1-800-643-0067, 8 a.m. - 8 p.m., EST, Monday - Friday. PART DESCRIPTION PART # Acorn Nut 2000452 Reflector 5203222 Top Wire Guard 2406515 Stud 2406514 Emitter Assembly 5203223 2000396 Washer 2000399...
Need help?
Do you have a question about the PG169T-A and is the answer not in the manual?
Questions and answers