Table of Contents
Advertisement
Available languages
Available languages
Quick Links
Advertisement
Table of Contents

Related Manuals for Grundig G-BCAM-01

Summary of Contents for Grundig G-BCAM-01
- Page 1 BABY WATCH BCAM AUS GUTEM GRUND...
- Page 2 _______________________________________________________ DEUTSCH 03-18 ENGLISH 19-34 TURKÇE 35-51 2 DEUTSCH...
- Page 3 Sie Ihren Nachwuchs im Auge. spielen. Sie benötigen einen Internetzugang Dieses Gerät ist für die Übertra- und ein GRUNDIG Fernsehgerät mit gung von Bild-/Tonsignalen in der Applikation „BABYWATCH“, die einem Haus oder Gebäude be- auf Ihrem Fernsehgerät installiert ist.
-
Page 4: Auf Einen Blick
AUFEINENBLICK ______________________________ 4 DEUTSCH... - Page 5 AUFEINENBLICK ______________________________ Kamerobjektiv und Abdeckung. DO... DIR, ohne Funktion. WPS/Reset ist die Taste zur Helligkeitssensor, ermittelt die Aufnahme der Kamera am Rou- Helligkeit am Aufstellungsort der ter (falls der Router WPS unter- Kamera. stützt, können Sie eine kabellose Infrarot- LEDs, leuchten bei unzu- Verbindung herstellen, indem Sie reichender Helligkeit am Aufstel- die Taste an der Kamera 3 bis...
- Page 6 MONTAGEUNDANSCHLIESSEN _________ Sie können Ihre GRUNDIG Kamera an einem geeigneten Ort aufstellen oder an der Wand montieren. Eine Halterung und Befestigungsma- terial befinden sich in der Verpak- kung des Gerätes. Wandmontage Hinweise: Der Untergrund muss fest und statisch tragfähig sein.
- Page 7 MONTAGEUNDANSCHLIESSEN _________ Haltewinkel mit den 4 mitgelie- ferten Schrauben an der Wand befestigen. Für den WLAN-Betrieb die WLAN Antenne anschrauben; oder für den LAN-Betrieb das LAN- Kabel in die Buchse » « Ethernet stecken. Steckernetzteil in die Netzsteck- Hinweis: dose stecken. Das LAN-Kabel wird mit dem –...
- Page 8 NETZWERKINSTALLATION ____________________ KameraamHeimnetz- KameraüberLAN-Ver- werkanschließenund bindunganschließenund anmelden anmelden Damit das Bild der Kamera über die Hinweis: Applikation »BABYWATCH« auf Ih- Die meisten Heimnetze sind rem Fernsehgerät eingeblendet wird, dynamisch. Wenn Sie ein dyna- muss sie an Ihrem Heimnetzwerk mit misches Netzwerk verwenden, Internetzugang angeschlossen und benötigen Sie einen DSL Router, der DHCP unterstützt.
- Page 9 NETZWERKINSTALLATION ____________________ Die Zeile »Kamera suchen« mit Das letzte Zeichen/die letzte » « oder » « wählen und mit Ziffer kann mit » « (blau) Λ ▯▯▯▯ »OK« bestätigen. gelöscht werden. – Nach kurzer Zeit wird ein Ka- Mit » «...
- Page 10 NETZWERKINSTALLATION ____________________ BetriebüberWLAN Kameraeinstellungen mit »OK« aufrufen, mit » « oder » « die Λ Hinweise: Zeile »Drahtlosverbindungsein- Damit die Kamera über WLAN stellungen« wählen und mit »OK« mit dem Heimnetzwerk verbunden bestätigen. werden kann, muss sie bei der – Nach kurzer Zeit werden die Anmeldung mit einem LAN-Kabel verfügbaren Drahtlosnetzwerke mit dem Router verbunden und...
- Page 11 BETRIEBMITDERKAMERA __________________ Bildschärfeeinstellen Gewünschten Modus mit » < « oder » « wählen und mit »OK« > Bildschärfe mit dem Einstellring bestätigen. am Kameraobjektiv einstellen. BlickwinkelderKamera Ansichtsmoduswählen verändern Während das „Livebild“ einge- Im Vollbildmodus kann der Blick- blendet wird, mit »@« das Menü winkel für das „Livebild“...
- Page 12 BETRIEBMITDERKAMERA _ _____________________ PositiondesKleinbildes Bilddrehen–horizontal wählen Während das „Livebild“ einge- blendet wird, mit » « (gelb) das Im Widget-Modus kann eingestellt wer- ▯ Bild horizontal drehen. den, an welcher Position das Kleinbild am Bildschirm eingeblendet wird. Babywatch-Funktion »Applikationsansichtsmodus« mit beenden »@«...
- Page 13 EINSTELLUNGEN ______________________________________ OptionenimModusBe- Bewegungserkennungsein- stellungen nachrichtigungen Mit » « oder » « die Option Bewegungserkennung Λ »Umgebungslicht“ wählen, dann deaktivierenundwieder mit » < « oder » > « je nach Umge- aktivieren bungsbedingungen »Helligkeit« oder »Dunkelheit« wählen. Während das „Livebild“ eingeblendet wird, mit »...
- Page 14 EINSTELLUNGEN ______________________________________ Geräuschempfindlichkeit Zum Anpassen des Erkennungs- bereichs die Zeile »Bewegungs- einstellen fenster« mit » « oder » « Λ Die Schaltfläche neben der Zeile wählen und mit »OK« bestätigen. »Geräuschempfindlichkeit« mit Mit » «, » «, » < « oder » >...
-
Page 15: Kennwortändern
EINSTELLUNGEN ______________________________________ EinblendungundMeldungen Neues Kennwort noch einmal eingeben und bestätigen. beiderBenachrichtigung Abhängig von der gewählten Die Schaltfläche »Ändern« mit Einstellung und der „Aktion“ im » « oder » « anwählen und mit Λ überwachten Raum wird eine Mel- »OK« bestätigen. dung eingeblendet: ,Hinweis: –... - Page 16 EINSTELLUNGEN ______________________________________ Hintergrundbildfürdas AndereKameraimHeim- Menüwählen netzwerkwählen Während das „Livebild“ einge- Während der »Echtzeit-Stream« blendet wird, mit » « (rot) das angezeigt wird, mit » « (rot) das ▯ ▯ Menü »Einstellungen« anwählen. Menü »Einstellungen« anwählen. Die Zeile »Thema« mit » «...
-
Page 17: Servicehinweisefürden Fachhandel
Direktiven 2009/125/EG und FürKundeninItalien: 2010/30/EU der Europäischen Für den Privatgebrauch ausserhalb Union ermittelt. von eigenen Gebäuden besteht eine Grundig erklärt, dass dieses Produkt allgemeine Genehmigungspflicht die EU-Richtlinie 1999/5/EG und wie auch bei der Nutzung für öffent- 2011/65/EU erfüllt. liche Zwecke. -
Page 18: Technische Daten
INFORMATIONEN _____________________________ Maximum 100 mW EIRP. Erlaubt Umwelthinweis für die Benutzung im Aussen- Dieses Produkt bereich ohne Einschränkungen wurde aus an den Aufstellort (Höhe) des hochwertigen Gerätes, zum Sammeln und Materialien und Überwachen von Telemetriedaten Teilen hergestellt, die und Berechnungssysteme. Bei an- für das Recycling tauglich sind und deren, wie oben aufgeführten An- wiederverwendet werden können. -
Page 19: Safetyandinformation
This video camera is not a toy; do not let the children play with it. For this, you need a local network access and a GRUNDIG television This device is for transmission of on which the "BABYWATCH" appli- image/sound signals within a cation is installed. - Page 20 OVERVIEW _______________________________________ 2 0 ENGLISH...
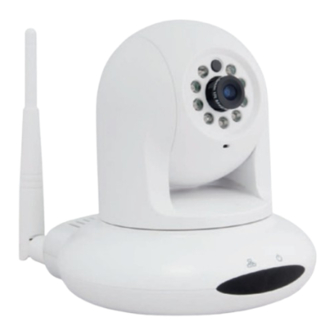
- Page 21 OVERVIEW _______________________________________ Camera lens and its cover. DO... DIR, no function. WPS/Reset, is the button to Brightness sensor determines the record the camera to the router; brightness of the location of the (If Router WPS supports, you camera. can make wireless connection Infrared LEDs turn on if the by pressing and holding the...
-
Page 22: Assemblyandconnection
ASSEMBLYANDCONNECTION ___________ You can position your GRUNDIG Remove the safety screw in the camera in a suitable place or mount mounting bracket (A) and loosen it onto the wall. Packaging of the the connection fittings (B). device contains an mounting brack- et and fixing elements. - Page 23 ASSEMBLYANDCONNECTION ___________ Drill the holes on the wall and Adjust the camera position onto insert the given plugs into these the mounting bracket and tighten holes. the safety screw (A). Fix the mounting bracket with the 4 supplied screws to the wall. For the WLAN operation, screw the WLAN antenna onto the de- vice;...
-
Page 24: Network Installation
NETWORKINSTALLATION _ _________________ Connectthecamerato Connectionofthecamera thehomenetworkand withaLANconnection signin andsigningin Note: In order to ensure that the camera Many home networks are Dy- view is displayed on your TV screen namic Networks. If you have over the "BABYWATCH" applica- a dynamic network, you must tion, your TV and Camera should be use a DSL modem that supports connected to the same network. - Page 25 NETWORKINSTALLATION _ _________________ Select the »Search Camera« line Last character/number can be de- with » « or » « and confirm it leted with » « (blue). Λ ▯▯▯▯ with »OK«. All entries can be deleted with – After a while, the found camera »...
- Page 26 NETWORKINSTALLATION _ _________________ RegistrationoftheCam- Enter the camera settings with »OK« and select the »Set Wire- eraviatheWirelessNet- less Connection« line with the » « work“WLAN” or » « and confirm with »OK«. Λ Notes: – After a while, available wireless In order to make the wireless networks will be displayed on network “WLAN”...
-
Page 27: Operationofthecamera
OPERATIONOFTHECAMERA _____________ AdjustingtheImagesharp- Close – function ends and the device returns to the ness current television show. Adjust the image sharpness by Select the desired mode with » « < using the adjustment ring on the or » « and confirm with »OK«. >... - Page 28 OPERATIONOFTHECAMERA _____________ Selectingthepositionof Turnthepicture–vertically theinsetpicture While “live streaming” is shown on the screen, turn the picture In the Widget mode you can select vertically with » « (green). the position at which the inset image ▯ is displayed on the screen. Turnthepicture–horizon-...
-
Page 29: Motion Detection Settings
SETTINGS _________________________________________ Notificationmodeoptions Select the »Movement Rate (%)« line with the » « or » « button Λ Deactivation/Activationofthe and adjust the movement rate MotionDetectionFunction with » « or » «. < > Note: While “live streaming” is shown Movement rate is the proportion on the screen, select the »Set- of the size of the moving object tings«... - Page 30 SETTINGS _________________________________________ Deactivation/Activationof SavingtheSettings theSoundDetection Select the push button »OK« with » « or » « and confirm with If the notification should be only Λ »OK«. made by video monitoring, select the »x« character in the box next Note: to the »Enable Sound Detection«...
-
Page 31: Changing The Password
SETTINGS _________________________________________ Changingthepassword Note: If the new password will not be While "live streaming" is shown saved, select the push button on the screen, select the »Set- »Cancel« with » « or » « and Λ tings« menu with » «... - Page 32 SETTINGS _________________________________________ Selectingthebackground Selectingothercameras imageforthemenu inthelocalnetwork While "live streaming" is shown While "live streaming" is on the screen, select the »Set- displayed on the screen, select tings« menu with » « (red) button. the »Settings« menu with the » « ▯...
- Page 33 1999/5/EC and 2011/65/EU. personal houses , there is general Complete and accurate text of the approval requirement for public use. Declaration of Conformity (DOC) can be accessed via the GRUNDIG ForthecustomersinNor- page on www.grundig.com/down- way: load/doc. This subparagraph is not valid for...
-
Page 34: Environmental Note
INFORMATION _________________________________ Maximum 100 mW EIRP. For the Environmentalnote collection of and compliance with This product has the telemetry data and the cal- been made from culation systems, the device is al- high-quality parts lowed to be used in the outdoors and materials which where it is located (at the same can be re-used and... - Page 35 üzerinden ayırmamanızı sağlar. Kamerayı yağmur, nem (damlama Bunun için yerel ağ erişimine ve veya sıçramalardan) ve ısıdan (sı- üzerine "BABYWATCH" uygulaması caklık, doğrudan güneş ışığı, vs.) kurulmuş bir GRUNDIG televizyona koruyun. ihtiyacınız vardır. Kamera oda şartlarında kullanıma uygun tasarlanmıştır, bu şartların Kamerahakkındabilgiler dışında kullanılması...
-
Page 36: Genelbakiş
GENELBAKIŞ _ ___________________________________ 3 6 TÜRKÇE... - Page 37 GENELBAKIŞ _ ___________________________________ Kamera lensi ve kapağı. DO... DIR, işlevsizdir. WPS/Reset, kamerayı yön- Parlaklık sensörü, kameranın lendiriciye kaydetme düğmesi; bulunduğu yerdeki parlaklığı (Router WPS destekliyorsa, belirler. kamera üzerindeki butona 3-10 İnfrared LED'ler bu yerdeki par- saniye basılı tutup bu sırada laklık yeterli değilse yanar (Gece router üzerindeki WPS butonla- Görüşü...
- Page 38 MONTAJVEBAĞLANTI _ _____________________ GRUNDIG kameranızı uygun bir yere yerleştirebilir veya duvara monte edebilirsiniz. Ambalaj kutusu içinde bir montaj kiti ile bağlantı elemanları vardır. Duvaramontaj Notlar: Taban ünitesi sabit olmalı ve statik yükü çekebilmelidir. Duvar üstyapıları için, örneğin ahşap veya içi boş duvarlarda, Bağlantı...
- Page 39 MONTAJVEBAĞLANTI _ _____________________ Montaj kitini verilen 4 vida ile du- vara sabitleyin. WLAN çalışması için WLAN ante- nini cihazın üzerine vidalayın; veya LAN çalışması için LAN kablosunu »Ethernet« soketine takın. Not: LAN kablosu cihazla birlikte verilir. DC 12V adaptörü prize takın. Elektrik kablosunu »DC12V«...
-
Page 40: Ağkurulumu
AĞKURULUMU ________________________________ Kamerayıevağınabağ- KameranınbirLANbağ- layınveoturumuaçın lantısıilebağlanmasıve oturumaçılması Kamera görüntüsünün "BABY- Not: WATCH" uygulaması üzerinden te- Bir çok ev ağı Dinamik Ağdır. levizyon ekranınızda gösterilmesini Dinamik bir ağa sahipseniz, sağlamak için TV ve Kameranız aynı DHCP destekleyen bir DSL mo- yerel ağa bağlı olması gerekmekte- dem kullanmalısınız. - Page 41 AĞKURULUMU ________________________________ Not: Kameranın adını kendi tercihinize Eğer Kamera arama başarısız göre – Veri girişiyle ilgili notlarda olursa; açıklandığı gibi girin ve kaydedin. » « (kırmızı), Detaylı arama için »Şifre« satırını » « ile seçin ve veya »OK« ile klavyeyi ekrana getirin. Detaylı...
- Page 42 AĞKURULUMU ________________________________ KameranınKablosuzAğ »OK« dümesi ile kamera ayarla- rına girip » « veya » « düğme- “WLAN”bağlantısıüze- Λ siyle »Kablosuz Bağlantı Ayarları« rindenkaydınınyapılması satırını seçip ve »OK« ile onayla- Notlar: yın. Kablosuz ağ “WLAN” ayarla- – Kısa süre sonra ekranda kullanı- rını...
- Page 43 KAMERANINÇALIŞTIRILMASI _ ____________ Görüntünetliğininayar- Kapat– fonksiyon sona erer ve cihaz geçerli lanması televizyon programına Kamera lensi üzerinde bulunan döner. ayar halkasını kullanarak görüntü » « veya » « ile istenilen modu < > netliğini ayarlayın. seçin ve »OK« ile onaylayın. İzlememodununseçil- Kameraaçısınındeğişti- mesi...
- Page 44 KAMERANINÇALIŞTIRILMASI _ ____________ Küçükresimkonumunun Görüntünündöndürülmesi seçilmesi –dikey Küçük görüntünün ekranda gösteri- Ekranda “canlı görüntü” göste- leceği konumu Widget modundan rilirken görüntüyü dikey olarak seçebilirsiniz. çevirmek için » « (sarı) düğmesi- ▯ »@« ile »Uygulama Görünüm ne basın. Modu« menüsünü seçin. Görüntünündöndürülmesi...
- Page 45 AYARLAR Bildirimmoduseçenekleri »Hareket Oranı (%)« satırını » « veya » « düğmesiyle ile seip Λ HareketAlgılamaİşlevinin » « veya » « ile hareket oranını < > kapatılıp/açılması ayarlayın. Not: Ekranda “canlı görüntü” gösterilir- Hareket oranı hareket eden ken »Ayarlar« menüsünü » «...
- Page 46 AYARLAR SesAlgılamanınkapatılıp/ Ayarlarınkaydedilmesi açılması » « veya » « ile »OK« düğme- Λ Bildirimin yalnızca ses monitörü sini seçin ve »OK« düğmesiyle üzerinden yapılıyorsa, »Ses onaylayın. Algılamayı Etkinleştir« yanındaki Not: kutudan »x« karakterini » « veya Değişiklikler kaydedilmeye- » « ile seçin ve »OK« ile silin. Λ...
- Page 47 AYARLAR Görüntüiletimitürünün »OK« düğmesine basın ve mevcut şifreyi klavye ile girerek seçilmesi kaydedin. Ekranda "canlı görüntü" gösteri- »Yeni Parola« satırını » « veya lirken »Ayarlar« menüsünü » « ▯ » « ile seçin ve »OK« ile onay- Λ (kırmızı) ile seçin. layın.
- Page 48 AYARLAR Yerelağdakidiğerkame- ralarınaranması Ekranda "canlı görüntü" gösteri- lirken »Ayarlar« menüsünü » « ▯ (kırmızı) ile seçin. »Kamera Ara« satırını » « veya » « ile seçin ve »OK« ile onay- Λ layın. – Kısa süre sonra bulunan kameraların ikonu ve IP adresi ekrana gelir.
- Page 49 EN 62087 ve kullanımlar için kamusal kullanım EN62301 tüzüklerine uygun olarak açısından genel bir onay gerekliliği belirlenmiştir. vardır. Grundig, bu ürünün 1999/5/EC ve 2011/65/EU sayılı EU tüzüğüne Norveç'tekimüşteriler uygun olduğunu beyan eder. için Uyum beyanının (DOC) tam ve ke- Bu altparagraf NyÅlesund merkezin-...
-
Page 50: Teknik Veriler
BİLGİLER __________________________________________ Yukarıda sıralananlara benzer Çevreileilgilinot diğer uygulamalarda, cihazın Bu ürün, yeniden bulunduğu yer (yükseklik) 10 m'yi kullanılabilen ve aşmamalıdır. geri dönüşüme sokulabilen yüksek İç mekanlarda maksimum 100 kaliteli parça ve mW EIRP. malzemelerden üretilmiştir. 2.DSSS'liSRDileFHSSgibi Bu nedenle, ürünü, hizmet ömrünün diğergenişbantmodülasyon... - Page 51 TÜRKÇE 5 1...
- Page 52 Bu ürün Arçelik A.Ş. tarafından ithal edilmiştir. Müşteri Hizmetleri: Tüm sorunlarınız için Grundig Hizmet Merkezi’ni haftanın 7 günü 24 saat aşağıdaki numaradan arayabilirsiniz. Hizmet Merkezimize 0216 4232207 nolu telefonu arayarak ya da 0216 4232353 nolu tel- efona faks çekerek de ulaşabilirsiniz.
- Page 53 ÜRÜNÜNÜZ 2 (İKİ) YIL SÜRE İLE GARANTİ EDİLMİŞTİR. Garanti süresi Grundig BabyWatch, kullanma kılavuzunda gösterildiği şekilde kullanılması ve Arçelik A.Ş.’nin yetkili kıldığı servis elemanları dışındaki şahıslar tarafından bakım, onarım veya başka bir nedenle müdahale edilmemiş olması şartıyla, malın bütün parçaları dahil olmak üzere tamamen malzeme, işçilik ve üretim hatalarına karşı...
- Page 54 Grundig Intermedia GmbH Beuthener Strasse 41 90471 Nürnberg www.grundig.com 72011 908 7500 40/12...
Need help?
Do you have a question about the G-BCAM-01 and is the answer not in the manual?
Questions and answers