
Related Manuals for CYCLOPS X3

Summary of Contents for CYCLOPS X3
- Page 1 User and Installation Manual Version 2.01 Please read this manual carefully before installing and turning on the X3 Alarm System and store it in a safe place. ...
-
Page 2: Table Of Contents
X3 DIY Vehicle Security System Table of Contents Notes on safety and using this manual ...................... 2 Intended Use .............................. 2 Components of the X3 .......................... 3 Features ................................ 4 Wireless Siren and Sensor Module ...................... 4 Pressure Sensor Module ........................... 5 Remote FOBs ............................. 5 Arm and Disarm ............................ 6 Panic Mode or Vehicle Locator ...................... 6 Programming and Diagnostics ...................... 6 Sleep mode ............................ 6 Safety and Installation Instructions ...................... 7 Installing the X3............................. 8 Installing the Siren and Sensor Module .................... 8 Programming Remote FOBs and Pressure Sensors into the Alarm ............ 10 Installing the Low Pressure Sensor ...................... 10 Programming Mode ............................ 10 Report Diagnostics (3) .......................... 11 Adjusting Shock Sensor Sensitivity (5) .................... 11 Programming a new remote (7) ...................... 12 Toggle shock sensor on/off (9)........................ 12 Toggle milli volt sensor on/off (11) ...................... 12 Programming Low Frequency Sensor (13) .................... 13 ... -
Page 3: Notes On Safety And Using This Manual
Observation: This symbol describes the result of an action. Intended Use The X3 is an alarm system designed for operation in most standard passenger vehicle models under normal operating environments. It may not be suitable for use for certain commercial vehicles or in certain environmental conditions. User Manual & Installation Instructions Page 2 ... -
Page 4: Components Of The X3
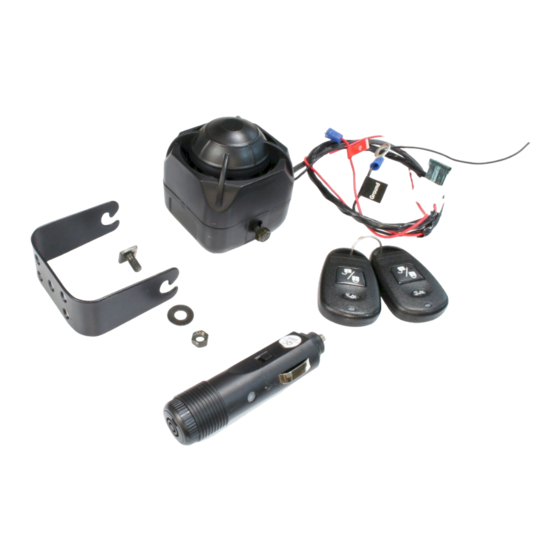
X3 DIY Vehicle Security System Components of the X3 Description Quantity Siren and Sensor Module 1 Pressure Sensor 1 Remote FOBs 2 Operating Manual 1 User Manual & Installation Instructions Page 3 ... -
Page 5: Features
X3 DIY Vehicle Security System Features The X3 is a DIY alarm system that is designed for most passenger vehicles and protects the vehicle and its content from theft. The X3 system consists of 3 main components with the following features. Please note depending you’re your model purchased, components and features may different slightly from those shown. Wireless Siren and Sensor Module The Siren and sensor module is the core module of the X3 system. It is very easy to install requiring only 2 wires for power. The 3rd, shorter wire is the antenna for the system. The module includes a siren as well as two in‐built sensors: • Milli‐volt Sensor – This sensor constantly monitors the battery voltage of the car and is triggered by small voltage drops caused by the doors or trunk being opened • Shock Sensor ‐ Alarm is triggered when the vehicle is bumped, disturbed or towed The system is armed, disarmed as well as programmed by the Remote FOBs. The module also includes the ability to be triggered by additional wireless sensors such as the Pressure Sensor module shown below. User Manual & Installation Instructions Page 4 ... -
Page 6: Pressure Sensor Module
X3 DIY Vehicle Security System Pressure Sensor Module The pressure sensor module is one of the wireless sensors that can be used to trigger the alarm. This sensor monitors changes in air pressure within the vehicle and if a door or trunk is opened, this should trigger the sensor. Please note that to work correctly, this sensor requires that windows, sunroof or any other vehicle openings are closed. The sensor is charged by insertion in your vehicle auxiliary power plug and once charged can be removed if required and it will continue to function elsewhere in the vehicle as long as the battery ... -
Page 7: Arm And Disarm
X3 DIY Vehicle Security System Arm and Disarm The large button showing lock and unlock symbols is used to arm and disarm the system. The siren will respond with two chirps when armed and a single chirp when disarmed. Panic Mode or Vehicle Locator Holding the large button down for more than 3 seconds (when either armed or disarmed) will trigger the siren for 30 seconds. If the remote is pressed to cancel the siren, the unit will return to the disarmed state. If the alarm is not cancelled by the remote and times out, the X3 will return to the previous state (armed/disarmed). Please note: in the final production version, it is intended to move the vehicle locator function to the small button, where it will trigger a different repeating chirp sequence. Holding down the small button in the sample batch will invoke a sleep function where the remotes will be disabled for 1 minute – this function was inserted for testing purposes only. Programming and Diagnostics The X3 has a number of programming and diagnostic features which are selected via a combination of button presses. These functions are described in detail later in this manual. Sleep mode The sleep mode is for future compatibility with planned enhancements to the system. When disarmed, hold the bottom button for more than 3 seconds and the siren will chirp quickly. The unit will now be asleep for 1 minute and will not respond to any remote buttons. After 1 minute the unit will again chirp quickly to signal that it is now awake User Manual & Installation Instructions Page 6 ... -
Page 8: Safety And Installation Instructions
X3 DIY Vehicle Security System Safety and Installation Instructions Please observe the prescribed safety instructions and stipulations provided by your vehicle manufacturer and any service workshops. Caution The Manufacturer will not be held liable for claims for damage resulting from the following: • Installation errors • Damaged to the devices from mechanical influences and over voltage • Alterations made to the device without the explicit permission of the Manufacturer • Use for purposes other than those described in the operating manual Warning Inadequate or incorrect cable connections could result in short circuits which could have the following consequences: • Cable fire • Airbag triggering • Damaged to vehicle electronic, electrical, control and signaling devices Observation Please observe the following instructions: •... -
Page 9: Installing The X3
X3 DIY Vehicle Security System Installing the X3 Installing the Siren and Sensor Module Warning To prevent the risk of short circuits, do not wear metallic objects such as rings, watches and the like when connecting the X3 to the battery. Ensure that you do not short the positive battery terminal to ground (such as the body of the car) via the installation tools. ► Locate the vehicle battery and carefully remove the protective covers that are covering the positive and negative terminals. Warning: Sound Hazard – Sound level from siren speaker (>120dBA @ 1meter) may cause hearing damage. Do not operate siren without adequate hearing protection for you and anyone in the immediate vicinity. ► Secure the Siren and Sensor module mounting bracket to a strong point on the vehicle chassis using the screws and nuts provided as shown below: User Manual & Installation Instructions Page 8 ... - Page 10 X3 DIY Vehicle Security System ► Install the Siren Module to the mounting bracket using the screws and nuts provided. The siren can be mounted at a number of different angles to suit your vehicle as shown in the images below. Wherever possible, it is recommended to mount the siren with the opening facing downwards, towards the ground as shown in the examples below. ► Loosen the nut on the battery negative terminal (black) and connect the X3 negative wire (black) to the battery negative terminal. ► Loosen the nut on the battery positive terminal (red) and connect the X3 positive wire (red) to the battery positive terminal. User Manual & Installation Instructions Page 9 ...
-
Page 11: Programming Remote Fobs And Pressure Sensors Into The Alarm
X3 DIY Vehicle Security System Warning: The Siren and Sensor module will beep once when connected to the battery. Programming Remote FOBs and Pressure Sensors into the Alarm Your X3 should come with the FOBs and Pressure sensor programmed into the siren module. If this is not the case for your product, please see the Troubleshooting section. Installing the Low Pressure Sensor ► Plug the Low Pressure Sensor Module into the vehicle auxiliary/lighter plug. √ The Low Pressure Sensor will enter charging mode when power is supplied to the auxiliary plug. The red LED on the Low Pressure Sensor will remain on to indicate that the battery is charging. ► The sensitivity of the Low Pressure Sensor can be tuned by adjusting the Sensitivity Adjustment Screw. Programming Mode The X3 can be customized via the Programming Mode. Programming mode is entered by holding both remote FOB buttons down for 4 seconds, after which the siren will chirp 4 times. Then the large button is pressed a number of times to enter a specific programming mode as shown in the table below. When pressing the remote to enter a specific ... -
Page 12: Report Diagnostics (3)
X3 DIY Vehicle Security System Report Diagnostics (3) ► If your X3 alarm is triggered and you would like to determine which sensor was the source, you can report X3 diagnostics by following these steps: 1. When disarmed, press and hold both buttons for 4 seconds. 2. The siren will chirp quickly. 3. Press the remote button 3 times (slowly). 4. For each press the siren will respond with a chirp. 5. After the 3 press, wait 2 seconds. 6. The X3 will report the following diagnostics (by chirping a number of times) indicating by the number of chirps, the sensor that caused the most recent trigger as shown in the table below:‐ Sensor No. of Chirps Shock 1 Milli volt 2 Glass breakage 3 Adjusting Shock Sensor Sensitivity (5) ► The X3 has 3 settings for Shock Sensor Sensitivity. You may want to adjust this if you find your shock sensor is too sensitive or not sensitive enough. There are a variety of factors that may affect this such as your vehicle size, the specific location in the vehicle that the X3 is installed and the environment in which your vehicle is used. To adjust the sensitivity of the Shock Sensor – follow these steps:‐ 1. When disarmed, press and hold both buttons for 4 seconds. 2. The siren will chirp quickly. 3. Press the remote button 5 times (slowly). ... -
Page 13: Programming A New Remote (7)
X3 DIY Vehicle Security System Programming a new remote (7) ► You can program a new remote into the X3 by following these steps: 1. When disarmed, press and hold both buttons for 4 seconds. 2. The siren will chirp quickly. 3. Press the remote button 7 times (slowly). 4. For each press the siren will respond with a chirp. 5. After the 7 press, wait 2 seconds – the siren will chirp 4 times. 6. You then have 2 seconds to press any button on the new remote. 7. The unit will chirp again 4 times (in a different tone) when learned, or upon timeout. 8. The unit can track a total of 5 remotes. Toggle shock sensor on/off (9) Depending on your vehicle and environment, it may be desirable to disable the shock sensor. ► The shock sensor can be toggled on/off by following these steps: 1. When disarmed, press and hold both buttons for 4 seconds. 2. The siren will chirp quickly. 3. Press the remote button 9 times (slowly). 4. For each press the siren will respond with a chirp. 5. After the 9 press, wait 2 seconds. 6. The siren will chirp to indicate the new status of the shock sensor Shock Sensor No. -
Page 14: Programming Low Frequency Sensor (13)
X3 DIY Vehicle Security System Programming Low Frequency Sensor (13) ► The low frequency sensor can be programmed into the X3 by following these steps: 1. When disarmed, press and hold both buttons for 4 seconds. 2. The siren will chirp quickly. 3. Press the remote button 13 times (slowly). 4. For each press the siren will respond with a chirp. 5. After the 13 press, wait 2 seconds – the siren will chirp 4 times. 6. You then have 2 seconds to program in the Low Pressure Sensor by turning it on. You can observe the red LED blinking when turned on. 7. The unit will chirp again 4 times (in a different tone) when learned, or upon timeout. User Manual & Installation Instructions Page 13 ... -
Page 15: Troubleshooting
X3 DIY Vehicle Security System Troubleshooting Antinuisance feature When armed, the X3 is designed to sound the siren for 30 seconds when triggered. The X3 is designed with an anti‐nuisance feature wherein the system will disable a trigger circuit and not sound the alarm if that particular circuit has been triggered more than 3 times since it was armed. Upon disarmed, the trigger count for that circuit is reset. This is important for example if the vehicle is parked in a parking garage and its shock sensor is being constantly triggered by a nearby jackhammer. Initial Connection and Learn Mode Note that for the initial sample batch of X3s, the remote FOBs and Pressure Sensor are already pre‐ programmed into the siren module. For future production versions this may not be the case and the initial learn mode described below should be followed. √ Upon connection to the battery, the X3 will commence Learn Mode and will chirp 3 high tones and 3 low tones. ► Program the first remote into the X3 by pressing any of the buttons on the remote control. √ The X3 will stop chirping indicating that you have successfully programmed in the first remote control. ► To verify, you can press the lock/unlock button and observe the following: Armed 2 chirps Disarmed 1 chirp ► Disarm the X3 and program the second remote control by entering the Program Mode using the following steps. 1. When disarmed, press and hold both buttons for 4 seconds. 2. The siren will chirp quickly. 3. Press the remote button 7 times (at an interval of around one press per second). 4. For each press, the siren will respond with a chirp. 5. After the 7 press, wait 2 seconds. The siren will chirp 4 times. 6. You then have 2 seconds to press any button on a new remote. 7. The unit will chirp again 4 times (in a different tone) when learned, or upon timeout. ... -
Page 16: Programming The Low Pressure Sensor To The X3
X3 DIY Vehicle Security System Programming the low pressure sensor to the X3 ► Disarmed the X3 and program the second remote control by entering the Program Mode using the following steps. 1. When disarmed, press and hold both buttons for 4 seconds. 2. The siren will chirp quickly. 3. Press the remote button 13 times (slowly). 4. For each press the siren will respond with a chirp. 5. After the 13 press, wait 2 seconds – the siren will chirp 4 times. 6. The user then has 2 seconds to program in the Low Pressure Sensor by turning it on. You can observe the red LED blinking when turned on. 7. The unit will chirp again 4 times (in a different tone) when learned, or upon timeout. ► To verify, turn on the low pressure sensor and arm the X3. Trigger the low pressure sensor by blowing into it and observe that the LED flashes when triggered and the X3 alarm sounds. To stop the alarm, simply disarm the system via the remote. User Manual & Installation Instructions Page 15 ...
Need help?
Do you have a question about the X3 and is the answer not in the manual?
Questions and answers