Table of Contents
Advertisement
Advertisement
Table of Contents

Summary of Contents for Snotty TS42S
- Page 1 7 in 1 Talking Infrared Thermometer Model: TS42S User's Manual Please read this instruction manual carefully before using your ear thermometer For a voice recorded version of this manual please visit www.snotty.com.au/products/thermometers/7in1- talking-thermometer...
-
Page 2: Table Of Contents
Index Introduction Important Information Before Use Product Identification and Caution Description of LCD Display Setting Volume, °C/°F and Date/Time Using the Thermometer Memory Recall and Deletion Battery Installation Trouble-shooting Storage and maintenance Technical Specifications Warranty Contact... -
Page 3: Introduction
Introduction Thank you very much for choosing this product. Utilizing infrared technology, this thermometer takes temperatures in seconds by measuring heat generated by the surface skin of the forehead or other objects. This product conforms to the provisions of the EC directive MDD(93/42/EEC).Its advantages include: 1. -
Page 4: Important Information Before Use
Important Information Before Use When using this product, please be sure to follow all instructions listed below. Failure to follow these instructions may affect the accuracy of the thermometer and cause injury. 1. Do not disassemble, repair, or remodel the thermometer. -
Page 5: Product Identification And Caution
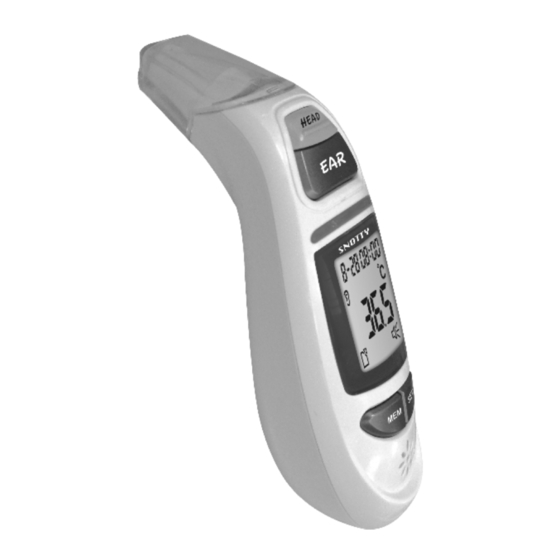
Product Identification and Caution Sensor tip with lens Forehead/cover cap (cover cap removed) Forehead thermometer mode button (forehead) Ear thermometer mode/On button (ear) LED signal red: high temperature alarm green: normal LCD Display Memory button Set button Speaker Battery compartment... -
Page 6: Description Of Lcd Display
Description of LCD Display Date Time “Measurement in Forehead icon progress” symbol Measurement mode “Ear” Unit of measurement (°C) Measurement mode Unit of measurement (°F) “Object” Measurement display “ Memory” symbol and storage space Speaker symbol number Battery warning symbol... -
Page 7: Setting Volume, °C/°F And Date/Time
Setting Volume, °C/°F and Date/Time LCD Display Press the SET button for 5 second 1. Volume Change the setting Save the setting and Confirm the entry 2. °C/°F Change the setting Save the setting and Confirm the entry 3. Date/Time Change the Year Save the setting and Confirm the entry... - Page 8 Setting Volume, °C/°F and Date/Time Setting Volume The unit in which the temperature will be displayed, the date and the time. When the thermometer is used for the first time and each time the batteries are changed, the date and time are displayed in the format 1-1 00:00 during the basic set-up (after the self test).
- Page 9 Setting Volume, °C/°F and Date/Time Changing from Fahrenheit to Celsius 1. Press the "SET" button to turn the °C/°F function on and off. 2. Press the “MEM” button to confirm entry.
- Page 10 Setting Volume, °C/°F and Date/Time Date/Time Function 1. Press the “SET” button to change. 2. Press the “MEM” button to confirm entry. 3. The blinking Date, followed by Year, Hour and Minutes will display. Repeat steps 2 and 3 to adjust the date/time setting.
-
Page 11: Using The Thermometer
Using the Thermometer Before each use, please check that the lens is intact, cleaned, if damaged, please contact your retailer or the service address. Bear in mind that the thermometer needs to have been in the room in which the measurement is taken for at least 30 minutes before use. - Page 12 Using the Thermometer Measuring body temperature in the ear 1. Press the EAR button for 1 second to switch the thermometer on. Following a successful self test, the device emits two short beeps. 2. Remove the cap by gently lifting the front of cap upwards (1) while simultaneously pulling it off forward (2).
- Page 13 Using the Thermometer Measuring body temperature on the forehead 1. Please note that the forehead/temples must be free from sweat and cosmetics and that taking medication and skin irritations can distort the result when measuring temperature on the forehead. 2. Press the HEAD button for 1 second to switch the thermometer on.
- Page 14 Using the Thermometer Measuring surface temperature 1. Press the EAR button for 1 second to switch the thermometer on. Following a successful self test, the device emits two short beeps. 2. Then press the “MEM” and EAR buttons simultaneously for 3 seconds to switch to the Object temperature mode.
- Page 15 Using the Thermometer The Readings: Release the button. The end of the measuring time is signalled with a short beep and the measured value appears on the display. (1) < 38°C: The reading show on LCD, meanwhile the backlight and alert light (green) will light for 3 sec and then the voice will pronounce the temperature.
-
Page 16: Memory Recall And Deletion
Memory Recall and Deletion Memory Recall: You can recall up to 30 measurements plus an average of all currently stored measurements in memory to share with your physician or trained healthcare professional. 1. Press the “MEM” button. The first reading displayed is the average of all measurements stored in memory. -
Page 17: Battery Installation
Battery Installation When the batteries get weak, the battery warning symbol appears" ". It is still possible to measure temperature. The batteries must be replaced. When the battery symbol flashes" " and Lo appears in the display, the batteries must be replaced. -
Page 18: Trouble-Shooting
Trouble-shooting When a malfunction or incorrect temperature measurement occurs, an error message will appear as described below (comes with backlight and voice prompt). LCD Display Cause Solution The temperature Operate the measured is higher thermometer only than between the specified 1. -
Page 19: Storage And Maintenance
Storage and maintenance • Clean the probe and tip with an alcohol swab before and after each measurement. • Use a soft, dry cloth to clean thermometer body. Never use abrasive cleaning agents, thinners or benzene for cleaning. Do not scratch the surface of the probe lens or the display. -
Page 20: Technical Specifications
Technical Specifications • Range of Measurement : 43℃ Body Temperature: 10°C ~50°C (50.0°F ~ 122.0°F) 34℃ 100℃ Object Temperature: 0°C ~ 100°C(32.0°F~212.0°F) 0℃ • Measuring accuracy : Ear: ±0.2°C(0.4°F): from 35.5°C to 42°C (95.9°F to 107.6°F) 42℃ ±0.3°C(0.5°F): outside the range 35.5℃... - Page 24 Wellkang Ltd 29 Harley St. W1G 9QR LONDON, U.K. Manufactured for: Perpetus Pty Ltd Australia ABN 49 142811 069 Made in China SNOTTY P.O. Box 111 Labrador Qld 4215 Australia web: www.snotty.com.au email: info@snotty.com.au 72-T42MN-031...
Need help?
Do you have a question about the TS42S and is the answer not in the manual?
Questions and answers