Table of Contents
Advertisement
Quick Links
Twizzle
Activity Centre
This product conforms to BS EN 1273:2005
Suitable for children who can sit up unaided, approximately
from 4 months. It is not intended for children who can walk by
themselves and weigh more than 11kg/25lbs.
INSTRUCTIONS: Read the instructions carefully before use and
keep them for future reference. The child may be hurt if you
do not follow these instructions.
V5
Advertisement
Table of Contents

Related Manuals for My Child Twizzle

Summary of Contents for My Child Twizzle
- Page 1 Twizzle Activity Centre This product conforms to BS EN 1273:2005 Suitable for children who can sit up unaided, approximately from 4 months. It is not intended for children who can walk by themselves and weigh more than 11kg/25lbs. INSTRUCTIONS: Read the instructions carefully before use and keep them for future reference.
-
Page 2: Safety Instructions
Safety instructions Warning: Adult assembly required. Warning: Use the activity centre only if your child meets all of the following conditions: Your child is at least 4 months old. • Your child can sit up unaided. • Your child is less than 76.2cm (30 inch) tall. •... -
Page 3: Battery Disposal
0161 335 2508. Welcome Thank you for purchasing the MyChild Twizzle Activity Centre. Please read the instructions and warnings carefully before use to ensure safe and satisfactory operation of this product. -
Page 4: Parts Checklist
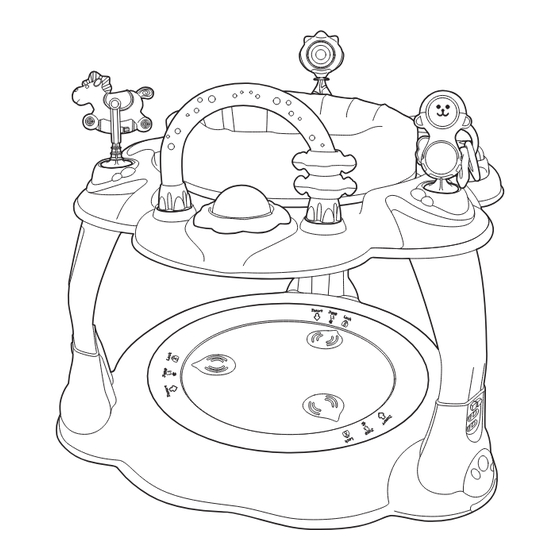
Parts checklist Contained in your carton are: Part Legs Seat fabric Screws Cover plates Toy bar Toy horse Toy flower Toy monkey Toy rings Toy bar housing Musical toy Seat unit * Footplate Seat tray Base * Comes attached to seat tray (14) You will require one Phillips screwdriver (not supplied). -
Page 5: Base Assembly
Base assembly 1. Insert the footplate (A) into base (B), 2. Press down on the footplate and ensuring you line up the arrows on the rotate it to the right, till the arrows on the footplate with the ‘Insert’ arrow on the footplate line up with the ‘Lock’... - Page 6 Legs assembly 1. Attach legs at points (1), (2) and (3) on the underside of the seat tray. 2. Working on one leg at a time. (A) Insert a leg. (B) Place a cover plate on. (C) Secure with a screw. Be careful not to overtighten the screw.
- Page 7 Seat tray and base assembly 1. Line up all the legs (A) with the fixing points on the base. Press in the button (B) on each leg and push the leg into the fixing point on the base until they ‘click’ into place (C). Repeat on remaining legs.
- Page 8 Musical toy assembly (continued) 2. Insert 2 x 1.5V AA batteries (not supplied) ensuring the correct battery orientation is observed and then reattach the cover, replacing the screw and ensuring it is not over tightened. ATTENTION: Refer to ‘Battery warnings’ on page 1.
- Page 9 Toys and toy bar assembly 1. To assemble the toy bar: (A) Thread the two toy rings onto the toy bar. (B) Place a toy bar housing on each end of the toy bar. (C) Rotate toy bar housings to the right to tighten.
- Page 10 Seat unit assembly 1. Remove the seat unit from the seat tray 2. Place the seat fabric into the seat unit. by pressing the clips (A) on the underside of the seat unit whilst lifting and rotating the seat unit. 3.
- Page 11 Seat unit assembly (continued) 5. Insert the assembled seat unit into the seat tray, pressing it down until it ‘clicks’ into place. Check the seat unit is able to rotate fully. Removing the seat unit 1. Press the clips (A) on the underside of the seat unit whilst lifting and rotating the seat unit.
-
Page 12: Height Adjustment
Height adjustment 1. Press in the button on each leg and raise or lower the leg until it clicks into place. Note: Ensure all legs are set at the same height before using. WARNING: DO NOT adjust the height whilst a child is seated in the activity centre. - Page 13 Removing the footplate 1. Press down on the footplate and rotate it to the left. Allow the footplate to spring up and then press down on one edge of the footplate to force the opposite edge up and remove the footplate. Play table assembly 1.
- Page 14 Play table disassembly 1. Press in the three buttons (A) on the underside of the play table/footplate and remove. page 13...
-
Page 15: Care And Maintenance
Care and maintenance To prolong the life of your nursery product keep it clean and do not leave it in • direct sunlight for extended periods of time. Plastic parts can be wiped clean with a damp cloth and mild soap then allowed •... - Page 16 Customerservice@kooltrade.co.uk Imported by MyChild. M34 3QA www.mychild.co.uk Tel: 0161 335 2508...
Need help?
Do you have a question about the Twizzle and is the answer not in the manual?
Questions and answers