
Related Manuals for Dorr WildSnap IR X12

Summary of Contents for Dorr WildSnap IR X12
- Page 1 Wildsnap Ir X12 InstructIon Manual Game and Surveillance camera WildSnap ir X12 www.doerrfoto.de...
-
Page 2: Table Of Contents
InstructIon Manual DÖrr Wildsnap Ir X12 Game and surveillance camera IMportant notes Before starting to use the camera, please note the following safety hints: • Your camera is fitted with a weatherproof housing according to protection class IP54 (dust and splash waterproof. Therefore the camera can be used outdoors. Nevertheless protect the camera from extreme weather conditions and direct sunlight. The recommended storage and operation temperature is -10 to 40 °C. • Make sure to use fresh batteries of the same type and brand only. • Use a soft cleaning tissue to clean the camera lens. Avoid touching the lens with your fingers. • Remove dust and spots at the camera housing with a soft and slightly damp tissue. • Store the camera at a dry and cool place when not in use. • Remove the batteries in case you do not use the camera for a longer period. • Do not drop the camera onto a hard surface. -
Page 3: Camera Description & Overview
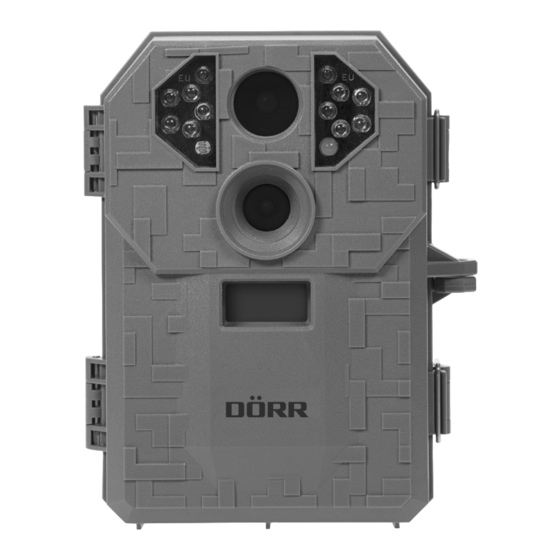
caMera DescrIptIon anD overvIeW twilight sensor Ir leDs Motion sensor Motion sensor in test Mode camera lens lead through for u-lock Display Battery compartment lid control Dial for Quick Installation & programming sD card slot Mini usB tripod socket Input socket for external Battery lead through for Fixing Belt Battery compartments... -
Page 4: Quick Start Guide
QuIck start GuIDe choose one of the two available energy sources Insert 4 AA batteries in each of the 2 battery compartments making sure to respect the correct polarity or connect the camera to a 12 V battery using the socket DC 12 V at the camera bottom. AA batteries and 12 V battery are not included in the scope of delivery. Insertion of the sD/sDHc Memory card Insert the SD memory card into the card slot at the camera bottom. Respect the symbol for the direction of insertion. Make sure to use a SD memory card with a capacity of minimum 2 GB, max 32 GB and speed of minimum Class 10. camera Installation Mount the camera on a tree or pole or any other suitable object using the supplied belt or. Do not fix the belt finally at this stage. Make sure that the camera won’t move with the wind. The optimum distance to the object is between 3 to 12 meters. Theoretically, larger distances are also possible, however with less reliability and a larger picture frame. We recommend to take a few test shots and to finally fix the camera afterwards – read more in chapter camera programming. camera activation Use the rotary dial to select the desired setting. For details read the chapter camera programming. Position default Settings QSET1 Resolution 6 MP – 3 pictures – 30 s delay QSET2 Resolution 6 MP – 1 picture – 30 s delay QSET3 10 s Video VGA – 30 s delay CUSTOM Resolution 4 MP – 1 picture – 5 s delay (default) Definition of delay: It is a predetermined pause during which the motion sensor is not active and no images will be taken. - Page 5 oFF: This setting switches the camera off. Qset1: Quick-set 1 Quick-set program 1 With this setting the screen shows the following information: 1. – Delay. The camera counts down from 30 to 0 s. 2. – Ready. The camera is now in operation and ready to take pictures. 3. The display also shows a chart indicating the battery status. 4. In case the camera does not notice any movements, the display will switch off after 10 s. In this mode the camera takes pictures with a resolution of 6 MP. With every activation of the motion sensor, the camera takes 3 continuous shots. Then the motion sensor takes a 30 s pause during which no pictures are taken. Qset2: Quick-set 2 Quick-set program 2 – Same display information as with QSET1 In this mode the camera takes pictures with a resolution of 6 MP. With every activation of the motion sensor, the camera takes 1 picture. Then the motion sensor takes a 30 s pause during which no pictures are taken. Qset3: Quick set 3 Quick-set program 3 – Same display information as with QSET1 In this mode the camera takes a 10 s video sequence with VGA resolution. Then the motion sensor takes a 30 s pause during which no pictures are taken.
-
Page 6: Memory Card (Sd/Sdhc)
• reset Camera settings are reset to the factory’s default values. • Delete Deletes all date on the SC card. Check first if the images and films have been saved on another media before you delete. • Quit Quits the programming mode. After a countdown of 30 s the camera will be ready to shoot test Mode: Select position test with the rotary dial. In this mode you can check the motion sensor’s range. Move in front of the camera forward, backward, to the left and to the right. As long as you move within the sensor’s range a green LED will blink at the right top window at the camera front. Once you move out of the range, the green LED stops blinking. Whenever necessary, redirect the camera. MeMory carD (sD/sDHc) Installation Open the camera’s protective housing. The SD card slot is located at the camera bottom. Insert the SD memory card as shown on the sketch at the housing. Make sure to format the memory card and that the card is not write-protected. The display will indicate a missing or false SD memory card. The camera supports SD/SDHC cards with a capacity of 2GB to 32GB. For best results we recommend the use LEXAR brand cards with a speed of minimum "Class 10". sD carD capacIty overvIeW Chart shows number of pictures or video sequences depending on resolution and SD card capacity. 6 MP 4 MP 2 MP Video 5 s Video 10 s Video 15 s Video 30 s 2 GB Sd c 1462 2048 3187 1024... -
Page 7: Specifications
specIFIcatIons Number and Type of LEDs 12 high performance infrared leds Infrared Flash IR 840 nm Trigger Time approx. 1,5 s resolution of camera Sensor 2 MP Sensor of latest generation/interpolated up to 6 MP Video Sequence Length 5/10/15/30 s at choice Video Format AVI/Codec, MJPG 30 FPS Number of Photos per Motion Detection 1 to 6 pictures (Burst) selectable motion Sensor 45° angle, distance approx. 18 m Flash Range approx. 18 m Sensor delay 5/10/15/30/60/120 s at choice Time Stamp Date/time Continuous Shooting Mode / Interval Mode not available Housing Protection Class IP 54 energy Source 8 x 1,5 V Mignon AA batteries or 12 V external battery (not included) memory card SD/SDHC2 GB up to 32 GB (not included) Specifications and design are subject to change without notice. 03.2015... -
Page 8: European Conformity Declaration Notes
european conForMIty DeclaratIon notes Weee InForMatIon The Waste Electrical and Electronic Equipment Directive (WEEE Directive) is the European community directive on waste electrical and electronic equipment, which became European law in February 2003. The main purpose of this directive is to prevent electronic waste. Recycling and other forms of waste recovery should be encouraged to reduce waste. The below symbol (trash can) on the product and on the packing means that used electrical and electronic products should not be disposed of with general household waste. It is your responsibility to dispose of all your electronic or electrical waste at designated collection points. Disposing of this product correctly will help to save valuable resources and it is a significant contribution to protect our environment as well as human health. For more information about the correct disposal of electrical and electronic equipment, recycling and collection points please contact your local authorities, waste management companies, your retailer or the manufacturer of this device. roHs conForMIty This product is compliant with the European directive 2011/65/EU of January 03, 2013 for the restriction of use of certain hazardous substances in electrical and electronic equipment (RoHS) and its amendments. ce MarkInG The CE marking complies with the European directives. You can download the relative EU declaration of conformity with following link: http://www.doerrfoto.de/info/EG-Konformitätserklärungen DÖrr GmbH · Messerschmittstr. 1 · D-89231 Neu-Ulm · Fon: +49 731 97037-0 · Fax: +49 731 97037-37 · info@doerrfoto.de w ww.doerrfoto.de...
Need help?
Do you have a question about the WildSnap IR X12 and is the answer not in the manual?
Questions and answers