Table of Contents
Advertisement
Advertisement
Table of Contents

Related Manuals for Creative SB1540

Summary of Contents for Creative SB1540
- Page 1 U s e r ’ s G u i d e Mo d e l N o : S B 1 5 4 0...
-
Page 2: Package Checklist
Registering Your Product Registering your product ensures you receive the most appropriate service and product support available. You can register your product during installation or at www.creative.com/register. Please note that your warranty rights are not dependent on registration. More Help For the latest news and products for the Sound Blaster, please visit www.soundblaster.com. - Page 3 Using Creative Software AutoUpdate Locating, downloading and installing updates for your Creative products is now simpler and faster with the web-based Creative Software AutoUpdate system. When you connect to Creative Software AutoUpdate via the Internet, the website will analyze your computer system to determine your operating system, language and which Creative products are connected to your system.
-
Page 4: About Your Hardware
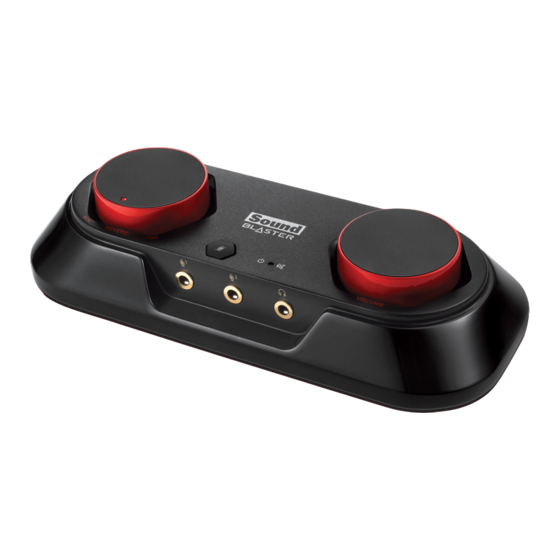
About Your Hardware Refer to the Quick Start leaflet for instructions on setting up your audio device. To learn more about your product, refer to the section below. Your Audio Device Your USB audio device has these jacks and connectors to enable the attachment of a wide variety of devices. - Page 5 Note: When devices are connected to mobile-in and line-in simultaneously, the device connected to the mobile-in has higher priority. Using display indicators and control dials Your USB audio device has the following indicators and control dials to adjust and monitor operational status.
-
Page 6: Connecting To A Computer
Setting Up Your Audio Device Connecting to a Computer Connect your USB audio device to a computer using the Micro-USB to USB cable provided. The power indicator will light up in red once the device is properly connected. Plug in your headphones or speakers to the device and experience the power of Sound Blaster with all your audio and music played from your computer. -
Page 7: Connecting To A Mobile Device
Connecting to a Mobile Device Enjoy your favourite music from your mobile devices including iPhones, Android phones and tablets, by connecting your mobile device to the mobile-in jack of the Sound Blaster R3/A6U using the 4-pole analog cable provided. To power up the USB audio device, connect an external power source, e.g. 5V 1A USB power adapter to the USB port. -
Page 8: Playing Music
Using Your Audio Device Your audio device works seamlessly with many external devices. To connect these peripherals, refer to their relevant sections below: Playing Music Singing Karaoke Creating/Recording Music Broadcasting/Podcasting Playing Music Experience enhanced audio from your computer or mobile device, by connecting analog stereo speakers to the line-out jack or by connecting stereo headphones to the headphone jack of the Sound Blaster R3/A6U. - Page 9 Component MicroUSB-to-USB cable USB port Analog speaker cable Analog stereo speakers Headphones Playing Music from a Mobile Device Using Your Audio Device - 8 -...
- Page 10 Component 4-pole analog cable Headset jack Analog speaker cable Analog stereo speakers Headphones Using Your Audio Device - 9 -...
-
Page 11: Singing Karaoke
Singing Karaoke To play karaoke music from external sources like computer or mobile device, connect the audio source to the USB port or mobile-in jack of the audio device. Then, connect your microphone(s) to the mic-in jack(s) and headphones to and headphone jack respectively. Singing Karaoke on a Computer Component MicroUSB-to-USB cable... - Page 12 Singing Karaoke on a Mobile Device Component 4-pole analog cable Headset jack Analog speaker cable Analog stereo speakers Microphone(s) Headphones Note: When headphones and a line-out device are connected simultaneously, audio will output to the headphones. Using Your Audio Device - 11 -...
- Page 13 To record audio from the microphones, ensure that you connect your computer, mobile device, or even external recording devices to the USB port or mobile-in/line-in jack. For more information on configuring the software for live instruments recording, refer to Using the Creative Software Suite - Microphone Settings. Recording Music on a Computer Component MicroUSB-to-USB cable USB port...
- Page 14 Recording Music on a Mobile Device Component 4-pole analog cable Headset jack Microphone Clip Microphone Guitar Headphones Attaching a Clip Microphone to a Guitar 1. Mount the clip microphone on the rim of the guitar's sound hole. 2. Adjust the gooseneck microphone to your preferred position. 3.
- Page 15 Broadcasting/Podcasting To do online streaming or broadcasting, connect your computer or mobile device to the USB port or mobile-in jack. You can also connect an external device like DAT (Digital Audio Tape) player or CD player to the line-in jack for music input. Broadcasting with a Computer Component Microphone...
- Page 16 Broadcasting with a Mobile Device Component Microphone Headset jack 4-pole analog cable External recording devices (DAT players, CD players, etc.) Using Your Audio Device - 15 -...
-
Page 17: Installing And Uninstalling Software
3. To complete the installation, follow the instructions on the screen. 4. When prompted, restart your computer. For Mac OS 1. Using your web browser, visit www.creative.com/support and locate the software package for the Mac OS. 2. Download this package into your local hard disk. - Page 18 4. Click the Yes button. 5. When prompted, restart your computer. For Mac OS 1. Click Applications > Creative > Creative Uninstaller 2. Select the Creative product to be uninstalled. 3. Click the Uninstall button. 4. Follow the on-screen instructions.
- Page 19 Creative Smart Recorder Creative WaveStudio Creative Software AutoUpdate Creative System Information Creative Product Registration Various other bonus Creative applications are also compatible for your audio device. Visit www.creative.com/support and navigate to the relevant product page to view and download these applications. Note The applications included with your audio device may differ from those described here.
- Page 20 Select whether the Sound Blaster R3/A6U Control Panel is activated when Windows starts. Restore default settings. Select the audio playback device. Select the supported software languages available for your system. General information regarding your Sound Blaster R3/A6U Control Panel software. Using the Creative Software Suite - 19 -...
- Page 21 Using the Creative Software Suite - 20 -...
-
Page 22: Microphone Settings
Chat tab, and speak to the host in the karaoke room. FX will be turned off by default, and Microphone Monitoring will always be turned off. Switch back to Karaoke mode to start a new singing session. Using the Creative Software Suite - 21 -... - Page 23 Select Instrument Mic for recording live instruments in high resolution (24-bit 48kHz). Note: When Instrument Mic is being selected, no microphone effect will be applied to the MIC 2 input. Both line-in jack and mobile-in jack will be disabled. Using the Creative Software Suite - 22 -...
- Page 24 SBX Pro Studio Smart Volume addresses the problem of abrupt volume level changes during playback and between songs by automatically and continously measuring volume, and intelligently applying gain and attenuation to compensate for those changes. Using the Creative Software Suite - 23 -...
- Page 25 1. Speakers / Headphones Configuration Displays the audio device that is currently connected to your computer. 2. Testing your audio playback Click to hear a sample audio clip being played back through your setup. Using the Creative Software Suite - 24 -...
-
Page 26: Mixer Settings
3) Go to the Mixer page of the Sound Blaster R3/A6U Control Panel. From the Instrument Mic/Line-In option under REC, click , and enable Listen to this device. Note: For the audio source playback, ensure that your Sound Blaster R3/A6U Control Panel is running. Using the Creative Software Suite - 25 -... -
Page 27: Equalizer Settings
Click to save the new configuration as a new preset. Note: The list of default EQ presets cannot be deleted or overwritten. Using the Creative Software Suite - 26 -... -
Page 28: General Specifications
General Specifications Connectivity Inputs Two 3.5 mm (1/8") jacks for mono analog microphone input One 3.5 mm (1/8") jack for stereo line-level analog input One 3.5 mm (1/8") jack for 4-pole analog cable USB Input: 5V 500mA Outputs One 3.5 mm (1/8") jack for stereo analog headphones One 3.5 mm (1/8") jack for stereo line-level analog output Interfaces One Micro-USB port... -
Page 29: Troubleshooting And Support
Troubleshooting and Support This section provides solutions to problems you may encounter during installation or normal use. This includes: Problems with Sound Problems with Simultaneous Playback/Recording Tips to Improve Your Singing/Recording Quality Problems with Sound No sound from the headphones. Check the following: The headphones are connected to the headphone jack. -
Page 30: Additional Support
Additional Support If you encounter any other issues or have any other enquiries about your Sound Blaster R3/A6U or any other Creative products, please visit our comprehensive knowledge base at support.creative.com or www.soundblaster.com for additional information. -
Page 31: License And Copyright
Information in this document is subject to change without notice and does not represent a commitment on the part of Creative Technology Ltd. No part of this manual may be reproduced or transmitted in any form or by any means, electronic or mechanical, including photocopying and recording, for any purpose without the written permission of Creative Technology Ltd.
Need help?
Do you have a question about the SB1540 and is the answer not in the manual?
Questions and answers