Advertisement
Quick Links
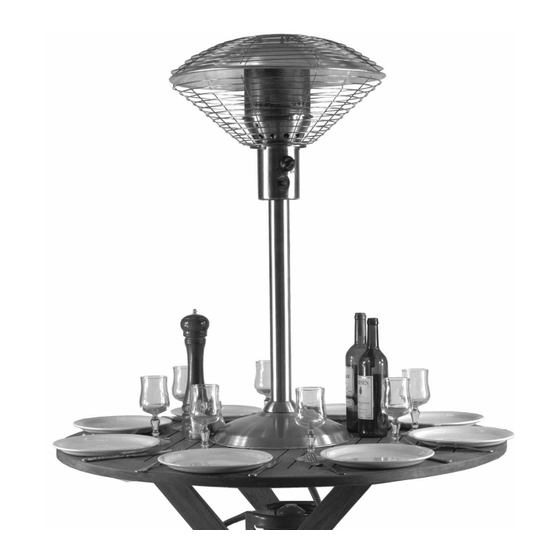
Assembly & User Instructions
Stainless Steel
4kW Table Top Patio Heater
These instructions are for your safety. Please read them thoroughly
before use and retain them for future reference
Visit us at www.uig.biz
Assembly & User Instructions
Stainless Steel
4kW Table Top Patio Heater
These instructions are for your safety. Please read them thoroughly
before use and retain them for future reference
Visit us at www.uig.biz
Advertisement

Related Manuals for Sahara 4kwStainlessSteel

Summary of Contents for Sahara 4kwStainlessSteel
- Page 1 Assembly & User Instructions Assembly & User Instructions Stainless Steel Stainless Steel 4kW Table Top Patio Heater 4kW Table Top Patio Heater These instructions are for your safety. Please read them thoroughly These instructions are for your safety. Please read them thoroughly before use and retain them for future reference before use and retain them for future reference Visit us at www.uig.biz...
-
Page 2: Parts Supplied
Parts Supplied Parts Supplied Ref Description Illustration Qty Ref Description Illustration Qty Ref Description Illustration Qty Ref Description Illustration Qty Base Base Parasol Parasol Base Weight Base Weight Upper Upper Lantern Lantern Guard Guard Decorative Decorative Support Pole Support Pole Regulator Regulator Lantern... - Page 3 Fixings Supplied Fixings Supplied Ref Description Illustration Qty Ref Description Illustration Qty Ref Description Illustration Qty Ref Description Illustration Qty M6 x 32 M6 x 32 Bolt Bolt Washer Washer M6 Nut M6 Nut Screw Screw M6 Dome M6 Dome Hose clip Hose clip Head Nut...
-
Page 4: Assembly Step
Assembly step 1 Assembly step 1 Base M6 x 32 Base M6 x 32 Support M6 Nut Support M6 Nut Weighted Weighted Washer Washer Bolt (A) Bolt (A) Pole Pole Base Plate Base Plate Hold weight into position from Hold weight into position from under side of base as shown. - Page 5 Assembly step 2 Assembly step 2 Lower pole cap Lower pole cap Slide lower pole cap Slide lower pole cap down pole and rest down pole and rest on base. on base. Visit us at www.uig.biz Visit us at www.uig.biz...
- Page 6 Assembly step 3 Assembly step 3 Lower guard Lower guard Slide lower guard over support pole Slide lower guard over support pole Lower Guard Lower Guard Support Pole Support Pole Visit us at www.uig.biz Visit us at www.uig.biz...
- Page 7 Assembly step 4 Assembly step 4 Regulator Regulator Lantern and Gas hose Lantern and Gas hose Gas hose Gas hose Using snap connector, connect Using snap connector, connect the short gas hose to gas hose the short gas hose to gas hose already attached to heater.
- Page 8 Assembly step 5 Assembly step 5 To check patio heaters for leaks To check patio heaters for leaks To be performed in a well ventilated area. Lie heater down on the floor as shown To be performed in a well ventilated area. Lie heater down on the floor as shown below.
- Page 9 Assembly step 6 Assembly step 6 M4 Screw (E) M4 Screw (E) Secure lantern to support pole Secure lantern to support pole with 3 screws provided. with 3 screws provided. Visit us at www.uig.biz Visit us at www.uig.biz...
- Page 10 Assembly step 7 Assembly step 7 Slide lower guard up pole Slide lower guard up pole through slots in metal lip of through slots in metal lip of lantern and rotate to secure in lantern and rotate to secure in position as shown.
- Page 11 Assembly step 8 Assembly step 8 M6 Nut M6 Nut Parasol Parasol Parasol Place parasol into position Parasol Place parasol into position aligning the three holes in aligning the three holes in the parasol with the three the parasol with the three bolts in the burner head and bolts in the burner head and secure with 3 M6 nuts.
- Page 12 Assembly step 9 Assembly step 9 Upper guard Upper guard (fig.a) (fig.a) Place upper guard Place upper guard onto parasol and onto parasol and secure with 3 dome secure with 3 dome head nuts provided. head nuts provided. (see fig.a) (see fig.a) Visit us at www.uig.biz Visit us at www.uig.biz...
- Page 13 Leak Testing Leak Testing • To be performed in a well ventilated area. • To be performed in a well ventilated area. • Confirm all control knobs are in the off position. • Confirm all control knobs are in the off position. •...
- Page 14 Use Instructions Use Instructions Before proceeding make sure you understand the warnings section of this manual. Before proceeding make sure you understand the warnings section of this manual. Lighting instructions: Lighting instructions: • Turn on gas supply at cylinder. • Turn on gas supply at cylinder. •...
- Page 15 WARNINGS WARNINGS • This product is for OUTDOOR USE ONLY • This product is for OUTDOOR USE ONLY • NEVER use indoors, in an enclosed area or below ground level. • NEVER use indoors, in an enclosed area or below ground level. •...
- Page 16 • This table top heater is not suitable for use with plastic tables. • This table top heater is not suitable for use with plastic tables. • In the interest of safety we recommend that this table top heater should only be •...
Need help?
Do you have a question about the 4kwStainlessSteel and is the answer not in the manual?
Questions and answers
what gas bottle size and type of gas needed. for this table top heater.
The Sahara 4kW Stainless Steel table top heater requires propane gas and a 13kg gas bottle.
This answer is automatically generated