
Related Manuals for Amacam AM-M80

Summary of Contents for Amacam AM-M80
-
Page 1: User Manual
AM-M80 USER MANUAL Please Register Your AM-M80 www.amacam.net/product-registration... -
Page 2: Table Of Contents
AMACAM AM-M80 USER MANUAL CONTENTS PACKAGE CONTENTS ................. 2 OVERVIEW ....................2 DIAGRAM OF CAMERA ................3 BASIC OPERATION ..................4 4.1. First set up ..................... 4 4.2. Mounting in the car ................5 4.3. Recording ....................5 4.4. Play back ....................6 MENU OPTIONS .................... -
Page 3: Package Contents
User Manual OVERVIEW The Amacam AM-M80 camera is designed primarily as a small video camera for mounting on the front or rear windscreen of a car. This is for the purpose of recording the car movements and externals activities, and would be of use in providing evidence for Insurance purposes. -
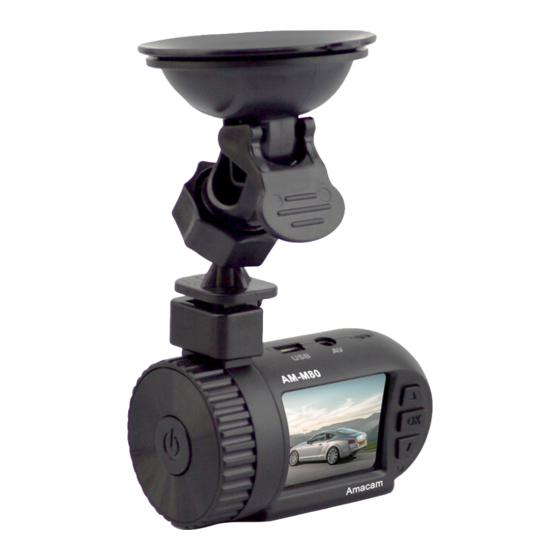
Page 4: Diagram Of Camera
AMACAM AM-M80 USER MANUAL DIAGRAM OF CAMERA 1. HDMI Slot 10. Screen Display 2. Micro SD Card Slot 11. Power Button 3. Reset 12. Mounting Bracket 4. Microphone 13. Camera lens 5. AV Out 14. Speaker 6. USB Socket 15. Indicator Light ... -
Page 5: Basic Operation
AMACAM AM-M80 USER MANUAL BASIC OPERATION 4.1. First Set Up Before the camera is used the following actions must be taken. This should be read in conjunction with the Menu Options description in this User Manual. The number references below refer to the Diagram and Key in Section 3 of this user manual. -
Page 6: Mounting In The Car
AMACAM AM-M80 USER MANUAL 4.2. Mounting in the Car Fix the suction operated mounting bracket to the car windscreen, usually this is done behind the rear view mirror. The mounting bracket on the camera (12) can be rotated to any position between 0 and 90° , to accommodate the slope angle of the car windscreen. -
Page 7: Play Back
AMACAM AM-M80 USER MANUAL – press Up button (7) To Zoom in To Zoom out – press Down button (9). To take picture, Press the OK button (8) for 1 second omly (Warning, pressing for a longer period will bring up the menu options) 4.4. -
Page 8: Menu Options
AMACAM AM-M80 USER MANUAL Menu Options Various menu pages are obtained by pressing the Power button (11). Different menus are obtained depending on the operating mode of the camera at the time. 5.1. In Video Mode One press (click) of the Power button (11) will result in the... -
Page 9: In Playback Mode
AMACAM AM-M80 USER MANUAL 5.3. In Playback Mode One press (click) of the Power button (11) will result in PLAYBACK menu Two clicks of the Power button (11) will result in the SET UP menu Playback Mode (Note that this is the same SET UP menu as in Video mode.) -
Page 10: Still Menu (Photo Mode)
AMACAM AM-M80 USER MANUAL Sub Menu Default Item Function/Comment Choice Setting Motion This applies only when the camera battery Detection is being charged (by being connected to the in car charger). When ‘On’ is selected the camera will start recording when motion of the camera or the image is detected. - Page 11 AMACAM AM-M80 USER MANUAL Sub Menu Default Item Function/Comment Choice Setting Sharpness Strong This sharpens or soften the contours Normal between tones. Soft White Auto Auto This adjusts the color tones according balance Daylight to the ambient light conditions. Cloudy...
-
Page 12: Set Up Menu (All Modes)
AMACAM AM-M80 USER MANUAL SET UP MENU (All Modes) Sub Menu Default Item Function/Comment Choice Setting Date/Time Year : Month :Day Each figure can be set using the UP(7) None-to be H : M : S and DOWN(9) buttons and then fixed... -
Page 13: Playback Menu (Playback Or Review Mode)
AMACAM AM-M80 USER MANUAL Sub Menu Default Item Function/Comment Choice Setting Version This is the version of the software in the 20140626.201 camera 2.DM07 AC Power When the camera is mounted in the car 15 Secs this is the time delay after switching the... -
Page 14: Further Operations
AMACAM AM-M80 USER MANUAL Menu Sub menu Item Function/Comment Choice choice Format SD Card All date will This is used to format new SD cards and will result in be deleted. all data on the card being deleted. Cancel Note. This menu is only available if there is a SD card in the camera. If there is no SD card, the message No File will appear on screen. -
Page 15: Connecting To The Computer
AMACAM AM-M80 USER MANUAL Files can be protected manually by making a short press on the Power button (11) during recording. All protected files will display a small key on the screen to signify that they are protected. Protected files cannot be unprotected. They cannot be deleted on the camera, but can only be deleted by connecting the camera to a computer. -
Page 16: Connecting To The Tv
AMACAM AM-M80 USER MANUAL 10.4.2. PC Camera On selecting ‘PC Camera’, the device will act as a camera for your PC and can be used with other applications, such as Skype, which may require a webcam to be connected to the computer. -
Page 17: Specification
AMACAM AM-M80 USER MANUAL 11. Specification Model Amacam AM-M80 Size 70 x 40 x 40 mm Weight 55.2 gms Processor NT96220 Chipset Image Sensor, 1920x1080, 1280x720, 720x480, 640x480,320x240 Pixels Viewing Angle 120 degrees 1.5” TFT Display LCD Screen Video Format... -
Page 18: Quick Reference Guide
AMACAM AM-M80 USER MANUAL 13. Quick Reference Guide Assume Camera is ON Date & Time Press the “POWER” button twice to enter “Set Up Menu” Select “Date/Time” Each figure can be set using the “UP” and “DOWN” buttons and then fixed and move to next number with the OK Button. - Page 19 Press the “POWER” button twice to enter “Set Up Menu” Select Version, Check the version number. The latest version can be downloaded here>>> www.amacam.net/support/firmware-update Register To keep up to date with the latest Firmware, Please ensure that you register your Amacam AM-M80 here>>> www.amacam.net/product-registration Page 18...
- Page 20 We really would like to receive AM-M80 videos from our customers. Amacam has a growing community of Amacam Dash Cam users. If you would like to share any of your Dash Cam videos with fellow Amacam customers on YouTube, please upload your clip here http://www.amacam.net/contact-us/#upload...
Need help?
Do you have a question about the AM-M80 and is the answer not in the manual?
Questions and answers