Table of Contents
Advertisement
Quick Links
Advertisement
Table of Contents

Summary of Contents for 7links PE-8074
-
Page 2: Table Of Contents
Table of Content WARRANTY ............................7 FCC CAUTION ............................8 SAFE SEATING GESTURES:....................... 9 CE STATEMENT OF CONFORMITY ....................9 CHAPTER 1 INTRODUCTION ......................10 ..........................10 VERVIEW ..........................11 EATURES ........................12 PECIFICATIONS ....................... 13 YSTEM EQUIREMENTS IP A & M ................ - Page 3 3.2.10 Web Camera Server Setup ..................37 3.2.11 Time Server Setup....................38 3.2.12 Password Setup ....................... 38 3.2.13 Quick Setup Finish....................39 IP C ....................... 39 ONFIGURATION 3.3.1 WAN........................... 39 3.3.2 LAN..........................45 3.3.3 Wireless ........................46 3.3.4 DDNS ......................... 51 ...........................
- Page 4 3.6.5 Remote Management ....................85 3.6.6 Time ........................... 86 3.6.8 User Account Management..................88 3.6.9 Folder Management ....................89 3.6.10 Email Alert......................... 90 & S ........................92 TATUS 3.7.1 Network Configuration .................... 93 3.7.2 User Account List ....................94 3.7.3 Event Log........................
- Page 5 4.4.2.3.2.1 Personal Application..................127 4.4.3 Printer Server ......................128 4.4.3.1 Printer Setting on PC...................... 129 ....................... 134 YSTEM ANAGEMENT 4.5.1 Reboot........................134 4.5.2 Change Password ....................135 4.5.3 Firmware Upgrade....................135 4.5.4 Profiles Save......................136 4.5.5 Remote Management ..................... 137 4.5.6 Time .........................
- Page 6 OPYRIGHT TATEMENT This user manual, including the products and software, may be reproduced, transcribed, transmitted and stored. That totally depends on the legal authorized copyright. Furthermore, it can be translated into any language in any form or by any means, except some documents or public software without the copy permission of our company.
-
Page 7: Warranty
Warranty One-Year Warranty is provided for consumer products. This warranty is subject to the conditions and limitations set forth herein. ("We") warrants and tests the Product to be free from defects in material and workmanship and to conform to published specifications. During the warranty period, should the Product fail under normal use in the recommended environment due to improper workmanship or materials, we will repair the Product or replace it with a comparable one. -
Page 8: Fcc Caution
FCC Caution 1. The device complies with Part 15 of the FCC rules. Operation is subject to the following two conditions: (1) This device may not cause harmful interference, and this device must accept any interference received, including interference that may cause undesired operation. 2. -
Page 9: Safe Seating Gestures
Safe Seating Gestures: You should follow the manufacturer’s instructions for adjusting the backrest to fit your body properly. An adjustable chair that provides firm, comfortable support is best. Adjust the height of the chair so your thighs are horizontal and your feet flat on the floor. The back of the chair should support your lower back (lumbar region). -
Page 10: Chapter 1 Introduction
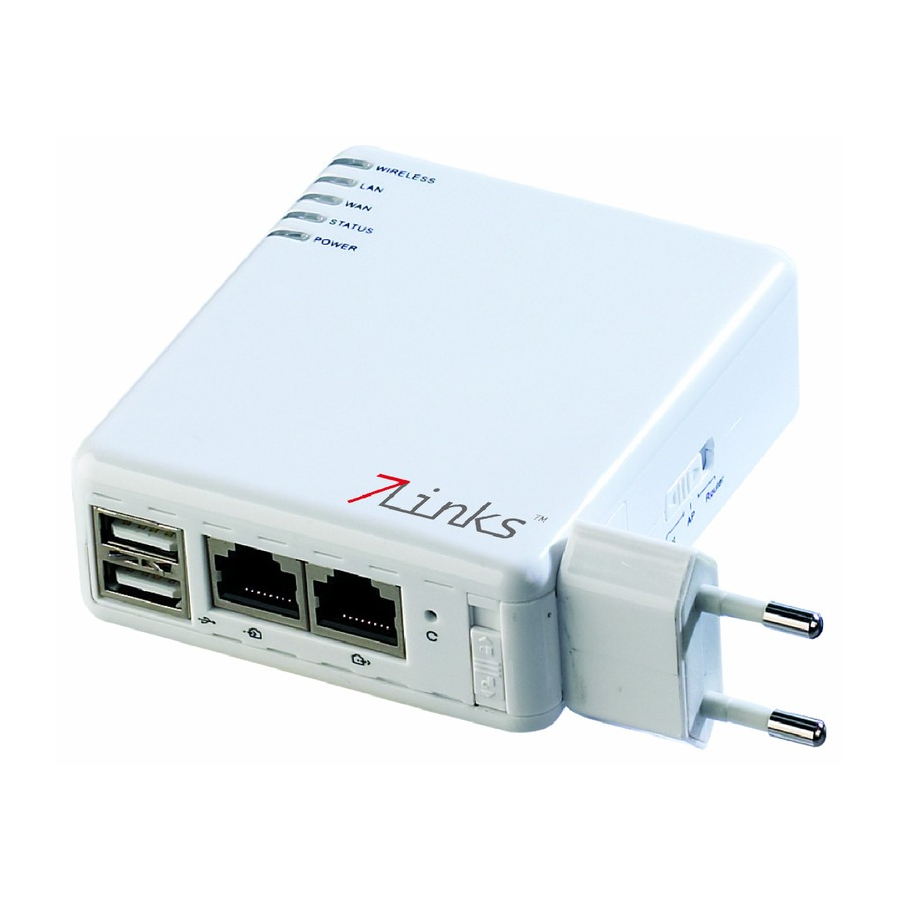
Chapter 1 Introduction Overview The Palm Server Router is a portable and convenient wireless solution for the traveling business person delivering 802.11g wireless connectivity with a maximum wireless signal rate of up to 54Mbps. Use it in conference rooms, hotel rooms, or even at hotspots. The Wireless Pocket Router/AP might be small in size, but is huge in functionality, supporting multiple operation modes, including Access Point (AP) mode, Router mode, and Wireless Client mode. -
Page 11: Features
Features The Palm Server Router’s main functions, including Wireless Access, Webcam Monitor, Print Server, FTP Server and IP Sharing are shown as below. These features of the Palm Server Router and their applying instructions in User Manual will not only fulfill your requirements, but also ease your inconvenience from the job. -
Page 12: Specifications
Specifications Connector: 1x RJ-45,10/100 Base TX for WAN Router Mode Support : Ethernet 802.3u, 10/100Mbps auto cross-over function. Connector: 2x RJ-45,10/100 Base TX for LAN Three Mode AP Mode Support : Ethernet 802.3u, 10/100Mbps auto cross-over function. Connector: 1x RJ-45, 10/100 Base TX to PC. Interface Wireless to Access Point. -
Page 13: System Requirements
System Requirements To begin with the Palm Server Router, you must have the following minimum system requirements. If your system can’t correspond to the following requirements, you might get some unknown troubles on your system. XDSL/Cable Modem and broadband Internet Account. One Ethernet (10 BASE-T or 10/100 BASE-TX) network interface card. - Page 14 【Step2】 Click on Properties button. User Manual v1.3...
- Page 15 【Step3】 Double click on Internet Protocol (TCP/IP). User Manual v1.3...
- Page 16 【Step4-1】 For getting IP automatically if you are one of the users under the Palm Server Router, please skip “Use the following IP address” and then select “Obtain an IP address automatically” and “Obtain DNS server address automatically” and then click on “OK” button.
- Page 17 ※ Notice: If you configure your computer’s IP Address manually, it needs to be on the same network segment. For example: IP Address: 192.168.1.xxx (xxx can be any number between 2 and 253, but it can’t be repeated, we use 10 to be the example.) Subnet Mask: 255.255.255.0 Gateway: 192.168.1.254 (this is the IP address of the Palm Server Router in AP Mode) DNS: 192.168.1.254 (use the Palm Server Router’s IP address or on your own choice).
-
Page 18: Network Testing
1.5.1 Network Testing There are two ways to test your Network whether it can work on Internet or not. They are “Testing with Internet Browser” and “Testing with Dos”. 1.5.1.1 Testing with Internet Browser Open an Internet Browser, such as Internet Explore or Netscape. Input a valid web address you like, for example, http://www.yahoo.com in the web address blank and then press enter. -
Page 19: Testing With Dos (Windows Xp Platform)
1.5.1.2 Testing with DOS (Windows XP Platform) 【Step1】 Go to start > Run. 【Step2】 Input cmd in the blank, and then click on OK button. The DOS icon will appear. 【Step3】 Input ipconfig in the flashing area then press enter. You will get an IP Address 192.168.1.200, for example, and Default Gateway as 192.168.1.1. - Page 20 【Step4】 Ping a legal WAN Address such as 192.168.1.254. If Internet works, it will show Reply from 192.168.1.254: bytes = 32 time = 3ms TTL =64, for example. If it can’t work, it will show Request timed out. User Manual v1.3...
-
Page 21: Chapter 2 Hardware Installation
Chapter 2 Hardware Installation Diagram of connecting hardware to the Palm Server Router The Palm Server Router is a portable and convenient wireless solution for the traveling businessmen delivering 802.11g wireless connectivity with a maximum wireless signal rate of up to 54Mbps. Use it in conference rooms, hotel rooms, or even at hotspots. The Wireless Pocket Router/AP might be small in size, but is huge in functionality, supporting multiple operation modes, including Access Point (AP) mode, Router mode, and Wireless Client mode. -
Page 22: Ap Mode Hardware Connection And Application
2.1.2 AP Mode Hardware connection and application Under AP Mode, it supports 2 LAN ports as Bridge, and user can connect to the Palm Server Router via LAN port or Wireless (WDS). The administrator can do the Quick Setup including LAN Setup, Wireless Setup, USB Disk Management Setup, User Account Management Setup, FTP Server Setup, Printer Server Setup, Web Camera Setup and System Setup. -
Page 23: Chapter 3 Router Mode
Chapter 3 Router Mode Administrator Quick Setup Instruction Make sure to switch the mode into Router Mode, then open a Microsoft Internet Explorer, Mozilla Firefox or Apple Safari browser, and enter http://192.168.1.1 (Default Gateway) into browser’s blank. Notice: If the homepage doesn’t appear, please check if the TCP/IP configuration is obtaining IP address automatically or not. -
Page 24: Quick Setup
User Name and Password The default values for User Name and Password are “admin” and “admin” (all in lowercase letters). Notice: Only the password can be changed, please read setup “3.2.12 Password Setup” or “3.6.2 Change Password”. In order to protect your own settings, it’s strongly recommended to change the password before you finish the Router Basic Setup. - Page 25 The above diagram shows all PCs and devices connected to your Palm Server Router and their status. Click on Quick Setup on the left screen of the main menu. Then you’ll see the full functionality selection screen appears and do the setting for each item. Note: The device models named of USB Device, Webcam and Printer will be shown under the picture of each device if the product supports.
-
Page 26: Wan Setup (Internet Connection)
User Account Management Setup: Set maximum user number, account and right for using personal services of your Palm Server Router for each user. Firewall Setup: To enable Firewall and set security level. QoS Setup: To enable/disable QoS setup. FTP Server Setup: To enable FTP server and set controlling rules. Print Server Setup: To enable /disable server. -
Page 27: Wan Type - Static Ip
3.2.1.1 WAN Type – Static IP Choose Static IP Address if all WAN IP information is provided to you by your ISP. You will need to enter the IP address, IP Netmask and IP gateway provided by your ISP. Each entered fields must be in the appropriate IP form, which are four IP octets separated by a dot (x.x.x.x). -
Page 28: Wan Type - Pppoe
Input it if requested by your ISP (Ex: Palm Server Router) MAC address Click on “Next” button to go on “3.2.2 LAN Setup”. 3.2.1.3 WAN Type – PPPoE This option is typically used for DSL services. Choose PPPoE (Point to Point Protocol over Ethernet) if your ISP uses PPPoE connection. - Page 29 Input it provided by your ISP. Input it provided by your ISP. Click on “Next” button to go on “3.2.2 LAN Setup” in page 32. User Manual v1.3...
-
Page 30: Wan Type - Pptp
3.2.1.4 WAN Type – PPTP This option is typically used for DSL services. Some DSL service providers supply a special DSL modem. This kind of modem only supports the PPTP tunnel to access the Internet, you should create a PPTP tunnel that carries a PPP session and terminates on the DSL model. -
Page 31: Lan Setup
3.2.2 LAN Setup If you are using the Palm Server Router with multiple PCs on your LAN, you must connect the LAN via the Ethernet ports on the built-in Ethernet switch. You must assign a unique IP address to each device residing on your LAN. The LAN IP address identifies the router as a node on your network;... -
Page 32: Wireless Setup
3.2.3 Wireless Setup The Palm Server Router is based on industry standards to provide compatible high-speed wireless connectivity within your home, business or public access wireless networks. Strictly adhering to the IEEE standard, the router will allow you to access the data you want, when and where you want it. -
Page 33: Usb Disk Management Setup
3.2.4 USB Disk Management Setup Easy to check all the USB storage devices connected to your Palm Server Router, view the entire data folder inside each storage device, and you can manage the disk formatting/partitioning via click on the button of this page. Select the USB Disk and click on “OK”... -
Page 34: User Account Management Setup
3.2.5 User Account Management Setup Personal users can use each individual application such as My Status, My Webcam and My Document. This section is to set the user’s right. Also, all the users right will be showed in User Account List and can do the edit or delete by clicking the meaning text. Input the User’s name and password, and then click on “Add”, and you will see the user information appear on the “User Account List”... -
Page 35: Firewall Setup
3.2.6 Firewall Setup The Firewall rules of the Palm Server Router are an advance feature used to deny or allow traffic from passing through the router. The default setting for Firewall Protection Level security is in Low Level, which attacks Blocking Policy, allow all Inbound and Outbound IP Filter Policy, and allow all router service access policy from WAN. -
Page 36: Ftp Server Setup
Make sure your connecting bandwidth with ISP and set the priority percentage. Once setting the QoS service, the transmitting performance will be affected, so please ensure your connection setting before doing this setup. Click on “Next” button to next step after finishing the above. -
Page 37: Printer Server Setup
3.2.9 Printer Server Setup The Palm Server Router, an Internet access solution for your LAN, which provides you the shared web surfing, and support USB interface printer, any users in the same subnet of the Palm Server Router can print their document via the network printers. If the printer isn’t connected, you can’t choose “Enable”. -
Page 38: Time Server Setup
3.2.11 Time Server Setup The section provides time alteration. The Router keeps a record of the current date and time, which is used to calculate and report various performance data, but changing the router’s date and time does not affect the date and time on your PCs. Select your time zone from the “Time Zone”... -
Page 39: Quick Setup Finish
3.2.13 Quick Setup Finish The Quick Setup has been completed successfully when you see this screen. To apply your new settings, please click on “Finish” button to reboot system automatically and go to the product’s diagram homepage. You may connect to Internet via wired or wireless at this moment according to above settings. - Page 40 3.3.1.1 Static IP The WAN (Wide Area Network) page shows the settings that are used to connect to your ISP (Internet Service Provider). Please select the Static IP for your specific ISP. If you applied for a Static IP connection type from ISP, please follow the steps to setup your WAN connection.
- Page 41 3.3.1.2 Dynamic IP If you applied for a Dynamic IP connection type from ISP, please follow the steps to setup your WAN connection. Cable modem providers typically use dynamic assignment of IP Address. 1. Host Name The host name is optional; but if your ISP requires you to input a specific host name, please put it in, for example, the Palm Server Router applied from ISP.
- Page 42 3.3.1.3 PPPoE If you applied for a PPPoE connection type from ISP, please follow the steps to setup your WAN connection. 1. User Name Input your user name supplied by ISP. If you don’t know, please check with your ISP. 2.
- Page 43 6. DNS If ISP provides you DNS information, please select “Specify DNS Server IP” and input the DNS information into the blank; otherwise, select “No Default DNS Server”. 7. Apply & Cancel Click on Apply button to continue. Click on Cancel button to clear the settings on this page.
- Page 44 3. PPTP Password Input the Password supplied by ISP. 4. Retype your Password Retype the password into this blank for confirming. 5. PPTP Server IP Input the Server IP supplied by ISP. If you don’t know, please check with your ISP. Input the WAN IP address provided by your ISP.
-
Page 45: Lan
3.3.2 Use this page to set up the local IP address and subnet mask for your router. Please select LAN under the IP Config menu and follow the instructions below to enter the LAN setting page to configure the settings you want. 1. -
Page 46: Wireless
Click on Apply button to continue. Click on Cancel button to clear the settings on this page. Besides, the DHCP information will be listed below, above DHCP Clients list, including IP Address and MAC address. 3.3.3 Wireless The Palm Server Router enables fastest 54 Mbps IEEE802.11g wireless transmissions and keeps compatibility with existing IEEE 802.11b devices. - Page 47 3. ESSID You can use the default ESSID and radio channel unless more than one Palm Server Router or access points are deployed in the same area. Under this situation, it is advised that you should use a different ESSID and radio channel for each of Palm Server Router or access point in order to distinguish from each other.
- Page 48 10. Authentication Mode Four authentication methods are supported: Open and Shared. Select Open, your wireless network would be intruded by anonymous. Not only your network bandwidth would be shared; but also transmitting data might be intercepted. Select Shared function and it can be taken effect. 11.
- Page 49 12. Encrypt Type - WPA The WPA encrypts each frame transmitted from the radio using the pre-shared key (PSK) which entered from this panel or a key got dynamically through 802.1x. WPA-PSK (TKSP): Allow the access from WPA clients simultaneously and the encryption keys are given from PSK respectively.
- Page 50 RADIUS Server Port: The UDP port number that the RADIUS server is listed. The default value is 1812. Shared Secret: The RADIUS server and client share a secret that is used to authenticate the messages sent between them. You must configure both sides to sue the same shared secret.
-
Page 51: Ddns
3.3.4 DDNS Dynamic DNS allows you to make an assumed name as a dynamic IP address to a static Please s hostname. Please configure the dynamic DNS below. elect DDNS under the IP Config menu, and follow the instructions below to enter the DDNS setting page to configure the settings you want. -
Page 52: Advanced
3. Host Name This field represents the host name you register to Dynamic-DNS service and expect to export to the world. 4. User Name User name is used as an identity to login Dynamic-DNS service. 5. Password Password is applied to login Dynamic-DNS service. 6. -
Page 53: Nat
3.4.1 NAT is a method of mapping one or more IP addresses and/or services ports into different specified services, where NAT stands for Network Address Translation. It allows the internal IP addresses of many computers on a Local Area Network (LAN) to be translated to one public address, saving users’... - Page 54 1. Enable Virtual Server: Check “Enable” to apply all those rules in Virtual Server List into the Palm Server Router. 2. Description: Enter the description of the virtual server, this filed allows you to record what this rule is used for. 3.
-
Page 55: Virtual Dmz
3.4.1.2 Virtual DMZ Virtual DMZ allows you to expose one computer to Internet, so that all inbound packets will be redirected to the computer you set. It is useful while you run some applications that use uncertain incoming ports. Please use it carefully. 1. -
Page 56: Firewall Configuration
3.4.2.1 Firewall Configuration The Palm Server Router provides built-in firewall functions, enabling you to protect the system against denial of service (DoS) attacks and other types of malicious accesses to your LAN while providing Internet access sharing at the same time. You can also specify how to monitor attempted attacks, and who should be automatically notified. - Page 57 the ICMP message. The IP source address is that of the host or gateway sending the ICMP message with the destination IP address being that of the original source IP address. You can enable ICMP Ping from WAN side or not. 4.
- Page 58 Sequence Number Out of Range Check: Protect against TCP out of range sequence number attacks. An attacker can send a TCP packet to cause an intrusion detection system (IDS) to become unsynchronized with the data in a connection. Subsequent frames sent in that connection may then be ignored by the IDS.
- Page 59 User Manual v1.3...
-
Page 60: Ip Filter
3.4.2.2 IP Filter Use IP Filter to deny LAN IP addresses from accessing the Internet. You can deny specific port numbers or all ports for the specific IP address. 1. Enable IP Filter: Check enable or disable to apply IP Filter function. 2. -
Page 61: Mac Filter
3.4.2.3 MAC Filter Use MAC filters to deny LAN computers by their MAC addresses from accessing the Internet. You can manually add a MAC address that is currently connected to the Palm Server Router. 1. MAC Filter Action: To deny or allow all MAC filter action. User Manual v1.3... -
Page 62: Url Filter
2. Enable MAC Filter: Check enable or disable to apply MAC Filter function. 3. Enable Log: All packets between WAN and LAN will be logged. 4. Description: Enter the filter description into this blank. 5. MAC Address: Enter the MAC address manually that you want to filter. 6. - Page 63 1. Enable URL Filter: Check enable or disable to apply URL filter function. 2. Enable log: All packets between WAN and LAN will be logged. 3. Description: Enter the filter description into this blank. 4. URL keyword: Enter the URL words into this blank to apply filter blocking, example: “www.yahoo”, then it’ll block all the websites from www.yahoo range.
-
Page 64: Qos
3.4.3 Quality of Service (QoS) refers to the capability of a network to provide better service to selected network traffic over various technologies, including Frame Relay, Asynchronous Transfer Mode (ATM), Ethernet and 802.1x networks, and IP-routed networks that may use any or all of these underlying technologies. -
Page 65: Server
Server The Palm Server Router provides FTP Server, Web Camera Server and Printer Server application. User Manual v1.3... -
Page 66: Ftp Server
3.5.1 FTP Server By directly connecting USB storage devices to any USB port, FTP server can be created with simple configuration. FTP Server utility allows both local and remote users to upload or download files, pictures or MP3 music from the same storage device in most easy and timely fashion. -
Page 67: Web Camera Server
3.5.2 Web Camera Server The Palm Server Router has built-in Web Cam Server. By connecting web camera to the router, it allows user to monitor their home or office from remote locations. Motion Detection function also been built-in and allows user to use webcam to detect any motion at their home or office and send email alert with captured images. -
Page 68: Web Camera Server Advanced Configuration
5. Record Setting: Please see the detail advance setting in “3.5.2.2 Web Camera Server Advanced Configuration”. 6. Apply & Cancel Click on Apply button to continue. Click on Cancel button to clear the settings on this page. 3.5.2.2 Web Camera Server Advanced Configuration Click on “Record Setting”... -
Page 69: Application For Web Camera
Click on Apply button to continue. Click on Cancel button to clear the settings on this page. 3.5.2.3 Application for Web Camera 3.5.2.3.1 Web Camera Monitoring application Monitor your home with a Webcam via the Palm Server Router. Take pictures or video via the Palm Server Router, also can do the monitoring or recording all images into the USB HDD for reviewing. -
Page 70: Web Camera Monitoring Via Wan Connecting
3.5.2.3.1.1 Web Camera Monitoring via WAN connecting For viewing the image via webcam from WAN connecting, below is the diagram. Palm Server Router How to check your WAN IP address To monitor the image via webcam from outside door, you need to know the WAN IP address. - Page 71 Monitor the image via webcam from WAN Input the WAN IP Address (as you see in above screen) into browser blanks, and you will see the personal account login screen appear then input your own user account and password. After login by personal, your will see the personal control panel screen as below, please click on “My Webcam”.
-
Page 72: Web Camera Monitoring Via Wifi Mobile Phone
3.5.2.3.1.2 Web Camera Monitoring via WiFi mobile phone Also, you may view the monitor live action through WiFi mobile phones. Palm Server Router Please fill the WAN IP address plus “/webcam.html” (ex: http://210.64.134.25/webcam.html) into the mobile phone’s browser blank and you will see the webcam user login screen appear. -
Page 73: Web Camera Recording
3.5.2.3.2 Web Camera Recording 3.5.2.3.2.1 Administrator setting The Palm Server Router also can record the pictures from Webcam; only Administrator can activate the settings. Select Web Camera Server from main Menu and enable this function, click on Record Setting button for further setting. To set up the Webcam Advanced Configuration for each text box, the image from webcam will be recorded into your USB HDD or Remote FTP, please refer to User Manual for the detail setting. - Page 74 After click on Disk Explorer, you will see the folder screen appear including all the folders inside the Palm Server Router. (Below is the example.) For getting the images from web camera or any files inside router, you may copy the files into your own HDDs directly.
-
Page 75: Personal Application
Personal application All the users under administrator’s setting can view entire webcam recording images from My Document. Please login by your own personal account. For viewing your own folder, please click on “My Document”. After click on “My Document”, you will see below folder screen appear. All the image files will be saved into the folder of “webcam_recorded_files”, please click into the folder for checking. -
Page 76: Printer Server
Notice: If you can’t open the folder inside the FTP router, please check with administrator to set up your FTP & Webcam’s right. 3.5.3 Printer Server The Palm Server Router has two USB ports for connecting with printers to be shared on the local area network. -
Page 77: Printer Setting On Pc
3. Printer Model: The printer model will be shown when plug the USB printer. 4. Printer Name: Enter the name of printer you like. 5. Printer Description: Enter the description of printer as your demand. 6. Apply & Cancel Click on Apply button to continue. Click on Cancel button to clear the settings on this page. - Page 78 Step 2: Select Local printer attached to this computer, and then click on Next button. Step 3: Select Create a new port and choose Standard TCP/IP Port from drop-down list, and then click on Next button. User Manual v1.3...
- Page 79 Step 4: Input your Palm Server Router’s address: 192.168.1.1 and click on Next button. Step 5: Select Custom and click on Settings… button to set the detail setting. User Manual v1.3...
- Page 80 Step 6: Select LPR and give it the same Queue Name as USB Printer Name as shown, and mark LPR Byte Counting Enabled. Finally, click on Next button. It has to be the same with the Printer Name as “1.2.2.9.1 Printer Server Configuration” on page 20. Before click on Finish button on the next screen after the aforesaid settings, you have to set the printer’s driver as well.
-
Page 81: System Management
Step 8: Click on Finish button and all steps of setting printer server are completely. System Management The Palm Server Router provides system management including password changing, firmware upgrade, time setting, user’s account setting and other detail settings. Following is each setting. -
Page 82: Reboot
3.6.1 Reboot If you had entered the wrong configuration while setting up your router or other utilities, you can always reboot your Palm Server Router by this setting. It’s necessary to reboot the router if it begins working improperly, please click on Reboot button to reboot the router. -
Page 83: Firmware Upgrade
1. Old Password: Enter the original password you set. 2. New Password: Enter the new password you want to change. 3. New Password (Confirm): Enter the new password again for confirming. 4. Apply & Cancel Click on Apply button to continue. Click on Cancel button to clear the settings on this page. -
Page 84: Profiles Save
3.6.4 Profiles Save To backup the current configuration setting or load the backup data, also you can restore the Palm Server Router to default setting by this function. 1. Save Settings To PC: Click on Save button for saving the configuration setting into assigned location. -
Page 85: Remote Management
3.6.5 Remote Management Remote Management allows the Palm Server Router to be configured from the Internet by a web browser. In general, only a member of your network can browse the built-in web pages to perform “Administrator” tasks. This feature enables you to perform the tasks from the remote (Internet) host. -
Page 86: Time
3.6.6 Time The System time is the time used by the Palm Server Router for scheduling services. You can manually set the time or connect to a NTP (Network Time Protocol) server. If a NTP server is set, you will only need to set the time zone. If you manually set the time, you may also set Daylight Saving dates and the system time will automatically adjust on those dates. - Page 87 3.6.7 UPnP Setting UPnP allows users to connect their UPnP-enabled broadband router, printer server and other devices right to the network with zero-configuration, meaning easier setup for installing the device on the network. The automatic discovery feature enables the device to obtain an IP address, present and describe itself to other devices and PCs on the network without having to install drivers, and then configure and use those devices.
-
Page 88: User Account Management
3.6.8 User Account Management Personal users can use each individual application such as My Status, My Webcam and My Document. This section is to set the user’s right. Also, all the users’ rights will be showed in User Account List and allowed to edit or delete by clicking the meaning text. 1. -
Page 89: Folder Management
3.6.9 Folder Management Easy to check all the USB storage devices connected to your Palm Server Router, view the entire data folder inside each storage devices, and you can manage the disk formatting / partition via click on the button in this page. User Manual v1.3... -
Page 90: Email Alert
1. Select the USB Disk and click on OK button for refreshing all disks before you perform disk partition, and the Unplug button will appear. 2. To partition/format the disk, please select the disk and click on Format button. 3. Moreover, if you want to view the data inside the disk, please go to “3.5.1 FTP Sever Setup”... - Page 91 1. Email Alert: Check the enable box to activate the email alert service. 2. SMTP Server: Specify an IP address of the SMTP server which can send mails from your Palm Server Router to the recipients’ mailboxes directly. 3. Your Mail (from): Enter the email address indicated the sending location. 4.
-
Page 92: Log & Status
Log & Status The Palm Server Router provides the log list and status of connection, user’s account. User Manual v1.3... -
Page 93: Network Configuration
3.7.1 Network Configuration Network Configuration shows all the connecting situation of LAN, WAN, Wireless and USB devices plugging. Each block shows configuration status, you may click on Refresh button to update the screen list. User Manual v1.3... -
Page 94: User Account List
3.7.2 User Account List This section shows all the user’s account right and status. Check the user name, status and opened directory/file in this screen. 3.7.3 Event Log The Palm Server Router provides system log data for review. The system log detail list is shown on this screen. User Manual v1.3... -
Page 95: Logout
Logout To logout the router via click on Logout button in Menu, and system will return to Login homepage as show on page 21. Personal Configuration Open a Microsoft Internet Explorer, Mozilla Firefox or Apple Safari browser, and enter http://192.168.1.1 (Default Gateway) into browser’s blank. - Page 96 to login, please check with administrator for setting.) Personal Panel Screen shows the Personal Panel for each right under the setting by administrator. The Palm Server Router provides personal control panel for each user to entrance to each application screen, please click on each icon for application. The icons will be in gray color and can’t be clicked if the user doesn’t have the right to use that function;...
-
Page 97: Personal Control Panel
3.9.1 Personal Control Panel “My Status” shows all the login information for your personal account. Click on “Main Menu” text to back to personal panel and select the other personal application. Notice: All above quota information is based on administrator’s setting. “My Document”... - Page 98 There will be “webcam_recorded_files” and “Your name” folder inside your web HD. “webcam_recorded_files” folder: All webcam images from Palm Server Router. “Your name” (here use test for example) folder: Each user’s data will be saved into their own folder. “My Webcam” can view the on time image when turn on the web camera.
-
Page 99: Site Map
3.10 Site Map The Palm Server Router provides site map clicking for each icon to carry out the setting easily from the home page. Chapter 4 AP Mode Administrator Quick Setup Instruction Make sure to switch the mode into Router Mode, then open a Microsoft Internet Explorer, Mozilla Firefox or Apple Safari browser, and enter http://192.168.1.254 (Default Gateway) - Page 100 Please click on Administrator button to login to set up at first time, also can change any settings in the future. Only the Administrator has the right to set and change all settings. User Name and Password The factory default values for User Name and Password are “admin” and “admin” (all in lowercase letters).
-
Page 101: Quick Setup
Quick Setup Typical Configuration Manager Page consists of two separate frames. The left frame contains all the means available for device configuration. Menus are indicated by file icons, and related menus are grouped into categories, such as LAN, WAN and etc., and indicated by folder icon, depending on whether the group of menus are expanded or not. - Page 102 Quick Setup full function table list Initiate as default setting. Initiate as default setting. Initiate as default setting. Initiate as default setting. Quick Setup instruction LAN Setup: Setup the IP Address for LAN and Group. If you are using the Router with multiple PCs on your LAN, you must connect the LAN via the Ethernet ports on the built-in Ethernet switch.
-
Page 103: Lan Setup
LAN Setup If you are using the Palm Server Router with multiple PCs on your LAN, you must connect the LAN via the Ethernet ports on the built-in Ethernet switch. You must assign a unique IP address to each device residing on your LAN. The LAN IP address identifies the router as a node on your network;... -
Page 104: Wireless Setup
Wireless Setup There are 2 ways of hardware connection via Wireless upper link and Wire upper link. AP/Bridge Setting Palm Server Router is based on industry standards to provide compatible high-speed wireless connectivity within your home, business or public access wireless networks. Strictly adhering to the IEEE standard, the router will allow you to access the data you want, when and where you want it. -
Page 105: Wds Setting
WDS Setting The WDS setting for hardware connection via WIRELESS upper link is as below. Select WDS from drop-down list. 6 is the default channel. Both 2 APs must share the same channel. (The wireless adapters will automatically scan and match the wireless setting.) Optional. -
Page 106: Usb Disk Management Setup
USB Disk Management Setup Easy to check all the USB storage devices connected to your Palm Server Router, view the entire data folder inside each storage devices, and you can manage the disk formatting / partition via click on the button of this page. Select the USB Disk and click on “OK”... -
Page 107: User Account Management Setup
User Account Management Setup Personal users can use each individual application such as My Status, My Webcam and My Document. This section is to set the user’s right. Also, all the users right will be showed in User Account List and can do the edit or delete by clicking the meaning text. Input the user’s name and password, and then click on “Add”, and you will see the user information appear on the... -
Page 108: Ftp Server Setup
FTP Server Setup The Palm Server Router can be the FTP Server provides users to transmit files, also for the guest can download the files from assign website. Moreover, by connecting USB HDD, USB Flash to the router, user can easily set up a FTP Server to share or download files for local or remote users. -
Page 109: Web Camera Server Setup
Web Camera Server Setup If you plan to use the Palm Server Router as a Web Camera site, connect a supported USB Web Camera to the USB port of the Palm Server Router. To enable the webcam server and access from WAN as demand, and the Image format can be selected. Make sure the webcam already connected to Palm Server Router, and then select “Enable”... -
Page 110: Password Setup
Password Setup Here suggests changing the password for logging into the configuration manager in terms of security reason. The password may consist of A-Z, a-z, 0-9, underscores, and a single dot (.) For changing password, please fills the password information into above blanks, and then clicks on “Next”... -
Page 111: Ip Configuration
IP Configuration This function allows you to add routing rules into Palm Server Router. It is useful if you connect several computers behind Palm Server Router to share the same connection to Internet. Use this page to set up the local IP address and subnet mask for your router. Please select LAN under the IP Config menu and follow the instructions below to enter the LAN setting page to configure the settings you want. - Page 112 6. Advanced Enable the advance setting and then setup the Router, DNS and WINS value. 7. Router This field indicates the IP address of DNS to provide to clients that request IP Address from DHCP Server, the default setting is the same with LAN IP address. 8.
-
Page 113: Wireless
Wireless The Palm Server Router enables fastest 54 Mbps IEEE802.11g wireless transmissions and keeps compatibility with existing IEEE 802.11b devices. The Palm Server Router complies Please s with IEEE 802.11b standard. elect Wireless under the main menu. Follow the instructions to enter the Wireless settings to configure the settings you want. 1. - Page 114 separation beginning at the first allowed channel for the country (for the US and most of Europe, channel 1, 6 & 11 are used.) Make sure that Palm Server Router sharing the same Channel (or Channels close in number) is as far away from each other as possible, based on the results of your site survey of the facility.
- Page 115 hexadecimal digits (0~9, a~f, and A~F) based on whether you select 64 bit or 128 bit in the WEP drop-down menu. Type a combination of up to 64 letters, numbers, or symbols in the blank, the Palm Server Router uses an algorithm to generate four WEP keys for encryption. If you want to type in the keys manually, leave this filed blank.
- Page 116 Radius with 802.x: Check this circle to enable Radius client function. WPA Rekey Timer: Allows for the session keys to be refreshed over time, minimizing the amount of data that is encrypted with the same session key. RADIUS Server IP: The IP address of RADIUS server. RADIUS Server Port: The UDP port number that the RADIUS server is listening.
-
Page 117: Server
Server The Palm Server Router provides FTP Server, Web Camera Server and Printer Server application. User Manual v1.3... -
Page 118: Ftp Server
4.4.1 FTP Server By directly connecting USB storage devices to any USB port, FTP server can be created with simple configuration. FTP Server utility allows both local and remote users to upload or download files, pictures or MP3 music from the same storage device in most easy and timely fashion. -
Page 119: Web Camera Server
4.4.2 Web Camera Server The Palm Server Router has built-in Web Cam Server. By connecting web camera to the router, it allows user to monitor their home or office from remote locations. Motion Detection function also been built-in and allows user to use webcam to detect any motion at their home or office and send email alert with captured images. -
Page 120: Web Camera Server Advanced Configuration
4. Preview: Click on this button, you can preview the image from webcam. 5. Record Setting: Please see the detail advance setting in “3.5.2.2 Web Camera Server Advanced Configuration”. 6. Apply & Cancel Click on Apply button to continue. Click on Cancel button to clean the setting on this page. -
Page 121: Application For Web Camera
4.4.2.3 Application for Web Camera * Web Camera monitoring application Monitor your home with a Webcam via Palm Server Router. Take pictures or video via Palm Server Router, also can do the monitoring or recording all images into the USB HDD for reviewing. -
Page 122: Web Camera Monitoring Via Wan Connecting
4.4.2.3.1 Web Camera Monitoring via WAN connecting For viewing the image via webcam from WAN connecting, below is the diagram. Palm Server Router How to check your WAN IP address To monitor the image via webcam from distance, you need to know the WAN IP address. Select “Network Configuration”... - Page 123 After login by personal, your will see the personal control panel screen as below, please click on “My Webcam”. There will pop-up screen shows the image from web camera as example below. User Manual v1.3...
-
Page 124: Web Camera Monitoring Via Wifi Mobile Phone
4.4.2.3.1.1 Web Camera Monitoring via WiFi mobile phone Also, you may view the monitor live action through WiFi mobile phones. Palm Server Router Please fill the WAN IP address plus “/webcam.html” (ex: http://210.64.134.25/webcam.html) into the mobile phone’s browser blank and you will see the webcam user login screen appear. -
Page 125: Web Camera Recording
4.4.2.3.2 Web Camera Recording * Administrator setting Palm Server Router also can record the pictures from Webcam; only Administrator can activate the settings. Select Web Camera Server from main Menu and enable this function, click on Record Setting button for further setting. To set up the Webcam Advanced Configuration for each text box, the image from webcam will be recorded into your USB HDD or Remote FTP, please refer to User Manual for the detail setting. - Page 126 After click on Disk Explorer, you will see the folder screen appear including all the folders inside the Palm Server Router. (Below is the example.) For getting the images from web camera or any files inside router, you may copy the files into your own HDDs directly.
-
Page 127: Personal Application
4.4.2.3.2.1 Personal Application All the users under administrator’s setting can view entire webcam recording images from My Document. Please refer to “1.3.1 Personal Setup Configuration” from page 24 to login by your own personal account. For viewing your own folder, please click on “My Document”. After click on “My Document”, you will see below folder screen appear. -
Page 128: Printer Server
Notice: If you can’t open the folder inside the FTP server, please check with administrator to set up your FTP & Webcam’s access rights. 4.4.3 Printer Server The Palm Server Router has 2 USB ports for connecting with printers to be shared on the local area network. -
Page 129: Printer Setting On Pc
4. Printer Name: Enter the name of printer you like. 5. Printer Description: Enter the description of printer as your demand. 6. Apply & Cancel Click on Apply button to continue. Click on Cancel button to clear the settings on this page. - Page 130 Step 2: Select Local printer attached to this computer, and then click on Next button. Step 3: Select Create a new port and choose Standard TCP/IP Port from drop-down list, and then click on Next button. User Manual v1.3...
- Page 131 Step 4: Input your Palm Server Router’s address: 192.168.1.254 and click on Next button. Step 5: Select Custom and click on Settings… button to set the detail setting. User Manual v1.3...
- Page 132 Step 6: Select LPR and give it the same Queue Name as USB Printer Name as shown on step 1 in page 51, and mark LPR Byte Counting Enabled. Finally, click on Next button. It has to be the same with the Printer Name as “Printer Server Configuration”.
- Page 133 You can name your printer, set it as default printer and share your printer as the next screen shown, the Printer Server setting is getting finally. Step 8: Click on Finish button and all steps of setting printer server are completely. User Manual v1.3...
-
Page 134: System Management
System Management The Palm Server Router provides system management including password changing, firmware upgrade, time setting, user’s account setting and other detail settings. Following is each setting. 4.5.1 Reboot If you had entered the wrong configuration while setting up your router or other utilities, you can always reboot your Palm Server Router by this setting. -
Page 135: Change Password
4.5.2 Change Password At this section, the administrator can change the system password. Only the password can be changed, the username for administrator is “admin” and can’t be changed anymore. 1. Old Password: Enter the original password you set. 2. New Password: Enter the new password you want to change. 3. -
Page 136: Profiles Save
1. Update Firmware: Click on Browse button to browse the local hard drive and locate the firmware to be used for update. 2. OK & Cancel Click on OK button to confirm the setting finish. Click on Cancel button to clear the settings on this page. -
Page 137: Remote Management
1. Save Settings To PC: Click on Save button for saving the configuration setting into assigned location. 2. Load Settings From PC: Click on Browse button for searching the saving configuration from hard drive, and then click on Load Button to load all the setting into the router. -
Page 138: Time
1. HTTP Connection Port: The port number used to access the router. 2. Remote Management: You can allow any Internet IP address to access the router, or set up deny rule according to IP setting. 3. IP Address: Internet IP address of the computer that has access to the router. 4. - Page 139 1. Set the Time: Select this item to set up time by manual, select the date and time from each drop-down list. 2. Apply & Cancel Click on Apply button to continue, or click on Cancel button to clear the settings on this page.
-
Page 140: User Account Management
1. Enable/Disable UPnP: Select enable to activate this service. 2. Apply, Cancel & Help Click on Apply button to add the settings into the list table. Click on Cancel button to clear the settings on this page. 4.5.8 User Account Management Personal users can use each individual application such as My Status, My Webcam and My Document. -
Page 141: Folder Management
6. Activated: Click On to allow the user’s right can be applied immediately. 7. Add, Apply & Cancel After finish above setting, click Add button to create the user. Click on Apply button to add the settings into the list table. Click on Cancel button to clean the setting on this page. 8. - Page 142 1. Select the USB Disk and click on OK button for refreshing all disks before you perform disk partition, and the Unplug button will appear. 2. To partition/format the disk, please select the disk and click on Format button. 3. Moreover, if you want to view the data inside the disk, please go to “3.5.1 FTP Sever Setup”...
-
Page 143: 4.5.10 Email Alert
4.5.10 Email Alert To monitor router activity, you can run on a local PC or a remote one elsewhere on the Internet. And the Palm Server Router provides the email alert facility so that the log messages can packed as an e-mail for someone who wants to receive these messages. In the following, here explain how to set up the email alert function. -
Page 144: Log & Status
Log & Status The Palm Server Router provides the log list and status of connection, user’s account. User Manual v1.3... -
Page 145: Network Configuration
4.5.9 Network Configuration Network Configuration shows all the connecting situation of LAN, WAN, Wireless and USB devices plugging. Each block shows configuration status, you may click on Refresh button to update the screen list. User Manual v1.3... -
Page 146: User Account List
User Account List This section shows all users’ account right and status. Check the user name, status and opened directory file in this screen. Event Log The Palm Server Router provides system log data for review. The system log detail list is shown on this screen. User Manual v1.3... -
Page 147: Logout
Logout To logout the router via click on Logout button in Menu, and system will return to Login homepage as shown in page 21. Personal Configuration Open a Microsoft Internet Explorer, Mozilla Firefox or Apple Safari browser, and enter http://192.168.1.1 (Default Gateway) into browser’s blank. - Page 148 Click on “Personal Panel” and login with your own User Account. (If you don’t have the right to login, please check with administrator for setting.) Screen shows the Personal Control Panel for each right under the setting by administrator. Palm Server Router provides personal control panel for each user to entrance to each application screen, please click on each icon for application.
-
Page 149: Personal Control Panel
4.8.1 Personal Control Panel “My Status” shows all the login information for your personal account. Click on “Main Menu” text to back to Personal Panel and select the other personal application. Notice: All above quota information is based on administrator’s setting. “My Document”... - Page 150 There will be “webcam_recorded_files” and “Your name” folder inside your web HD. “webcam_recorded_files” folder: All webcam images from the Palm Server Router. “Your name” (here use test for example) folder: Each user’s data will be saved into their own folder. “My Webcam”...
-
Page 151: Site Map
Site Map The Palm Server Router provides site map clicking for each icon to carry out the setting easily from the home page. User Manual v1.3... -
Page 152: Chapter 5 Client Mode
Chapter 5 Client Mode When set in Wireless Client mode, the Palm Server Router allows connection to an existing wireless network by installing complicated driver. The Palm Server Router supports WPA-PSK to secure your wireless data communications. Plug it into an available Ethernet connection to create an 802.11g wireless network instantly that allows access to single or multiple users with a maximum wireless signal rate of up to 54Mbps. - Page 153 Select the folder you want to save the installation program and then click on “Next” button until the next screen appears. The program has been installed completely when you see the screen below, and then click on “Close” button. User Manual v1.3...
-
Page 154: Setting Up Of Client Mode
Setting up of Client Mode Step 1: When starting to apply the Client Mode, make sure the slide switch had been moved to “Client Mode”, and your TCP/IP setting is obtaining IP automatically. If that action isn’t completed, the diagram below will appear: Step 2: The screen shows the Client Mode page indicating all the connecting information as screen below. - Page 155 User Manual v1.3...
- Page 156 Step 3: The Site Survey screen will show all the wireless connection signals, you can click on “Rescan” to show the SSIDs, and then select the SSID you want to connect. Step 4: After you select the SSID you want, please click on “OK” for connecting (shown as next step). User Manual v1.3...
- Page 157 Step 5: You will see the selected SSID which is shown on the screen, and you can click on “Submit” for submitting (shown below). User Manual v1.3...
- Page 158 Step 6: You can click on “Status” to view the Client Mode connection status after connecting; if the screen doesn’t show the status of connecting data, click on “Refresh” for renewing the screen. As for the volume of SSID setup; it will be immediately enabled, and the Palm Server Router will also save it as the pre-setup file;...
-
Page 159: Chapter 6 Advanced Applications
Chapter 6 Advanced Applications Application for Web Camera 6.1.1 Web Camera Monitoring application Monitor your home with a Webcam via Palm Server Router. Take pictures or video via Palm Server Router, also can do the monitoring or recording all images into the USB HDD for reviewing. - Page 160 How to check your WAN IP address To monitor the image via webcam from outside door, you need to know the WAN IP address. Select “Network Configuration” under Log & Status in main Menu after connection, and you will see the WAN IP Address which used to connect to webcam screen. Here use 210.64.134.25 as an example.
-
Page 161: Web Camera Monitoring Via Wifi Mobile Phone
Web Camera Monitoring via WiFi Mobile Phone Also, you may view the monitor live action through WiFi mobile phones. NES- Mini Server Router Please fill the WAN IP address plus “/webcam.html” (ex: http://210.64.134.25/webcam.html) into the mobile phone’s browser blank and you will see the webcam user login screen appear. -
Page 162: Web Camera Recording
Web Camera Recording Administrator Setting Palm Server Router also can record the pictures from Webcam; only Administrator can activate the settings. Select Web Camera Server from main Menu and enable this function, click on Record Setting button for further setting. To set up the Webcam Advanced Configuration for each text box, the image from webcam will be recorded into your USB HDD or Remote FTP, please refer to User Manual for the detail setting. - Page 163 After click on Disk Explorer, you will see the folder screen appear including all the folders inside the Palm Server Router. (Below is the example.) For getting the images from web camera or any files inside router, you may copy the files into your own HDDs directly.
-
Page 164: Personal Application
Personal Application All the users under administrator’s setting can view entire webcam recording images from My Document. Please refer to “1.3.1 Personal Setup Configuration” to login by your own personal account. For viewing your own folder, please click on “My Document”. -
Page 165: Application For Printer Server
Notice: If you can’t open the folder inside the FTP server, please check with administrator to set up your FTP & Webcam’s access rights. Application for Printer Server With the Palm Server Router, easy and convenient printer access, this versatile Palm Server Router gives home and office networks built-in efficiency because it allows multiple users to share a printer from anywhere on the same network area without sharing your PCs. -
Page 166: Printer Setting On Palm Server Router
Palm Server Router The detail setting for printer server on the Palm Server Router and PC is as the instructions from next page. Printer Setting on Palm Server Router 1. Select Printer Server under main Menu in Server area. It has to be the same with Queue Name. -
Page 167: Printer Setting On Pc
3. Input a name of the printer, 1180 as example which must be the same as set Queue Name. 4. Finally, click on Apply button. Printer Setting on PC After Enable Printer Server in Quick Setup and Printer Server Configuration, please follow the steps to set the detail LPR settings in your PC. - Page 168 Step 3: Select Create a new port and choose Standard TCP/IP Port from drop-down list, and then click on Next button. Step 4: Input your Palm Server Router’s address: 192.168.1.1 and click on Next button. Step 5: Select Custom and click on Settings… button to set the detail setting. User Manual v1.3...
- Page 169 Step 6: Select LPR and give it the same Queue Name as USB Printer Name as shown, and mark LPR Byte Counting Enabled. Finally, click on Next button. It has to be the same with the Printer Name as “1.2.2.9.1 Printer Server Configuration”...
- Page 170 Step 7: Select the Manufacturer and Printers. If your printer isn’t listed in the table, please install its driver CD and then click on Have Disk… button for installation. Or click on Next button to finish the setting. You can name your printer, set it as default printer and share your printer as the next screen shown, the Printer Server setting is getting done.
Need help?
Do you have a question about the PE-8074 and is the answer not in the manual?
Questions and answers