Table of Contents
Advertisement
Quick Links
Advertisement
Table of Contents

Related Manuals for LG LCRM1240ST


Summary of Contents for LG LCRM1240ST
- Page 1 website:http://us.lgservice.com LCRM1240SW/SB/ST...
-
Page 3: Precautions To Avoid Possible Exposure To Excessive Microwave Energy
PRECAUTIONS TO AVOID POSSIBLE EXPOSURE TO EXCESSIVE MICROWAVE ENERGY • DO NOT attempt to operate this oven with the door open, since open-door operation can result in harmful exposure to microwave energy. It is important not to defeat or tamper with the safety interlocks. •... -
Page 4: Important Safety Instructions
IMPORTANT SAFETY INSTRUCTIONS The safety instructions below will tell you how to use your microwave oven to avoid harm to yourself or damage to your oven. WARNING – To reduce the risk of burns, electric shock, fire, injury to persons, or exposure to excessive microwave energy: 1. -
Page 5: Safety - Coffee Maker
SAFETY - COFFEE MAKER IMPORTANT SAFETY INSTRUCTIONS When using electrical appliances, basic safety precautions should always be flowed to reduce the risk of fire, electric shock and/or injury to person, including the following: 1. Read all instructions. 2. Do not touch hot surfaces. Use handles and knobs. 3. -
Page 6: Specifications
*IEC 60705 RATING STANDARD Specifications subject to change without prior notice. INSTALLATION 1. Remove your LG Coffee Combo and all packing materials from the shipping carton. 2. Place the oven on a level surface that provides at least 4 inches of space at the left, right, top, and rear sides for proper ventilation. -
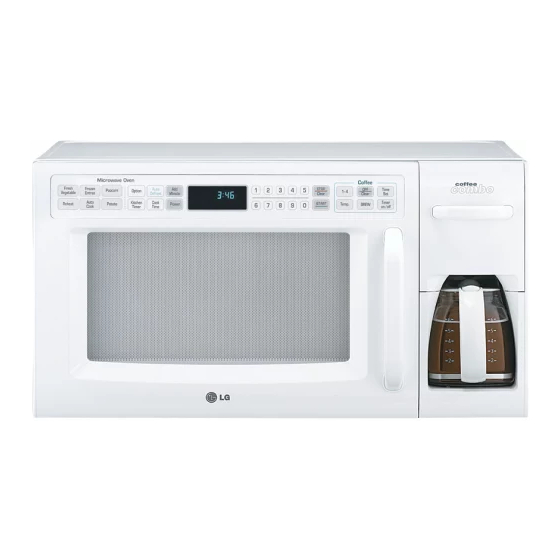
Page 7: Parts And Accessories
UNDERSTANDING YOUR COFFEE COMBO PARTS AND ACCESSORIES Control Panel Microwave Oven See-Through Door Safety Interlock System Your oven comes with the following accessories: 1 Use and Care Guide 1 Glass Turntable 1 Turntable Support 1 7 cup Water Reservoir 1 7 cup Carafe with lid... -
Page 8: Control Panel
1. DISPLAY. The Display includes a clock and indicators that tell you time of day, cooking time settings, and cooking functions selected. 2. STOP/CLEAR. Touch this pad to stop the oven or clear entries. (microwave oven only) 3. START. Touch this pad to start all entries (except the Auto Cook and Add Minute function which start automatically) and to turn Child Lock on or off. -
Page 9: Using Your Microwave Oven
USING YOUR MICROWAVE OVEN COOKWARE GUIDE Most heat-resistant, non-metallic cookware is safe for use in your microwave oven. However, to test cookware before using, follow these steps: 1. Place the empty cookware in the microwave oven. 2. Measure 1 cup of water in a glass measuring cup and place it in the oven beside the cookware. -
Page 10: Tips For Microwave Cooking
TESTING FOR DONENESS Because foods cook quickly in a microwave oven, you need to test frequently for doneness. STANDING TIME IN OVEN Depending on density, food often needs to stand from 2 to 15 minutes either in or outside of the oven after cooking power shuts off. -
Page 11: Kitchen Timer
USING YOUR MICROWAVE OVEN KITCHEN TIMER Your microwave oven can be used as a kitchen timer. You can set up to 99 minutes, 99 seconds. Example: To set 3 minutes. Touch: Display Shows: TIMER and time counting down. CHILD LOCK... -
Page 12: Potato (Example)
USING YOUR MICROWAVE OVEN SENSOR TOUCH OPERATION INSTRUCTION Sensor touch cooking provides exciting new features to make microwaving easier. The Sensor Menu is preprogrammed with many popular food choices and helps you heat or reheat perfectly. Sensor Menu: Reheat, Potato... -
Page 13: Reheat Table
USING YOUR MICROWAVE OVEN REHEAT This feature allows you to reheat precooked room- temperature or refrigerated foods without selecting cooking times and power levels. This feature has 3 categories: dinner plate, soup/sauce, casserole. See Reheat Table for more information. Example: To reheat casserole. -
Page 14: Auto Cook Table
USING YOUR MICROWAVE OVEN AUTO COOK Use this function to cook food without entering a cook time or power. Refer to the “Auto Cook Table” below for more information. Example: To cook 4 slices of bacon. Touch: Display Shows: Time counts down... -
Page 15: Custom Set Table
USING YOUR MICROWAVE OVEN CUSTOM SET CUSTOM SET provides four modes which make using your microwave oven quite handy. You can select CLOCK, SOUND ON/OFF, SCROLL SPEED and LBS/KG. The clock must be set to program or set “Auto-On” brewing of coffee. -
Page 16: Auto Defrost
USING YOUR MICROWAVE OVEN AUTO DEFROST Three defrost sequences are preset in the oven. The auto defrost feature provides you with the best defrosting method for frozen foods. The Cooking Guide on the front of the oven cavity will show you which defrost sequence is recommended for the food you are defrosting. -
Page 17: Auto Defrost Table
USING YOUR MICROWAVE OVEN AUTO DEFROST TABLE Category Food to be Defrosted Beef Ground beef, Round steak, Cubes for stew, Tenderloin steak, Pot roast, Rib roast, Rump roast, Chuck roast, Hamburger patty Lamb MEAT Chops (1-inch thick), Rolled roast Pork Chops ( ⁄... -
Page 18: Multi-Stage Cooking
MICROWAVE POWER LEVELS Your microwave oven has 10 cook power levels to let you cook or heat a wide variety of foods. Refer to the table below for suggestions: Microwave Power Level Table... -
Page 19: Cooking Tips
USING YOUR MICROWAVE OVEN WARNING: Do not use large sheets of aluminum foil because they hinder cooking and may cause arcing. You may use small pieces of foil to shield poultry legs and wings. Keep all aluminum foil at least 1 inch from the walls and door of the oven. - Page 20 USING YOUR MICROWAVE OVEN COOKING TIPS (continued) Fish 1. Arrange fish in a large shallow non-metallic dish or casserole. 2. Cover with pierced microwave plastic wrap or casserole lid. 3. Place the dish on the turntable. 4. Cook according to the instructions in the Fresh Fish Cooking Table below.
-
Page 21: Preparing Coffee
USING YOUR COFFEE MAKER PREPARING COFFEE 1. Pull out the water reservoir. (Remove the water reservoir, lift it slightly) <Fig. 1> 2. Place a #2 size paper coffee filter in the filter basket (Fig. 2, 3). Add coffee for the amount to be brewed (Fig. -
Page 22: Brew Strength Control
USING YOUR COFFEE MAKER BREW STRENGTH CONTROL Pre-selecting the taste (flavor selector) The flavor selector (Fig. 9) allows you to adjust the flavor of your coffee to suit your personal tastes. It helps ensure a full, rich flavor, while allowing you to select a milder flavor without bitter aftertaste, or a strong, robust taste. -
Page 23: Self-Cleaning (Hot Water Tube)
USING YOUR COFFEE MAKER SELF-CLEANING (HOT WATER TUBE) 1. To clean, fill the water reservoir to capacity with a mixture of water 2. Press the “BREW” button. One cycle should be sufficient to adequately clean the coffee maker. 3. Run at least two cycles of fresh cold water through the unit before using the unit again to brew coffee. -
Page 24: Small Batch
USING YOUR COFFEE MAKER Brew This pad is used when you want to brew more than 4 cups of coffee. Touch: Display Shows: NOTE: When the brewing is completed, coffee maker enters KEEP WARM mode automatically. • Warming temperature is set at medium when the unit is plugged in. -
Page 25: How To Set The Brew Timer For Auto-On Mode
USING YOUR COFFEE MAKER HOW TO SET THE BREW TIMER FOR AUTO-ON MODE This pad enables you to enjoy freshly brewed coffee at any pre-set time within a 24-hour period. NOTE: Time of Day must be set before setting Auto-On time. Example program: Auto-On, 7:20 A.M., Brew Touch: Display Shows:... -
Page 26: Adjust Warming Plate Temp
USING YOUR COFFEE MAKER ADJUST WARMING PLATE TEMP Use this pad when you want to adjust the warming plate temperature of coffee after brewing (including small batches). This pad can be used during brewing (including small batches), or warming. Example: Setting to high during brewing Touch: Display Shows: NOTE:... -
Page 27: Other Functions
- “Auto-On” will operate normally and warm function will be cancelled. Simultaneous Operation 1) Basically, you can not use the Microwave Oven while the brew functions, such as ‘Brew’, ‘1-4’ are activated. Otherwise you can use all other Microwave functions, such as timer and clock. -
Page 28: Troubleshooting
The clicking sound is caused by a mechanical switch turning the microwave oven’s magnetron ON and OFF. The heavy hum and clunk is from the change in power the magnetron draws as it is turned ON and OFF by a mechanical switch.The change in blower... - Page 29 CAUTION: Do not overcook. Standing time allows foods to continue cooking evenly for a few minutes after the actual microwave oven cooking cycle ends. The amount of standing time depends upon the density of the foods. As in conventional cooking, the initial temperature of food affects total cooking time.
- Page 31 Printed in China P/NO.: 3828W5A4205...
Need help?
Do you have a question about the LCRM1240ST and is the answer not in the manual?
Questions and answers
When I fill the coffee maker with water and put it into the slot, the water drains out the back. Is there a easy fix for this?
Water draining out the back of the LG LCRM1240ST coffee maker when filled could be caused by the filter basket not being fully seated to the reservoir or the reservoir’s seal not being properly engaged. This can lead to leakage.
This answer is automatically generated