Table of Contents
Advertisement
Quick Links
Advertisement
Table of Contents

Related Manuals for Focus RM-518 plus

Summary of Contents for Focus RM-518 plus
- Page 1 The Magical remote User Guide V.990907...
-
Page 2: Table Of Contents
Contents Introduction of Remote Control Specification Start the Remote control set up 1 Prepare 2 Set ID 3 Notice 4 Trouble shooting Remote Key description 1 Key location: 2 Key Description How to install Emitta Smart Commander? Make sure before Installation Start the installation After Installation Introduction for Key Remap... - Page 3 3.3 Remap key’s Shortcut: 3.4 Remap key with macro command 3.4.1 Normal Characters: 3.4.2 System Characters 3.4.3 Special Characters FCC Information Production Notice - 2 -...
-
Page 4: Introduction Of Remote Control
Introduction of Remote Control This remote is not only a RF 2.4GHz wireless remote, but also it combines the radio frequency wireless technology and an optical trackball with mouse keys and MCE start Key. When you use it under Vista platform, you can press the MCE direct keys, and you can use the multimedia keys as your media controller. -
Page 5: Specification
Specification: 1 Remote control: 2.4GHz wireless with 8 channels, ID: 65536 ID per channel. Working range: 10 meters360 degree navigation Key numbers: 47 keys included, 2 mouse key, 4 arrow key, 26 function key and 15 characters key. Trackball: 19mm Optical, 800DPI Battery: AA size of Alkali batteries x 2pcs Dimension: 178 x 50 x32 mm 2 Receiver:... -
Page 6: Start The Remote Control Set Up
Start the Remote control set up: 1 Prepare: 1.1 Turn on the power of computer, and plug USB receiver into USB port of your computer. 1.2 Open the battery cover under the remote and place 2 AA batteries inside the battery compartment. -
Page 7: Notice
3 Notice: 3.1 RF signal LED light on the receiver will be flashing when the remote is being used. 3.2 When Battery Low LED light on Remote is lighting, it means the remote requires changing batteries. 3.3 When doing the ID setting, please make sure the distance between the receiver and remote is within 60 cm (2 feet). -
Page 8: Trouble Shooting
4 Trouble shooting: If your remote cannot work after installation, please check followings: 4.1 Make sure you have connected the receiver correctly to the computer, The receiver has been properly plugged into computer’s USB port. 4.2 Make sure you have inserted two AA batteries into its compartment correctly. 4.3 If without any interference, such as other computer peripherals, the working distance ( distance between remote and the receiver) is about 10 meters. -
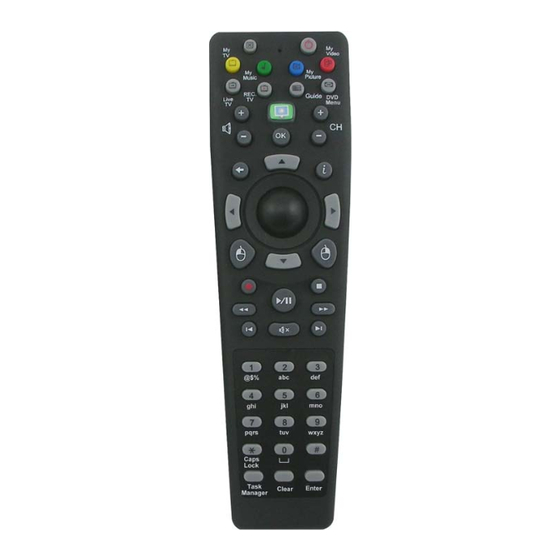
Page 9: Remote Key Description
Remote Key description 1 Key location: This remote control has 4 areas of keys with different functions 1. First area is the MCE direct keys. (In the red block) 2. Second area is the Multimedia control keys. (In the yellow blocks) 3. -
Page 10: Key Description
2 Key Description: 2.1 First area is the MCE direct keys. (In the red block) You can use those keys into Vista Multimedia Center directly before you remap keys as other function, or you can remap any one of them as your customized function key. -
Page 11: How To Install Emitta Smart Commander
How to install Emitta Smart Commander? Make sure below before Installation: 1. Please check your box package should be included Installation CD, Remote control and USB Receiver. 2. Please make sure your remote control is the right version, difference version or model will be stopped when you install Emitta Smart Commander SC-503. -
Page 12: Start The Installation
Start the installation 1. Install the installation CD 2. Screen will pop up the installation icons. If not pop up, please click Autorun.exe from CD for installation. 3. Click first icon “Install now” for installation. Click for installation - 11 -... - Page 13 4. Select the language for process Select language 5. Installation will keep on till finished. Please process according with the instruction in installation. (For more introduce, please check the User guide - flash file in this CD) - 12 -...
-
Page 14: After Installation
After Installation: 1. After installation, please restart your computer to register the hardware and software into your computer system. 2. Please plug the USB receiver at the same USB port on your computer, in case you plug on different USB port, installation will be required by system again. 3. -
Page 15: Introduction For Key Remap
Introduction for Key Remap: Emitta smart commander is wonderful software; it can remap any key on the remote control RM-518, makes it as a palm keyboard, makes it as a gaming controller, and remap keys as different function for different application, it support not only remap key code, but also support macro command and shortcut keys. - Page 16 Picture 1-A: - 15 -...
- Page 17 Picture 2-A: High speed speed - 16 -...
-
Page 18: Text Typing
2.2 TEXT Typing: Use number pad on remote for TEXT typing. 2.3 Characters selection: Click first check box in first block for alphabetic character prior to numerical character. Ex.: abc2, def3, chi4...and so on, Otherwise 2abc, 3def, 4chi…etc When enable the option, press you will get a symbol table. - Page 19 Picture 2-B - 18 -...
-
Page 20: Symbol Table Setting
2.5 Symbol table setting: When press 1, symbol table will show up. Select the color from the selection bar to change the table’s color. Change the bar in second block to change to table’s opacity rate. - 19 -... -
Page 21: Caps Lock
Caps lock: 2.5.1 Press as a Caps lock key on desktop keyboard. 2.5.2 Enable the keyboard LEDs remind, you will know the keys are capital letters or lowercase. - 20 -... -
Page 22: Hot Key Setting
3 Hot key setting: 3.1 Application list: Emitta default 19 applications in list, you can select any one to remap its special hot keys, or you can remap key for all of application You can add more into the list or delete some from the list. - 21 -... -
Page 23: Remap Keys List
3.2 Remap keys list: Find out the key from the list, then double click the Hotkey/Shortcut to set the key new code. - 22 -... -
Page 24: Remap Key's Shortcut
3.3 Remap key’s Shortcut: You can easily select key from list to remap any key as any hot keys or shortcut, you can also set key to quick launch application. Example: Original printings New Shortcut Remark My Video to My Computer Keyboard’s hotkey My Music to Print Screen... -
Page 25: Remap Key With Macro Command
3.4 Remap key with macro command. You can remap key with macro command, it can be set as Normal Characters, System Characters, and Special Characters. 3.4.1 Normal Characters: Normal characters are A – Z, a – z, 0 – 9, space key and symbol keys (~`!@#$%^&*()-=[]\;’,./_+{}|:”<>?) For examples: s gives you a lower case “s”... -
Page 26: Special Characters
3.4.3 Special Characters: A special character starts with an escape sequence character “\” (Backslash) and followed by a character (case sensitive) defined as following: – Use “\\” character to represent a “\” Backslash key. – Use “\a” character to represent a Pause key. –... - Page 27 – Use “\+” character to represent a Keypad Plus (+) key. – Use “\.” character to represent a Keypad Period (.) key. – Use “\1” character to represent a Keypad 1 key. – Use “\2” character to represent a Keypad 2 key. –...
-
Page 28: Fcc Information
FCC Information: The Federal Communication Commission Radio Frequency Interference Statement includes the following paragraph: The equipment has been tested and found to comply with the limits for a Class B Digital Device, pursuant to part 15 of the FCC Rules. These limits are designed to provide reasonable protection against harmful interference in a residential installation. -
Page 29: Production Notice
Production Notice: 1 The Changes or modifications not expressly approved by the party responsible for compliance could void the user’s authority to operate the equipment. 2 Modification could void authority to use this equipment. 3 To comply with the FCC RF exposure compliance requirements, no change to the antenna or the device is permitted.
Need help?
Do you have a question about the RM-518 plus and is the answer not in the manual?
Questions and answers