Table of Contents
Advertisement
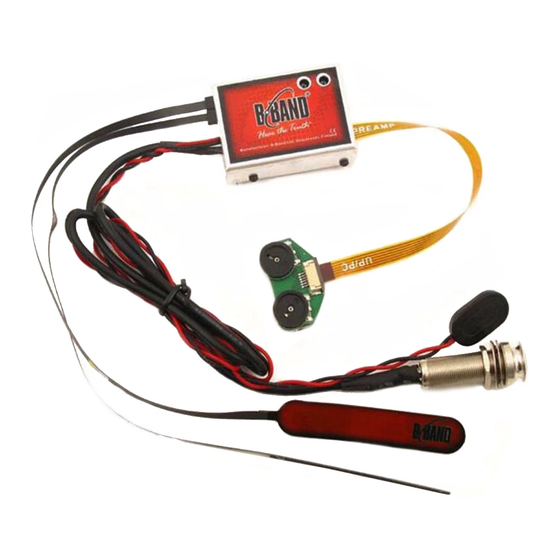
A2 INSTALLATION MANUAL
B-BAND A2 END PIN PREAMP EQUIPPED WITH HZZLESS™ CIRCUIT.
USE WITH B-BAND UST AND AST TRANSDUCERS, AG-MIC, MAGNETIC PICKUP
USE WITH STEEL OR NYLON STRING GUITARS, OR OTHER SUITABLE INSTRUMENTS.
This is a basic installation manual and tip sheet. For more information, technical support and
pictures of installations for B-Band products please check the B-Band website www.b-band.com
or contact your B-Band dealer, distributor or B-Band directly.
25.3.2009
Advertisement
Table of Contents

Subscribe to Our Youtube Channel
Related Manuals for B-band A2

Summary of Contents for B-band A2
- Page 1 USE WITH STEEL OR NYLON STRING GUITARS, OR OTHER SUITABLE INSTRUMENTS. This is a basic installation manual and tip sheet. For more information, technical support and pictures of installations for B-Band products please check the B-Band website www.b-band.com or contact your B-Band dealer, distributor or B-Band directly.
-
Page 2: Dear Customer
The outstanding sound reproduction of B-Band transducers is based on the technology of a very special, worldwide-patented material that is exclusive to B-Band. This material is very dif- ferent from, and has nothing to do with, piezo-electric films or transducers. - Page 3 (typical for condenser microphones) B- Band UST and AST always require a B-Band preamp. Do not cut, pull, crimp or bend at a sharp angle any B-Band trans- ducers. Standard piezo preamps will not work properly with B-Band pickups.
- Page 4 Note! In the USA, transducers and preamps are packaged together. The A2 is a two input / two output endpin preamp. Designed as a platform for two sources, the best performance is with the 4.1 UST package contents: combination of UST and AST.
-
Page 5: Preparing The Guitar For Installation
• Wood or metal drill bit, 3 mm (.12”) • Screwdriver, Posidriv #1 • Endpin reamer, 12 mm (.47”) or wood drill bit, 12 mm (.47”) • Allen wrench, 2 mm (.08”) • Punch (spike) • 13 mm (.51) wrench to tighten the nuts on the preamp endpin jack •... - Page 6 UST as preamp. For the A2 preamp, the AST’s lead goes away from the the saddle lies on it. It is preferred, that the hole for the UST is high “E”...
-
Page 7: Installing The Preamp
If the UST or AST are connected improperly, a loud audible hum will occur. Make sure that they are connected correctly. 7.2 Inside the A2 there are four DIP-switches: Switch #1 is an on-off switch for the treble boost on #1 chan- UST or AST nel (normally UST). -
Page 8: Installing The Pickups
Fit the UST all the way to the other end and bottom of the slot. Then put 9.3 If you are installing an A2 with the optional B-Band AG-MIC the saddle in place. -
Page 9: Troubleshooting
After installation the UST pickup can have very high output, enough is distributed making some strings louder or softer than others. We to overdrive the B-Band preamp input, causing distortion. The UST highly recommend a manmade material for the saddle. -
Page 10: Customer Feedback
If you notice any other problems, please contact the dealer, distributor or manufacturer, for help. 11. CUSTOMER FEEDBACK Saddle If you have any comments, positive or negative, about any B-Band (side view) product, please do not hesitate to contact B-Band. Bridge 12. - Page 11 B-Band’s prior ANY LEGAL THEORY, INCLUDING NEGLIGENCE B-Band will, without charge for labor or parts, repair written consent, including: AND OTHER TORTS, BREACH OF CONTRACT, or (at B-Band’s discretion) replace the product or its...
- Page 12 B-Band, B-Band logo, A2, UST, AST, AG-MIC, HzzLess and “microscopic lens-like gas bubbles” are either registered trademarks or trade- marks of B-Band Ltd in the United States and / or other countries. Patented, patents pending. List of patents are available from B-Band Ltd...
Need help?
Do you have a question about the A2 and is the answer not in the manual?
Questions and answers