Advertisement
Advertisement

Summary of Contents for Hisense Chill RC07N1CBD1
- Page 1 Beverage Dispenser USER MANUAL MODEL RC07N1CBD1...
-
Page 2: Table Of Contents
Contents 1. Important Safety Guide....... 2 5. Notes before Use.......11 2. Specifications........5 6. Maintaining this Product....17 3. Product Description......6 7. Troubleshooting and Maintenance..18 Installation and Use 8. Disposal of Used Products....19 Recommendations.......8 1.Important Safety Guide 1.1General safety and daily use It is important to use your appliance Chill is designed to refrigerate various safely. - Page 3 (including children) with appliance. Keep all packing materials and reduced physical, sensory or mental contact Hisense. capabilities, or a lack of experience and knowledge, unless they have been given Please wait for 2 hours before...
- Page 4 Damaged cords or plugs may cause a short electrician or authorized service engineer. circuit, electric shock, or overheat and Only genuine Hisense service parts should even cause a fire. be used. WARNING: If the power cord is damaged, the cord...
-
Page 5: Specifications
2.Specifications ELECTRICAL REFRIGERATION ¼ HP Hermetically Sealed Model RC07N1CBD1 Unit Size Voltage 115V Refrigerant R-134a Frequency 60Hz Charge 3.5 ounces Current 1.3A DIMENSIONS CAPACITY 60.2inches Height Selections 153centimeters 24inches Width Levels 61centimeters 24.4inches Depth 12 Oz. Cans 18 per level, 72 total 62centimeters 133lbs Weight... -
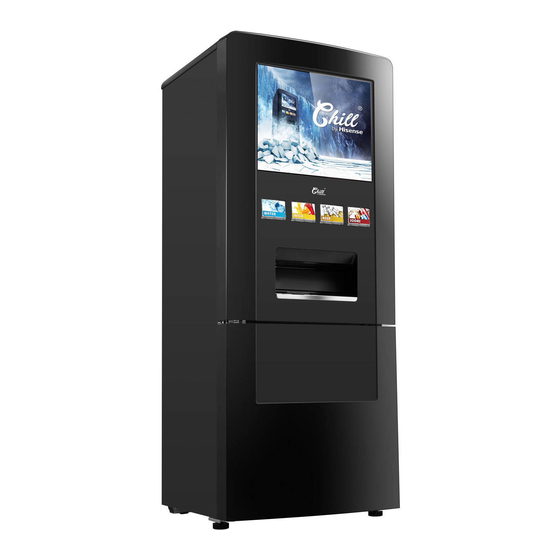
Page 6: Product Description
3.Product Description 1.Vend Rack : The upper refrigeration appliance during installation. compartment contains a four-level vend 6.Adjustable feet : Height can be adjusted rack. After fully filled, the rack can hold by turning the feet to extend or retract 72 short 12oz cans or 36 long them. - Page 7 12.Poster Frame cover: A flap cover on selection button. Common beverage cards top of upper door, which can be opened are included with Chill for users' use and by users to install the poster frame. replacement. 13.Poster window : The front display door 18.Delivery chute: The small opening for window.
-
Page 8: Installation And Use Recommendations
4.Installation and Use Recommendations Before using the appliance for the first Install the appliance in a dry place to time, please note the following avoid high moisture. recommendations. Keep the appliance out of direct sunlight , In order to improve efficiency of the rain or frost. - Page 9 4.2 Changing Front Poster and Beverage selection cards PUSH 4.2.1 Changing the Beverage Selection Cards 1.Turn selection button upward from the bottom to show the beverage selection card, located on the back of each selection 2.Hold the poster frame handle at the button.
- Page 10 4.Place the new poster in the poster the top corners of the of poster frame. frame, pushing it downward evenly until 6.Replace the poster frame with the new the poster is aligned against the bottom poster back to the original place and turn of the poster frame.
-
Page 11: Notes Before Use
5. Notes before Use 5.1 Steps for installing and starting 8.Beverage selection: Select your the appliance beverage and enjoy! 5.2 Explanations on Operation of Display 1.Install the appliance on a level, smooth Panel floor. 2.Connection of power: Insert the plug into a standard 3-prong wall outlet. - Page 12 Celsius. Locks. Each vend level can be individually locked. 5.3 Pre -cooling Storage Compartment There are four Child Locks in all, one for each vend rack level, which correspond to The pre-cooling storage compartment can each selection button. The child locks be used to cool and store beverages in are located at the right side of each vend unopened cases, or individual beverages.
- Page 13 level (d) Corresponds to beverages at the top vend rack level (a) Note: After the selection button is pressed, Corresponds to beverages at vend the motor of the corresponding vend rack rack level (b) level will be started. It is normal to hear Corresponds to beverages at vend the vend motor running during the rack level (c)
- Page 14 5.7 Vend rack loading guidelines Note: Most dispensing problems are from The vend rack can accommodate72(12 oz) incorrect beverage loading. Please follow cans in all, or 36 long 16 oz cans, or bottles. loading instructions. Requirements for container sizes Warning signals will not occur when the compatible with Chill are as follows: front vend door is open.
- Page 15 5.8 Guide to Beverage Loading Please load and operate the appliance according to the guidelines in th is manual. Incorrect beverage loading may result in When loading short 12 oz cans, ensure inconsistent operation. the can spacer is in place, secured in the 1.
- Page 16 Note: When filling up the top vend rack Please do not mix different sizes or level, if the containers have a relatively shapes of containers on same vend rack large external diameter, you are advised level, for best dispensing performance. not to place any container at position Its recommended to load glass bottles in number 6 to improve dispensing...
-
Page 17: Maintaining This Product
6. Maintaining this Product Interior cleaning The appliance interior should be cleaned, It’s recommended to clean, or wipe the or wiped regularly. appliance regularly at least every two months. -Clean the vend rack and related areas with a mild detergent and then wiped dry Caution! The appliance should not be with a soft cloth. -
Page 18: Troubleshooting And Maintenance
Hisense warranty servicer . for service, below. Symptom Possible cause & Resolution Check whether the power cord is plugged into the power outlet properly. -
Page 19: Disposal Of Used Products
. 8. Disposal of Used Products It is prohibited, according to local regulations, to dispose of this appliance as household waste. Packaging materials Packaging materials with the recycle symbol are recyclable. Dispose of the packaging into a suitable waste collection container to recycle it. Before disposal of the appliance 1. - Page 20 This warranty shall apply solely when this Product is purchased, stored, transported, handled, operated and maintained according to the Hisense provided instructions attached to or furnished with the Product. Hisense will, in its sole determination, repair or refund units deemed defective solely for materials or workmanship, at Hisense’s discretion,...
- Page 21 ABOVE, AND NO OTHER EXPRESS WARRANTY OR GUARANTY GIVEN BY ANY PERSON, FIRM OR ENTITY WITH RESPECT TO THE PRODUCT SHALL BE BINDING ON HISENSE. THIS WARRANTY IS THE SOLE AND EXCLUSIVE WARRANTY WITH RESPECT TO THE PRODUCT AND HISENSE IS THE EXCLUSIVE WARRANTY PROVIDER FOR THE PRODUCT.
- Page 22 Write down the following information about your appliance to better help you obtain assistance or service if you should ever need it. You will need to know your complete model and serial number. You can find this information on the model and serial number label located on the Product.
- Page 23 Factory-specified replacement parts will fit right and work right because they are made with the same precision used to build every new appliance. To locate factory-specitied replacement parts in your area, call Hisense Customer Service toll free, at 1-877-465-3566.( English & Spanish, Monday–Friday 9 a.m.
- Page 24 In the case of an insurance loss such as fire, flood, or theft, your registration will serve as your proof of purchase. Better Service If you have any questions about your new Hisense product, your registration will help us assist you.
Need help?
Do you have a question about the Chill RC07N1CBD1 and is the answer not in the manual?
Questions and answers