Table of Contents
Advertisement
Quick Links
Advertisement
Table of Contents
Troubleshooting

Summary of Contents for Vortex 851R
- Page 1 User Guide for Vortex 851R printer (R13) 28-May-2014...
-
Page 2: Contents Copyright Statement
Copyright statement © 2013 RTI Digital, This document, attachments, and information contained herein are the confidential and proprietary property of RTI Digital and their suppliers. As such, this document, attached files, and information contained herein are subject to all nondisclosure and proprietary information agreements currently in effect with your organization. -
Page 3: Table Of Contents
3.1. Choose a location ......................20 3.2. Unpacking and Setup ......................20 3.3. Checking the contents ....................20 3.4. Connecting the Vortex 851R ..................21 3.5. Setting up the Printer ....................23 3.5.1 Maintenance Module (MM) ..................23 3.5.2 Installing Ink Cartridges ....................25 3.5.3. - Page 4 6.1. Maintenance Module (aka Service Station) Troubleshooting ..........88 6.2. Printhead Troubleshooting ....................89 6.3. Print quality problems ......................89 6.4. Vortex 851R Troubleshooting Guide ................... 90 GENERAL ..........................90 Documents to read before (available on ftp) ................. 90 Checklist before doing any support ..................90 Troubleshooting Tools ......................
- Page 5 How to detect: ........................93 How to fix: ........................... 93 How to detect: ........................93 How to fix: ........................... 93 PRINT ENGINE: ERROR MESSAGES ..................94 Crit 63 03-phead offline cancelpage ..................94 CARTRIDGE_MISSING_X ....................94 DATA_PATH_UNDERRUN ....................94 Fatal 71 02 offline cancelpage ....................95 How to detect: ........................
- Page 6 Paper Cutting (PC) ......................140 Firmware Error Messages (ER) ..................141 Maintenance Module (MM) ....................143 7. Printer Specifications ......................144...
-
Page 7: Introduction
Memjet™ print technology to make you familiar with the terms and basics of this new technology that forms the basis of the Vortex 851R printer series. The following sections walk you through the installation steps, explain the components of the printer and their roles, and then teach you how to operate your printer. - Page 8 Figure 3 The Memjet printhead contains 70,400 nozzles in 10 rows (brown stripe in Figure a). An electron microscope image of a single nozzle (Figure b). The small size of the nozzles results in very small (1-2 picolitre) paint drops, approximately 14 micron drop diameter on paper, effectively achieving the highest print resolution the human eye can see.
-
Page 9: Printer Parts And Their Functions
2.2. Print engine The print engine is the heart of the Vortex 851R printer. It is responsible for the actual print process. The major subsystems of the engine are the mechanics (paper transport), ink delivery system (including print head and ink tanks), the print controller and a paper cutter. -
Page 10: Print Mechanism
Picture of Fluidic Connectors and Memjet Printhead Cartridge 2.5. Print Mechanism During printing, the print mechanism moves the paper through the print zone below the static printhead. 2.6. Cutter The NorthStar cutter is designed to provide a complete cut of continuous media in the crossweb direction. -
Page 11: Ink Cartridges
2.7. Ink Cartridges Vortex 851R Series Printers use a single Printhead Cartridge and five Ink Tanks (two Black, one Cyan, one Magenta, and one Yellow). During installing the ink cartridges the Printer should be turned off. Picture of the ink cart r idge... - Page 12 Picture of Ink Cartridge Cross - Section Picture of Ink Cartridge Cross - Section with Air Vent Path Detail -12-...
-
Page 13: Ink Connection Ports
2.8. Ink Connection Ports Ink connection ports allow the connection of the external ink supply houses to the print engine. Unique, zero insertion-force, ganged connectors allow all 10 ink hoses to be engaged with the printhead in one movement. The printhead can be removed or installed without disconnecting any of the ink hoses. - Page 14 Picture of Bulkhead Assembly Other IDS Components Picture of Other IDS Components -14-...
-
Page 15: Maintenance Module
Maintenance Module 2.10. Aka Service Station (SS) The multi-station, maintenance module (MM) maintains and cleans the printhead by wiping off waste ink and contamination. In addition, the MM assists with printing by priming the printhead, as well as protecting it when not in use, and guiding the paper as it passes under the printhead. - Page 16 Picture of Maintenance Module (MM) Assembly (exploded view) The maintenance module should be replaced as part of annual maintenance or after printing one million inches. NOTE: The maintenance module is not intended to be end-user serviceable, although it is a service part for technicians.
-
Page 17: Wiper Station
2.12.1. Wiper station The printhead must be wiped to remove ink cross-contamination and particulates. The cylindrical wiper rotates to wipe the entire width of the printhead. The roller rotates for the duration of the lift-dwell-lower cycle. The intent is not to merely blot the nozzles but to have functionally translational wiping. -
Page 18: Capping/Spittoon Station
2.12.3. Capping/spittoon station The printhead should not be allowed to dry out after priming. The cap station is used when the printer is idle. The cap station limits evaporation from the printhead by sealing around the nozzles and maintaining a humid environment. The cap is an elastomer seal that fits around and over the printhead nozzles. -
Page 19: The Control System
connected by cables to the OmniPEC main board. The OmniPEC allows connections to paper motors, ink level sensors, ink pump and additional sensors. Dual resolution file format to • achieve crisp Print Quality (PQ) yet • reasonable file size • 1600 dpi lossless text expansion •... -
Page 20: Installing The Printer
Installing the Printer Choose a location 3.1. The Vortex 851R should be placed on a properly levelled worktable or cabinet which is able to handle the printer’s weight and minimum 61 cm (24 inch) wide. Unpacking and Setup 3.2. The printer is shipped in a strong cardboard or wooden box. Before opening the box, check that the box is not damaged in any way and was not turned upside down during shipment. -
Page 21: Connecting The Vortex 851R
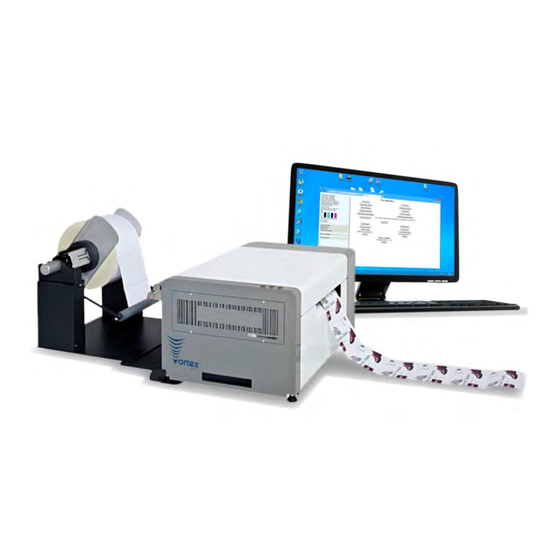
Printer and co n t ents Rewinder/Unwinder Connecting the Vortex 851R 3.4. Make sure the printer is used with the mains cable suited to the requirements of the electrical system of your country. The internal power supply in the Printer is rated 115 to 240VAC, 50/60 Hz. - Page 22 CAUTION Do not use an outlet that shares the same circuit with large electrical machines or appliances Turning Power On/Off Powering Up: 1. Turn on the main switch and 2. Press the Main Power Button on top of the Printer. Powering Down Printer: Press Main Power button on the top of the Printer, and wait until the engine is turned off.
-
Page 23: Setting Up The Printer
Setting up the Printer 3.5. After the printer has passed inspection, install the maintenance module, the printhead, and the ink cartridges, as explained in the following sections. To set up the printer you need to do the following: 1. Install the Service Station (if shipped as a separate unit) 2. - Page 24 The Service Station fits in the port immediately above the Ink Tank Station. 1. Plug in the white flat flex cable to the motor PCA on the maintenance module. Slide the Latch open on the Maintenance Station Circuit Board: Plug the ribbon connector (blue side up) into the space under the Latch than close the Latch: 2.
-
Page 25: Installing Ink Cartridges
NOTE: The MM must be perfectly aligned with bar to prevent misalignment! 3.5.2 Installing Ink Cartridges Vortex 851R Series Printers use a single Printhead Cartridge and five Ink Tanks (two Black, one Cyan, one Magenta, and one Yellow). During installing the ink cartridges the Printer should be turned off. -
Page 26: Installing The Printhead
To make sure you have a good contact, remove the ink tank and re - insert twice. Picture of inserting the ink cartridges Magenta Yellow Cyan Black Black Cyan ( , inserted in the top left slot. Black (K) – two cartridges – inserted in the bottom left and bottom right slots. •... - Page 27 bubbles from a previously primed printhead. The priming process is designed to use less than 5ml of ink. To prime the printhead manually, 1. Fill the main channels of the printhead. 2. Generate a pressure pulse to push out any bubbles. 3.
- Page 28 3. If the printhead latch is not raised, press the Printhead Eject button for three seconds. This will automatically initiate printhead latch opening. This process may take several seconds. 4. Remove the fluidic cap protectors from the two fluidic couplings. 5.
- Page 29 9. Remove the protective strip from the electrical contacts. While holding the printhead cartridge by the handle with one hand, grasp the pull tab with the other hand and, slowly and carefully, peel back the plastic strip covering the electrical contacts. Dispose of the removed strip immediately and do not allow the removed strip to contact the electrical contacts.
- Page 30 12. When the printhead cartridge is fully inserted into the printer rotate it to a vertical position as shown. 13. Slowly close the printhead latch. The fluidic couplings should advance and seal to the printhead cartridge. 14. Close the printhead latch. When the printhead latch is closed, the printer will prime, clean and cap the printhead automatically.
- Page 31 NOTE: The Printer may take up to 12 minutes to set itself up during initial startup. This is normal. The machine will emit a number of chirps, whirrs and other noises as it circulates ink and runs systems. CAUTION Do not remove the Printhead while fluid is primed in the system! 3.5.4.
-
Page 32: Media Handling
3.5.5. Media Handling 3.5.1.1. Print Area Print area can be found on the back of the printer where the operator needs to feed the materials. Any media type must go through the metal paper guide in order to avoid any movement during printing. -
Page 33: Connect The Printer To A Computer
3.6. Connect the printer to a computer 3.6.1. Direct connection to a personal computer The printer connect to directly via USB AB cable and a TCP/IP cable. For the driver installation advice to use the USB AB cable, or install that in offline mode and after the installtion seletc the correct port for the USB usage. -
Page 34: Installing The Printer Driver
3.7. Installing the Printer Driver Your printer can be installed: A) online via Network B) via direct USB connection The preferred installation is over Network, since USB installation process may conflict with previously installed USB printer software. A) Installing Printer online via Network Setup Steps: Make sure your printer is turned on and online Your printer is connected to your network via LAN cable Your PC is connected to the same network (LAN or WIFI) - Page 35 The setup console will start: Click ’Install printer software’ and accept the terms in the license agreement, then click ’Next’. -35-...
- Page 36 When asked, select ‘Configure to print over the Network’ The installation will begin and a new window will pop-up with the available printers on the network. Select your printer and click Next. -36-...
- Page 37 When the installation is finished, you can set this printer as default and/or print test page (not necessary). Click Finish button and exit the installer. Open Windows/Devices and Printers, right click on Vortex Printer Series Driver and select Printer Properties...
- Page 38 Select Ports tab from the top and deselect Enable bidirectional printing. Click Apply and OK. Printer installation is finished. -38-...
- Page 39 B) Installing Printer via direct USB connection. For this method, make sure: Your printer is turned on You have connected your PC to the printer with USB AB cable. On the user PC or laptop, open folder that contains the printer driver software ’R13 driver’ and run WinSetup.exe: As the installer starts, Windows will prompt for permission.
- Page 40 The setup console will start: Click ’Install printer software’ and accept the terms in the license agreement, then click ’Next’. -40-...
- Page 41 When asked, select ‘Configure to print using USB'. When the installation is finished, you can set this printer as default and/or print test page (not necessary). Click Finish button and exit the installer. Installation is finished. -41-...
-
Page 42: Driver Specifications - Printer Preferences
My Print settings: Acces your costum print settings for various jobs that you uploaded through the „Media Profile Upload+ int he Toolbox- Media type and media size are defined by the Vortex 851R Series Driver and included during installation. Field Values... - Page 43 3.7.1.1.Layout Tab Resizing – Lets you specify the Original Size or Custom Resize: lets you resize the original as a % of normal size. The printer will print the document in the size you selected regardless of the size of the paper selected. Print on: lets you specify the particular size of paper that you want to print on regardless of the size of the original...
- Page 44 3.7.1.2.Media Tab Printing Adjustments: Allows you to make minor positioning changes to the print area in relation to the media if needed. NOTE: Only works on jobs using less than the full print area (less than 8.5" wide). Media Layout: possible to set what kind of print jobs will arrived.
- Page 45 3.7.1.3.Import/Export When updating to new Memjet driver, the Import/Export tab is used to save previously adjusted media sizes and My Print Settings. You can also use this function to copy printer and media settings from one PC to another. When exporting these settings, an .ini file will be generated, which can be copied onto another computer,- where the driver is installed as well - and can...
-
Page 46: Label Printing, Generating Print Jobs
5. Change port from TCP/IP to FILE (or Print to File) Print jobs are pre-defined printjobs which could be usable in the future. The Vortex 851R printer is only working with .PRN files which can be generated from the driver of the printer. -
Page 47: Printers Buttons
3.9.0.Printers Buttons Power button /green LED/ When push the power button, the engine will start and start to priming or will do a little maintance. At first start should to wait lot time (10-15mins) because the ink delivery system is empty. -
Page 48: Buttons And Led Signals
3.9.1. Buttons and Led signals The first button from the left is the Power button, with an integrated Green led. The second button is the Cancel / Clear Error with a Red led and the last one is the Feed/Unfeed with a Yellow led. The power button only sorts two GPIO pins so it does not require any kind of software for its operation, consequently it can be used to power on the engine during the manufacturing process even if there is no firmware on the machine. -
Page 49: Toolbox
4. Toolbox On the welcome screen you can select your language and on the left side you will find the status panel of the engine. If the engine is ONLINE it is ready to print. 4.1.User Interface -49-... -
Page 50: Diagnostics
Provides access to the Printer User Control screen. From this screen you can Clear Errors, Cancel a Job, Reset the Job Counter and Reset the Page Counter. You can also perform some maintenance and operating tasks such as: Clear Error: If the engine is in error status, it is possible to delete with this button. There are some fatal states that are unable to delete. - Page 51 Print Color Bars – Prints 7 color bar page to check color quality. Print Ink Channels – Prints 5 color bar page (YBCBM) to check whether all color channels are working properly. MAKE SURE YOUR PRINTER IS SET TO CONTIOUS MODE AND YOU ARE USING CONTINOUS MEDIA WHEN YOU ARE PRINTING THESE TEST/SAMPLE PAGES.
-
Page 52: Ink Usage
4.3.Ink Usage Allows you to monitor the estimated amount of ink left in each of the five Ink Tanks. You can monitor inkusage and consumption and schedule Tank changes (saving down-time during a print run.) NOTE – Ink Usage only works when you start with a new Tank and leave it in the Printer Please note that ink usage/job history will be lost after turning the printer down. -
Page 53: Network Configuration
4.4.Network configuration On this page you will see the actual engine network configurations. The network settings page provides information about the network connectivity, Printer name, Domain name, and IP configuration settings. dhcp:-if its on then the machine will get an ip address from the router. This is the basic setting also. -
Page 54: Service Menus
4.5.Service Menus For authorized peronnel only. Provides acces to more advanced printer control and maintenance menus. Under this menu you can find many basic engine settings. Very easy to uncalibrate the engine, this is the reason of the password protection. Here possible change TOF,BOF, Cut, Gap, r2r distances, Tof2Tof settings. -
Page 55: Maintenance Guide
5. Maintenance Guide 5.1. Maintenance Overview To ensure reliable operation and high print quality while using the product, the regular inspection and maintenance steps are required to be performed. These include mechanical subsystems checks, occasional cleanings, consumables changing and print head cleaning. Cleaning The most essential maintenance operation is automatic –... - Page 56 General Maintenance Interval Tasks Daily Bi-weekly Monthly Anually As Needed Printhead (manual wipe) Wipe PPCA Contact Cleaning Every PH Removal IDS Fluidic Couplings Every PH Removal Aerosol & Debris Clean Clean Clean Clean Clean Removal Optical Sensors – Paper Clean Clean Clean Path...
-
Page 57: Daily Maintenance Tasks
5.2.1. Daily Maintenance Tasks Aerosol and debris removal Ink may transfer from printer components into media path. Remove excess ink and debris daily to ensure optimal printing. NOTE: If the operator finds paper debris on a starwheel, check to see whether or not it is aligned with the edge of the media. - Page 58 NOTE: Do not wipe the starwheels as they may release and fall out. Do not clean the printhead nozzle plate at this time; it will be cleaned during another task. 5. Use a clean, dry lint-free cloth dry the inside of the unit. Avoid the grit rollers since they can snag on the cloth and create debris.
-
Page 59: Bi-Weekly Maintenance Tasks
Aerosol Starwheels Picture of removing Aerosol from Housing surface Pinch Rollers Picture of the Wipe Upper Surfaces 6. Fold the cloth between wipes to ensure a clean, uncontaminated surface is used each time. 7. Use a vacuum cleaner if necessary to remove debris inside and outside surfaces of the clamshell. - Page 60 Paper path optical sensor cleaning • Wiper inspection • Aerosol and debris removal – see at daily maintenance tasks Optical Sensor Cleaning Clean the four optical sensors in the paper path every two weeks. 1. Pinch the clamshell latch to release and open the clamshell. Picture of Paper Path Optical Sensor Locations - Top -60-...
- Page 61 Picture of Paper Path Optical Sensor Locations - Bottom 2. Moisten a foam swab with distilled water. 3. Place the damp swab on each sensor and twist back and forth to clean the surface. Use a new, moist swab on each sensor. -61-...
-
Page 62: Monthly Maintenance Tastks
4. Repeat cleaning and drying process for all four sensors. Wiper Inspection 1. Pinch the clamshell latches to release and opend the clamshell. NOTE: The wiper is automatically in the up position when the clamshell is open. 2. Go to Toolbox and click on ‘Eject Sevice Station’ button. 3. - Page 63 Waste Ink Tray Latches 2. Even the absorber is completely darkened with waste ink, with no white showing, it may still be able to hold additional ink due to evaporation. The capacity of the waste ink absorber is 1.6L. Visually inspect the waste ink absorber and tray to see if there is ink leaking out of the tray.
- Page 64 Ink Tubing Pinch Valve and Pump Motor Vents (x5) Picture of Rear Ink Tubing Detail Buffer Box Peristaltic (ink) Pump Tubing into Fluidic Couplings Peristaltic Pump Pinch Valve and Vents (x5) Picture of Ink Tubing Connections Use a finger to gently pry both fluicid coupling covers off in order to inspect the ink tube connections underneath.
- Page 65 Picture of Remove Fluidic Coupling Covers 2. Visually inspect each tubing connection point for leaks. If leaks are found, escalate to a technician for troubleshooting. 3. Follow the exposed length of each tube and visually inspect each ink tube for inks or pinches in the tubing.
- Page 66 Lifter Motor – Gear Inspection and Encoder Cleaning The lift motor gear, on the right side of the unit, must be inspected every month. Lift Motor Gear Lift Motor Motor Encoder ( under cover ) Picture of the Lift Motor Assembly Location 1.
- Page 67 Picture of removing the Lift Motor Encoder Cover Picture of cleaning the Lift Motor Encoder Paper Path Grit Roller Inspection The three paper path grit rollers must be inspected every month. Grit Rollers Picture of Grit Rollers -67-...
-
Page 68: Annual Maintenance Tasks
1. Inspect the print rollers for ink residue and debris. If none is found, proceed to the next PM task. If residue is seen, perform the following steps to remove it. Picture of Grit Rollers with residue 2. Lightly moisten a toothbrush with a small amount of DI water. 3. - Page 69 Maintenance Module Cleanining Clean the Maintenance Module (aka Service Station) every year. 1. Lay absorbent disposable towels under the base of the printer. Picture of layed towels NOTE: it recommended to do a System Deprime before ejecting the Maintenance Module. Also it is better to remove the printhead and cap itt o avoid contamination and adequate moisture.
- Page 70 Manually rotate the maintenance module positioning gear until the module disengages from the drive gear and gently pull the module forward until you can disconnect it from the translation motor. Positioning Picture of removing the Maintenance 4. Disconnect the ribbon cable connector for the wiper motor to free the MM. Picture of disconnecting MM from Wiper Motor 5.
- Page 71 7. Inspect the cap for ink contamination and cracking or permanent deformation of the cap. If permanently damaged, escalate to a technician for replacement. Picture of wiping the Cap Seal wuth damp lint-free cloth 8. Inspect the wiper module components for damage or permanent deformation. If permanently damaged, escalate to a technician for replacement.
- Page 72 Picture of disconnecting wiper PCB from Wiper Housing 2. Disconnect the wiper PCB from the ribbon cable, as shown in the figure below. Picture of disconnecting Wiper PCD from ribbon cable 3. Route the ribbon cable through the housing to free the wiper, as show non the next pictures.
- Page 73 Retention Picture of removing the MFR after opening retention tabs -73-...
- Page 74 5. Remove the MFR to access the transfer roller (TR) that is installed below the MFR in the wiper module assembly. Picture of Transfer Roller (TR) 6. Visually inspect the transfer roller (TR) for unusual ink accumulation. The transfer roller is stainless steel. Ink may accumulate in scratches on the roller. Wash the roller with damp lint-free cloth if necesarry.
- Page 75 2. Verify that Toolbox reflects the tank removal. 3. Align each ink tank with the rails on the printer and insert. Repeat until all five ink tanks are re-installed. Picture of re-installing Ink Tanks 4. Re-fasten each ink tank latch to ensure it moves properly and engages fully. If not, escalate to a technician for replacement.
- Page 76 5.2.4.1.Cutter Inspection and Cleaning WARNING! – To avoid personal injury, power off the printer before performing this task! 1. Fold a damp lint-free cloth and insert it into the groove beneath the cutter General maintenance Pictures of cleaning the Cutter 2.
-
Page 77: As Needed Maintenance Tasks
5.2.5. As Needed Maintenance Tasks The following general maintenance tasks should be performed on an as needed basis, based upon inspection during every day use and/or when performing other tasks. The printhead cartridge should be manually wiped after the following occurrences: after paper jams •... - Page 78 3. Dampen a lint-free cloth with distilled water 4. Gently wipe the print nozzle plate from one end to the other Picture of wiping the nozzles 5. Fold the cloth and clean the nozzle plate again to remove remaining debris. Pictures of soiled lint-free cloth Close the clamshell.
- Page 79 Picture of moisten PH Cap Perform the following steps to ensure proper printhead cartridge cleaning: Open the toolboox and press system deprime. This command will de-prime the system. During de-priming, the printhead latch will release. Listen for the latch to click and observe that it is “popped up”...
- Page 80 Latch popped up Ink backs out of tubing during de - prime Picture of released Latch and empty ink tubes 5. Open the latch. -80-...
- Page 81 6. Tilt the printhead cartridge towards the rear of the unit until it clicks. Picture of tilting PH towards rear of the unit 7. Slide the printhead cartridge out of the print engine. Picture of sliding the PH out of the unit 8.
- Page 82 Picture of capping the PH NOTE: Each time the printhead is removed, clean the PPCA contacts and fluidic couplings! 9. Locate the PPCA contacts. PPCA Contacts Picture of PPCA Contacts 10. Use a new, lint-free cloth dampened with DI water to gently wipe up-and-down to clean the PPCA contacts.
- Page 83 Picture of cleaning the PPCA Contacts 11. Locate the fluidic couplings. Fluidic Couplings Picture of Fluidic Coupling Location Picture of Fluidic Coupling with ink residue 12. Moisten a foam swab with DI water. -83-...
- Page 84 Pictured of moisten swab 13. Place the foam swab in one of the ink channels on the fluidic coupling and rotate to clean. Picture of cleaning the ink channel 14. Use a new, moist foam swab and repeat the process for each ink channel on both fluidic couplings until all 10 openings are cleaned.
- Page 85 15. Remove the cap from the printhead Picture of uncapping the PH 16. Wipe from one end to the other with the damp lint-free cloth. Picture of wiping the PH 17. Align the PH cartridge with the pin on the PPCA board and slide it into the print engine.
- Page 86 Alignment Pin PH Groove Picture of PH alignment pin interface 18. Tilt the top of the printhead cartridge toward the back of the printer, about 20º. 19. Gently seat the back of the printhead cartridge into the print engine. 20. When the back of the printhead is firmly seated, gently rotate the printhead cartridge into position against the stops on the printhead connector board until it clicks into place.
- Page 87 Waste Ink Absorber Replacement The waste ink absorber was designed to last the life of the printer under normal printing conditions, taking into account evaporation. Replace the waste ink absorber when ink is leaking out of the waste ink tray. 1.
-
Page 88: Troubleshooting
6.Troubleshooting 6.1. Maintenance Module (aka Service Station) Troubleshooting The following table lists some possible problems related to the maintenance module, with possible causes and solutions. Problem Possible Causes Solution Motor stalls Jammed gear train from Check through each • broken post or improperly of the possible seated gears causes. -
Page 89: Printhead Troubleshooting
6.2. Printhead Troubleshooting Occasionally, print quality is affected by minor problems that arise with the printhead. The following table provides a list of common printhead issues, their symptoms, and solutions: Problem Problem Causes Solution Air and air bubbles causing Appear as missing groups of Cured by recirculation, priming or cycles of bloacked nozzles... -
Page 90: Vortex 851R Troubleshooting Guide
6.4. Vortex 851R Troubleshooting Guide GENERAL Documents to read before (available on ftp) Print engine: • OEM Setup and Operations Guide • OEM Troubleshooting Guide • OEM Service and Repair Guide • Technical Specifications Vortex 851R: • Training – software module •... -
Page 91: Troubleshooting Tools
Troubleshooting Tools Serial communication between the NorthStar print engine and the host PC enables detection and analysis of issues. You will also need the related software for entering commands, serial logging. More information about it int he next phase. Serial Communication and Related Tools The most important troubleshooting tool is serial communication, which requires a special serial cable and some software on the PC. - Page 92 under power, connected via USB and the firmware in standby mode! As long as the .tcl file the batch file and the USBcmd.exe are in the same folder there should be no issues with the upload! After the custom routines are burned to the flash, the engine need to be restarted! The result can be checked via TTL cable during the power-up sequence the engine will print the following messages onto the TTL output: 1.
-
Page 93: Dead Engine,Ews,Firmware
Dead engine,EWS,Firmware Dead engine: When is a print engine dead? After Dediprog re-flash, the putty output is empty or not interpretable, green LED is off. EWS: How can I reach the print engine information page? Open the toolbox. Firmware: How can I burn the firmware? All firmware has a Readme file. -
Page 94: Print Engine: Error Messages
PRINT ENGINE: ERROR MESSAGES Crit 63 03-phead offline cancelpage 1. Clean printhead contact sensors. 2. Replace print head 3. Flash Omnipec 4. Replace Omnipec CARTRIDGE_MISSING_X • clean cartridge chip with isopropyl alcohol • clean chip readers with isopropyl alcohol • run cm_ink •... -
Page 95: Fatal 71 02 Offline Cancelpage
Fatal 71 02 offline cancelpage Dongle Please ensure: 1. That P2002 on the MPCA has not been lifted from the solder pads on the PCA 2. That there is insulating tape on the dongle covering the solder pads 3. That the wires between the dongle PCA and P2002 are connected to the dongle PCA and to the connector Incorrect NVM settings Interruptioin the sensor power How to detect:... -
Page 96: How To Detect
5) gpio_pin_get SS_LIFT_UP (should return a 0 indicating that the cap is down). 6) maint_enable 1 (re-enable the maintenance state machine). Service station position unkown How to detect: ss_pos returns unknown unknown How to fix: 1. Clean service station 2. Replace lifter arm if broken 3. -
Page 97: Maintenance_Busy
TCL> servo_debounce SSLift TCL> vars_getset servo_disable_gpio_debounce --- Instructions for collecting sensor history information --- 0.turn off maintenance: maint_enable 0 1. add lift sensor to servo history: servo_sensor SSLift 0 SS_LIFT_UP 2. store lift servo history: servo_history_store SSLift 3. go to known position and set start servo position to 0: ss_down;... -
Page 98: How To Fix
nvm_getset pump_motor returns 0 How to fix: nvm_getset mpcarev 5 nvm_getset wiper_motor E nvm_getset pump_motor B shutdown 1 PAPERPATH_CUTTER_ERROR reset PAPERPATH_FEED_TIMEOUT • clean sensors • check paperpath • check paper settings & positioning PAPERPATH_PAPERJAM • clean entry/exit sensors -98-... -
Page 99: Print Quality Issues
6.5. Print Quality Issues Print quality issues can be grouped into the following categories, as explained in subsequent sections. Two-letter abbreviations are used as the prefix for each category, so that they can be reported to the support team and tracked with metrics for further analysis. Color Mixing (CM) •... -
Page 100: Examples For Color Mixing
Examples for Color Mixing CM01: Fine Clouds of Ink or Misting Issue CM01: Fine Clouds of Ink or Misting displays as a fine spray of small ink drops from the upstream print area that is falling on the downstream print area of the page. Picture of Color Mixing: Clouds of Ink Picture of Color Mixing: Fine Misting -100-... - Page 101 Cause Misting typically results from by the poor “break off” of the tails of the ejected ink drops, which results in very small droplets that have very little momentum. Higher pen-to- paper spacing, difficult images, or old printheads may amplify this defect. To resolve this issue: 1.
- Page 102 Cause CM02: Color Contamination Repeated at Beginning of Every Page CM02 displays as small amounts of color contamination that appear on top of a page. The contamination is reduced after a couple of pages. Picture of color Mixing: Color Contamination The printhead is covered with ink somewhere and the ink keeps wicking back to the channels.
- Page 103 Cause CM03: Color Contamination at 1 mm Intervals CM03 usually displays as color contamination lines that continue at approximately 1 mm intervals after the majority of the color has cleared. Picture of Color Mixing: Color Contamination at 1mm intervals Ink mixing is caused by location of feed holes in the back channel. Resolution Check the tubes at the back of the print engine before circulating ink.
- Page 104 Cause CM04: Color Mixing in the Middle of the Page CM04 is the printing of mixed colors after long, continuous printing or short periods of idle time (~ 5 seconds) from a printhead that does not show signs of internal leaks. Picture of Color Mixing: Example 1 Picture of Color Mixing: Example 2 -104-...
- Page 105 Picture of Color Mixing: Example 3 Cause Color mixing results when ink migrates across the printhead surface from heavily printing nozzles into the nearest odd or even nozzle row that is not printing. Resolution Use profile tool loading (Printing Preferences →Color Tab→Color Matching) to verify that the correct color profiles are being used.
- Page 106 CM05: Color Contamination CM05 Color Contamination is when prints that are supposed to be one color are coming out in a different color. Picture of Color Contamination Samples Cause Although leaks are possible in the backchannel, the most common cause of color contamination is mixing of ink from drool on the nozzle plate.
- Page 107 4. Purge the ink and clean the nozzle plate before resuming backpressure. Then, print the same set of plots. If not resolved, contact Customer Service and report error code CM05-04: Possible printhead damage. -107-...
- Page 108 CM06: Vertical Lines Throughout Page/Drooling CM06 displays as vertical white lines followed by a dark dot. Picture of Verical Lines with Dark Dot from Drooling Cause A puddle has formed in front of the nozzle, possibly due to a particle or fiber on the printhead surface, and is capturing the drops that are fired.
-
Page 109: Streaking (Sr)
Streaking (SR) White or grey lines or parabolas running vertically in print jobs, as well as white, unprinted areas, are called “streaks.” Picture of Streaks SR01: Growing Nozzles Out SR1 displays as a region of “nozzles out” (that is, nozzles stop working) that becomes increasingly worse on the way down the page or when any large (>1cm wide) region of nozzles out moves or changes down the page. - Page 110 SR02: Large Missing Nozzles with Varying Amount SR02 displays as a parabola-shaped area in the middle of the page. Picture of Streaks: Parabolas Cause Bubbles can air-block ink from getting to nozzles or a puddle has formed in front of the nozzle.
- Page 111 SR03: Large White Area SR03 displays as a large white area with almost no nozzle firing and is consistent from page to page. Picture of Streaks: White Areas Picture of Streaks: Single Die Cut Cause This print defect indicates an electrical issue or damage to the printhead. Resolution For lines approximately 1”...
- Page 112 SR04: Lines/Prints Fall In SR04, text or images become weaker page after page and finally drop out. Cyan Nozzles are Out Picture of Streaks: Lines or Prints Fail Cause The nozzles can dry out over time if there is not enough on-page and inter-page servicing.
- Page 113 SR05: Random Small Streak SR05 displays as random, small, thin lines that are visible on the print but do not grow along the page. Picture of Random Small Streaks Cause Thin streaks can be caused by internal contaminants, external contaminants (fibers), air bubbles, or printhead damage.
- Page 114 SR06: Weak Chips SR06 displays as weak chips that result when some dies do not eject properly. The issue does not improve by varying pulse width. Picture of Streaks: Weak Chips Example Cause This print defect may result from an electrical failure due to a cracked die or extended periods of nozzle dehydration.
-
Page 115: Dot Misplacement (Dp)
Dot Misplacement (DP) Dot misplacement can be observed as lines or solid fill areas that are fuzzy. Picture of Dot Misplacement Examples DP01: Poor Text Quality In DP01, text becomes fuzzy or unfocused after many thousands of pages have printed. Picture of Dot Misplacement: Text Becomes Fuzzy Over Time Cause Asymmetric “wear”... - Page 116 3. Replace printhead with a new one or swap with another printhead. If not resolved, contact Customer Service and report error code DP01-04.: Poor text quality unresolved. -116-...
- Page 117 DP02: Graininess Graininess presents as a mottled, random pattern in a solid fill area. Picture of Dot Misplacement: Graininess Cause Excessive printhead-to-paper spacing or a worn-out printhead can cause this printing defect. Picture of Dot Placement Examples Poor and Good Resolution 1.
-
Page 118: Banding (Bd)
Banding (BD) Banding defects are shown in the following illustration and detailed in subsequent sections. Picture of Banding Examples BD01: Initial Page Startup Defect BD01 displays as color change or poor directionality at the start of nozzle firing. Picture of Initial Page Startup Defect This defect results from dehydration of the ink nozzles. - Page 119 Resolution 1. Check the Maintenance Algorithm (KWS + Inter page spit) TCL › maint_user_recovery 1 If not resolved, continue to the next step. 2 . Re - run servicing and print the plots again. If not resolved, continue to the next step. 3 .
- Page 120 BD02: Optical Density or Color Variation BD02 displays as an area of half-tone prints with unexpected color variation or horizontal, thin lines with dot placement error. Picture of Banding: Variation of Optical Density or Color This defect results from heat (generated while printing the solid black area) that creates a sub optimal ejection behavior of the nozzles that later have to print the half-tone area.
- Page 121 BD03: Die Boundary Banding BD03 displays as dark, light, or rainbow bands 0.5 mm to 1 mm wide at die boundaries not caused by dead nozzles or mist. Picture of Die Boundary Banding This defect results from a shift in dot grid from one die to the neighboring die due to a printhead related defect, lack of die flatness at die ends, or a combination of both.
- Page 122 BD04: High Frequency Banding BD04 displays as horizontal, high frequency, dark bands that are visible in solid fill area. Picture of High Frequency Banding This defect is caused by a variation in dot placement due to paper path, firmware/rendering, or a combination of both. Resolution 1.
- Page 123 BD05: Low Frequency/Page Advance Banding BD05 displays as a horizontal, dark bands, visible in solid fill areas mainly close to the top or bottom of the page. Picture of Low Frequency/Page Advance Banding Cause This defect is caused by a variation in dot placement due to the paper path in the print engine, the systems that feed in the paper, or a combination of both.
-
Page 124: Other General Print Quality Errors (Ge)
Other General Print Quality Errors (GE) This section covers issues that come from mechanical behaviors, such as varying distance for top of form, smears or dots, marks or ink on the paper, scrambled or skewed printing. Picture of Other General Print Quality Errors -124-... - Page 125 GE01: Marks on the Print Paper, Dust GE01 presents as fine, detail artifacts on the print that resolve after running maintenance. Picture of Dust and Marks on Paper Cause This defect results from paper dust or other particles hanging from the printhead. Resolution 1.
- Page 126 GE02: Varying Top of Form Margin GE02 presents as a varying margin from lead edge of paper to top of print form. Measurment varies significantly. Picture of Varying Top of Form The print defect may result from dirty sensors or data that has timed out. -126-...
- Page 127 Resolution 1. Evaluate paper path sensors. 02: Varying top of form margin unresolved. GE03: Ink on Back/Top of Page GE03 displays as ink tracks on back or front side of the media. Picture of Ink on Back or Top of Page This defect indicates that the platen is dirty or an ink puddle is building up on the print engine.
- Page 128 Resolution 1. Physically wipe the platen. If not resolved, continue to the next step. 2. Evaluate the ink buildup inside the print engine If not resolved, contact Customer Service and report error code GE03-03: Ink on back/top of page unresolved. -128-...
- Page 129 GE04: Bleed Line or text quality looks very fuzzy. Edges of each line look ragged. Some media may have better performance than others. print mode and color profiles are the main ways used to control this behaviour. Picture of Examples of Clear Edges and Ragged Edges (Bleed) Bleed results from ink and media interaction.
- Page 130 GE05: Scrambled Print GEO5 displays as scrambled or garbled print spanning a zone width equal to one die chip (20 mm) Picture of Scrambled Print This defect generally results from a poor connection between printhead and printer. Alternatively, it can arise from cracked dies or broken bond wires. Resolution 1.
- Page 131 If not resolved, as a last resort, switch printhead to see if the defect follows the printhead or is still present on the printer. If the defect is in the printhead, install a new printhead and report error code GE05-05: Scrambled print unresolved. -131-...
- Page 132 GE06: Print Skew GE06 presents as an untended skewing of the body of print. I.e., the print is crooked on the page. Cause This defect results from various issues of paper path handling. Resolution 1. Remove ay paper jam. If not resolved, continue to the next step. 2. Check the media feeder.
-
Page 133: Paper Handling (Pa)
Paper Handling (PA) Issues with paper handling (PA) cause a range of defects, as detailed in the following sections. Page Marking from Paper Handling Page Marking from Paper Handling displays as smudged ink. Cause This defect results when the top of the media makes contact shortly after printing. Resolution 1. - Page 134 PA02: Feeder Marks PA02 displays as tracks on the paper that correspond to the measurements of the sheet feeder’s wheels (2 x 1/2'” wide, roughly 5 in apart). Cause This defect results from a dirty feeder assembly, possibly from aerosol or an ink spill that contacts media.
- Page 135 banding (less than an inch between lines) can be caused by other noise or imperfections in the paper path. Resolution 1. Print a solid area fill plot (insert plot here) and measure spacing. 2. Reset belt tension and rerun diagnostic 1040 plot. Check pulleys and bearings for any slop or run-out.
- Page 136 Paper Jams and Head Crashes PA09: True Paper Jams The sound of crinkling paper usually precedes the notification of a paper jam, PA09. Paper must be cleared to continue printing. Cause Causes include debris or objects in the paper path; platen out of position; bent or curled media prior to entering the printer;...
- Page 137 3. Open clamshell; check for and remove any foreign objects in paper path causing the problem. Margin Defects Margin defects may appear in the top margin, in the bottom margin, or with the image askew on the page. PA12: Incorrect Top Margin The top margin appears very large or very small or nonexistent as the printed image can run off the edge of the media Cause...
-
Page 138: Ink Delivery System (Id)
Ink Delivery System (ID) For issues with missing or non-recognized ink cartridges, a standard good practice is to remove all ink cartridges, then insert them one at a time and run the “qa” command. In this way, the actual cartridge can be identified, instead of the confusion that may result with bus contention or an incorrectly chipped cartridge. - Page 139 ID03: Ink Low Indicator When Not Actually Low The printer reports empty ink and refuses to print, but the cartridge still has more than 7CCs remaining. Cause In order to trigger low ink, the low ink sensor must detect low ink in the prism of the cartridge.
-
Page 140: Paper Cutting (Pc)
Resolution 1. Remove the maintenance module and evaluate whether it was the cause. 2. Dismantle the printer to locate the source of ink. Paper Cutting (PC) Issues with paper cutting (PC) cause a range of defects, as detailed in the following sections. -
Page 141: Firmware Error Messages (Er)
Firmware Error Messages (ER) Error messages (ER) may display on the Toolbox, indicating a problem. The following sections detail some of the more common messages. ER01: PEP Data Underrun The paper path motion stops under this condition. Partially printed pages are common as the error only occurs while the paper path is moving. - Page 142 ER04: SS Lift Error In order to protect from situations that could cause ink mixing and possible spillage, the printer will not function if it is tilted. Cause Tilt sensors can give bad readings when there is excess electrical noise or EMF in the vicinity, or if the table on which the print engine sits is vibrating.
-
Page 143: Maintenance Module (Mm)
Maintenance Module (MM) Issues with the maintenance module (MM) cause a range of defects, as detailed in the following sections. The maintenance module is also known as the service station (SS) in some contexts and messages. MM01: Wiper Not Spinning The wiper roller is not spinning. -
Page 144: Printer Specifications
7. Printer Specifications Printer Technology Drop on Demand Thermal Inkjet printing Printable width is 215.9 mm (8.5 inch) 70,400 nozzles (14,080 per color) Five channels: Cyan, Magenta, Yellow, Black (2x) Print Speed 300mm/s at 1,600 x 1,600 dpi black 300mm/s at 1,600 x 800 dpi color 150mm/s at 1,600 x 1,600 dpi black and color 12 inches/s (21,6 km/day) Print Quality... - Page 145 Cutter Integrated cutter Operation data Power supply 90-240 V ~50/60 Hz, PFC Power consumption max. 1200 W (5A bizt.) Operating temperature 15-35 C Humidity range Dimensions Width 61 cm Height 40 cm Depth 40.5 cm Weight 40 kg -145-...
- Page 146 Print speed quick chart The table below shows the print performance of the printer expressed in printing length and label count for given print time intervals. This information is for getting a feel of the volume the printer can print for planning purposes. Speed (IPS –...
Need help?
Do you have a question about the 851R and is the answer not in the manual?
Questions and answers