Table of Contents
Advertisement
Instructions
IT
GB
FR
Français
English
DE
Deutsch
Nederlands
PT
Português
Ελληνικά
SCM2
6
GB
IT
Italiano
NL
ES
Espãnol
GR
RU
Русский
COFFEE AND CAPPUCCINO MAKER
CONTENTS
INTRODUCTION ...........................................7
Symbols used in these instructions .......................................7
Letters in brackets .................................................................7
Troubleshooting and repairs ..................................................7
SAFETY ....................................................7
Avvertenze fondamentali per la sicurezza ...............................7
Designated use .......................................................................7
Instructions ............................................................................7
Child safety.............................................................................8
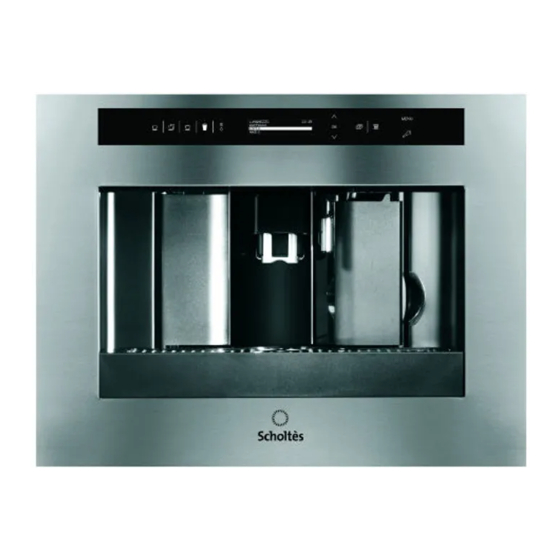
DESCRIPTION .............................................8
Description of the appliance .................................................8
Description of the control panel..............................................8
PRELIMINARY CHECKS..................................8
Controls after transport .........................................................8
Installing the appliance ...........................................................8
Connecting the appliance........................................................8
DISPOSAL .................................................8
BUILT-IN INSTALLATION ................................9
TURNING ON AND HEATING UP ......................11
MAKING COFFEE USING COFFEE BEANS ..............11
.............................................................12
ADJUSTING THE COFFEE MILL ......................12
COFFEE (INSTEAD OF BEANS) .........................12
DELIVERING HOT WATER..............................12
FUNCTION) ..............................................13
CLEANING ...............................................13
Cleaning the coffee maker ...................................................13
Cleaning the grounds container ............................................13
Cleaning the drip tray............................................................13
Cleaning the water tank .......................................................13
Cleaning the spouts .............................................................13
Cleaning the pre-ground coffee funnel..................................13
Cleaning the inside of the coffee maker ................................14
Cleaning the brewing unit ....................................................14
Rinsing .................................................................................14
Setting the clock ..................................................................14
Setting the language ............................................................15
Setting auto-start time .........................................................15
Descale .................................................................................15
Changing coffee temperature................................................15
Setting water hardness ........................................................15
Resetting default values (reset) ...........................................16
Statistics ..............................................................................16
Advertisement
Table of Contents
Troubleshooting

Related Manuals for SCHOLTES SCM2

Summary of Contents for SCHOLTES SCM2
-
Page 1: Table Of Contents
USING THE APPLIANCE FOR THE FIRST TIME ..11 TURNING ON AND HEATING UP ......11 MAKING COFFEE USING COFFEE BEANS ....11 CHANGING THE QUANTITY OF COFFEE IN THE CUP SCM2 .............12 ADJUSTING THE COFFEE MILL ......12 MAKING ESPRESSO COFFEE WITH PRE-GROUND COFFEE (INSTEAD OF BEANS) ......12... -
Page 2: Introduction
Buzzer ..................16 • Make sure the socket used is freely accessible at all times, ena- bling the appliance to be unplugged when necessary. TURNING THE APPLIANCE OFF ......16 • If the appliance is faulty, do not attempt to repair. TECHNICAL SPECIFICATION......16 Turn it off using the main switch (A23), unplug from the mains socket and contact Customer Services. -
Page 3: Child Safety
Child safety PRELIMINARY CHECKS To lock the control panel, press the icon (B3) then the OK icon Controls after transport (B9). After removing the packaging, make sure the product is complete and To unlock the control panel, press any icon, then within 5 seconds, undamaged and that all accessories are present. -
Page 4: Built-In Installation
BUILT-IN INSTALLATION Verify the minimum measurements required for correct installation of the appliance. The coffee maker must be installed in a column and the column must be firmly fixed to the wall with commercially available brackets. Important: • Important: all installation or maintenance operations must be per- formed with the appliance disconnected from the mains electri- city supply. - Page 5 x 16 Position the rails on the sides of the cabinet as shown in the figure. Position the appliance on the rails, making sure the pins are cor- Fix with the screws supplied, then extract them completely. rectly inserted in the housings, then fix it with the screws supplied. If the coffee maker is installed over a warmer drawer, use the top surface of this as a reference to position the rails.
-
Page 6: Using The Appliance For The First Time
USING THE APPLIANCE FOR THE MAKING COFFEE USING COFFEE FIRST TIME BEANS • Coffee has been used to factory test the appliance and it is the- 1. The appliance is preset to make coffee with a normal taste. refore completely normal for there to be traces of coffee in the You can also choose coffee with an extra-mild, mild, standard, mill. -
Page 7: Changing The Quantity Of Coffee In The Cup
The appliance is now reprogrammed with the new setting and is ready for use. You can change the amount of coffee in the small cup, medium cup, large cup and mug. N.B.: When the icon (B11) is pressed, double the amount of coffee set previously with the icon (B10) is delive- red. -
Page 8: Making Cappuccino (Using The Steam Function)
• Turn the cappuccino maker outwards and place a container un- CLEANING derneath (fig. 5). Cleaning the coffee maker • Press the icon (B6) (fig. 20). The appliance displays: "HOT WATER PRESS OK". Press the OK Do not use solvents or abrasive detergents to clean the coffee icon (B9) again and hot water is delivered from the cappuccino maker. -
Page 9: Cleaning The Inside Of The Coffee Maker
fee funnel is not blocked (fig. 21). Danger! Before performing any cleaning operations, the ma- chine must be turned off by pressing the main switch (A23) and un- plugged from the mains power supply. Never immerse the coffee maker in water. Cleaning the inside of the coffee maker 1. -
Page 10: Setting The Language
Setting the language liveries and pauses. • After about 30 minutes "RINSING FILL TANK!" is displayed. To change the language on the display, proceed as follows: • Empty the water tank, rinse to eliminate descaler residues, then • Press the MENU icon (B2) to enter the menu, then the fill with clean water. -
Page 11: Resetting Default Values (Reset)
• Press the OK icon (B9). TECHNICAL SPECIFICATION • Press the icons (B7) and (B8) until the number of spots Voltage: 220-240 V~ 50/60 Hz max. 10A coincides with the number of red squares on the test strip (for Absorbed power: 1350 W example, if there are 3 red squares on the test strip, select Pressure: 15 bars “●●●... -
Page 12: Displayed Messages
DISPLAYED MESSAGES DISPLAYED MESSAGE POSSIBLE CAUSE REMEDY REMEDY • The water tank is empty or positioned • Fill the tank with water and/or insert it incorrectly. correctly, pushing it as far as it will go. GROUND TOO FINE ADJUST MILL! •... -
Page 13: Troubleshooting
TROUBLESHOOTING Below is a list of some of the possible malfunctions. If the problem cannot be resolved as described, contact Customer Services. PROBLEM POSSIBLE CAUSE REMEDY The coffee is not hot • The cups were not preheated. • Warm the cups by rinsing them with hot water.
Need help?
Do you have a question about the SCM2 and is the answer not in the manual?
Questions and answers