Table of Contents
Advertisement
Quick Links
Advertisement
Table of Contents

Related Manuals for Medion N11652


Summary of Contents for Medion N11652
- Page 1 2MP Webcam with Headset MEDION ® P86004 (MD 86061) Instruction Manual N11652...
-
Page 2: Table Of Contents
Contents What Your 1 Year Warranty Means ..........4 Safety Instructions ................ 4 Applications .................. 5 Electromagnetic Compatibility ........... 5 Connections ................5 Repairs ..................5 Cleaning ..................6 Backup ..................6 Package Contents ................. 6 System Requirements..............7 View ....................7 Setup.................... -
Page 3: What Your 1 Year Warranty Means
What Your 1 Year Warranty Means Great care has gone into the manufacture of this product and it should therefore provide you with years of good service when used properly. In the event of product failure within its intended use over the course of the first year after the date of purchase, we will rem- edy the problem as quickly as possible once it has been brought to our attention. -
Page 4: Applications
Applications This product is intended for private use only. Electromagnetic Compatibility When connecting additional or other components ensure that Guidelines for Electro-Magnetic Compatibility (EMC) are ob- served. Keep the device at a distance of at least one metre from high frequencies and magnetic sources of interference (television, loudspeaker boxes, mobile telephones etc.) to avoid malfunc- tioning and data loss. -
Page 5: Cleaning
Cleaning Please make sure the webcam, particularly the lens, does not get dirty. Use a damp cloth to clean the webcam and stereo headset. To clean, do not use solvents, corrosive or aerosol detergents. Backup Note Always backup your data onto an external storage device (e.g. -
Page 6: System Requirements
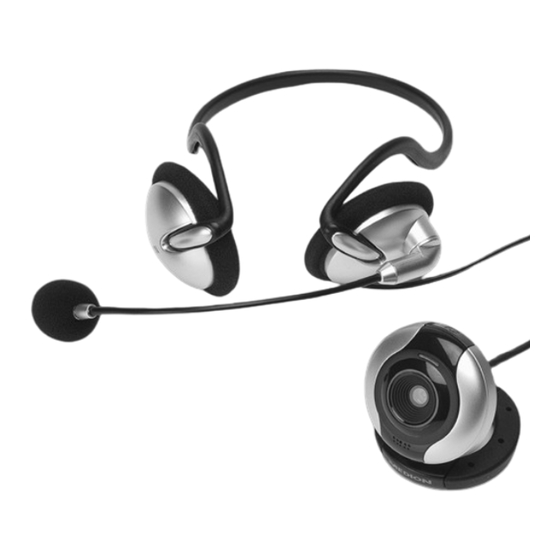
System Requirements Operating system Microsoft Windows XP/Vista/7 Processor 1.6 GHz processor or faster Installation CD-ROM/DVD-drive Disk storage 200 MB or more free fixed disk storage Connection USB, microphone and headphones con- nection View 1 Snapshot button(using YouCam 3) 2 Power light 3 Lens 4 Microphone... - Page 7 1 Ear pad 2 Microphone 3 Connection cable After Sales Support TEL: 1 300 884 987 WEB Support: www.medion.com.au...
-
Page 8: Setup
Setup Installing the Software Caution! Important files may be changed or overwritten when you are installing programs or drivers. Before installing the program make a backup of your original files which you will be able to access later if problems occur after installing the software. Note Install the software before connecting the webcam and ste- reo headset. - Page 9 Note If installation does not start automatically, the Autorun fea- ture is deactivated. Manual installation without Autorun: Click “Start” and select the “Run” feature. Now enter the name (letter) of the CD-ROM drive fol- lowed by a colon and "\autorun\demo32.exe". ...
-
Page 10: Connecting The Webcam To The Pc
Connecting the Webcam to the PC Connect your webcam to your computer as follows: The driver software must already be installed. Switch on the computer and all peripheral devices (monitor, printer modem, etc.) and wait until operating system has fin- ished booting. -
Page 11: Connecting The Stereo Headset To The Pc
Connecting the Stereo Headset to the PC You can connect the headset while the computer is running. Insert the 3.5 mm pink jack into the microphone input on your sound card. Insert the 3.5 mm green jack into the output socket on the sound card. -
Page 12: Technical Support
Technical Support Both webcam and headset have been vigorously tested in our laboratories in conjunction with a wide variety of devices and pe- ripherals. However, the drivers will need to be updated from time to time. This is because there may be compatibility problems with other components which were not tested (programs, devices). -
Page 13: Technical Specifications
Technical Specifications Webcam Port USB 2.0 Sensor 2.0M CMOS sensor 1600 x 1200 pixels Power supply 5 Volt (USB) Software compatibility Windows XP /Vista/7 Stereo Headset Port: 3.5 mm jack (green, pink) After Sales Support TEL: 1 300 884 987 WEB Support: www.medion.com.au... - Page 14 MEDION Australia Pty Ltd St. Leonards, NSW 2065 Australia MEDION Help Desk: 1300 884 987 E-Mail: australia@medion.com www.medion.com.au...
Need help?
Do you have a question about the N11652 and is the answer not in the manual?
Questions and answers