
Summary of Contents for ARK Powerpack DA10W
- Page 1 The original 12v smart charger battery box Operating Instructions Before operating this product please read this manual thoroughly and retain it for future reference Part no. DA10W 2012 Ark Corporation Pty Ltd...
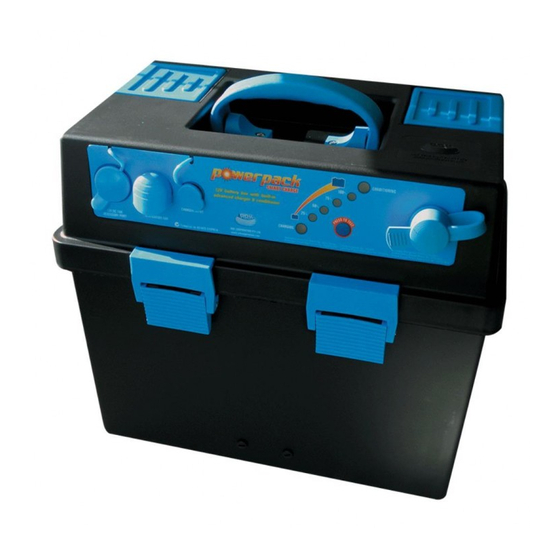
- Page 4 Identifying the parts Powerpack adaptor Positive high current terminal Stainless steel brackets Positive terminal cover 12V DC 10A accessory port with cover Carry handle Charger input with cover Negative terminal cover LED condition/charge indicator Negative high current terminal Battery isolator switch Ventilation fan CAUTION To prevent fire or shock hazard,...
- Page 5 Accessory port 10A fuse Internal battery securing strap Base Negative battery cable (black) Latches Positive battery cable (red) CAUTION For your own safety do not remove internal covers as these are non-servicable parts 12V DC battery not supplied...
- Page 6 Powerpack mounting It is recommended that the Powerpack be securely mounted with the supplied quick release mounting brackets. 1. Place the Powerpack in a suitable location with adequate air ventilation and easy access. 2. Mark bracket mounting holes as indicated, then fasten mounting brackets securely with screws provided.
- Page 7 Connecting the battery The Powerpack is suitable for most 12V DC batteries, we recommend AGM (sealed batteries). Powerpack internal dimension: 330mm L x 180mm W x 240mm H External dimension: 360mm L x 240mm W x 320mm H Place the battery into the Powerpack base and fasten via the internal battery securing strap.
- Page 8 CAUTION Batteries can generate explosive gases, ensure free air flow around the Powerpack and tighten terminals securely.
- Page 9 Connecting the load There are two output connection options: The positive and negative high current terminals or the accessory port Both the high current terminals & the accesssory port 7 11 can be disconnected by the battery isolator switch Note: a battery is a high current device. For your safety never connect a device or load to the high current terminals 7 11 without turning the battery isolator switch...
- Page 10 CAUTION Always check polarity when connecting to Powerpack. Incorrect termination may cause damage Wing nuts Terminals Washers Accessory 12V plug Removable isolator key...
- Page 11 Energy indicator The Powerpack is fitted with advanced electronics to monitor the energy level at all times. The battery energy level can be monitored via the LED condition/ charge indicator To view the battery condition charge level press & hold down the “press to test”...
- Page 12 Using smartcharge The Powerpack smart charge is based upon an advanced software program that monitors your battery. Smart charge will select from the following auto charge cycles to optimise your battery’s performance. The auto charge cycles are as follows: Charge Recovers a flat battery to a peak voltage.
- Page 13 Resting Allows the battery to consolidate after boosting. Charger ceases charging to allow the battery to rest while allowing voltage to normalize at 12.8V. Then proceeds to conditioning. Conditioning Maintains performance and prolong battery life. Battery charge is maintained at 12.8V. at 0.1A the battery is continually monitored and the charging current is automatically adjusted to maintain battery voltage at 12.8V for a period of 500 hours then proceeds to re-waken.
- Page 16 Important. Please read. •Ensure Powerpack isolator switch is in the off position while the battery is charging, except when charging through the external terminals. • Keep clear of naked flame, spark or conductive material, while the battery is charging. • Ensure that the Powerpack ventilation fan is operating while the battery is charging.
Need help?
Do you have a question about the Powerpack DA10W and is the answer not in the manual?
Questions and answers
I have inherited an ARK POWERPACK DA10W and installed a new battery in it, however the test button for battery health does not work, Can you help?
The test button for battery health on the ARK Powerpack DA10W may not work after installing a new battery if the battery isolator switch is in the off position. The isolator switch must be turned on for the LED condition/charge indicator to function.
This answer is automatically generated