
Related Manuals for Motus M-FUSION

Summary of Contents for Motus M-FUSION
- Page 1 OWNER’S MANUAL MODEL: M-FUSION DESCRIPTION: Motus® Fusion Group Indoor Racing Bike INCLUDES: Motus® M-Racing PC; Dual SPD & Cage Pedals & CHR ALL RIGHTS RESERVED; COPYRIGHT® MOTUS USA 2008...
-
Page 2: Safety Instructions
Dear Motus USA Customer, We would like to thank you for buying our studio sports training equipment ,hope that it affords you the desired satisfaction. Please note and follow the information and instructions for assembly and use. If you have any questions, please contact at any time. -
Page 3: Parts List
Basic Maintenance and Pre-us Suggestions and Requirements: - Lubricant is recommended as a Silicone Spray (Do Not Use WD-40). Lubricate seat neck and display neck if adjustment becomes difficult. - Flywheel should be thoroughly cleaned prior to; and port workout. This will prevent build up on flywheel as-well as limit rough operation of the unit. - Page 4 13 Nylon Nut 51 Outer Chain Cover 14 Washer 52 Round Head Screw 15 Hex Head Bolt 53 Left Crank 16 Cap Nut 54 Right Crank 17 End Cap 55 Left Pedal 18 Bearing 56 Right Pedal 19 Bearing 57 Bolt 20 S Nut 58 Cap 21 Belt Wheel Rod...
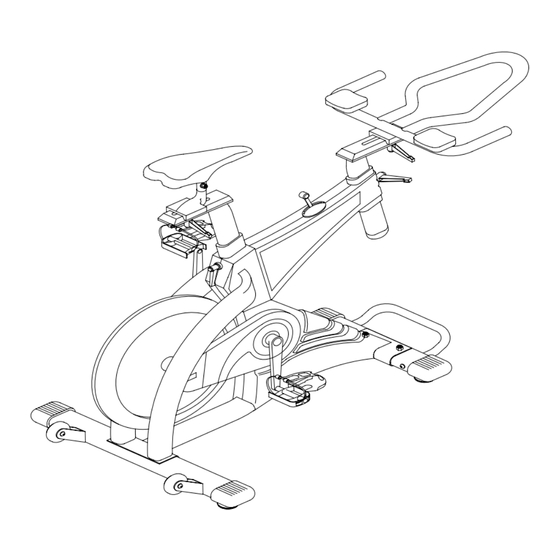
- Page 5 OVERVIEW CHART:...
-
Page 6: Packing Parts List
PACKING PARTS LIST:... - Page 7 Remove all parts and bags from box. Read the owner’s entire manual before assembly. Let out all parts and hardware pack as shown in pre-assembly checklist drawing. Some parts may be pre-assembled. Step 1. Slide the Rear Foot Bar (2) to the rear of the Main Frame (1) with two Washers (14) and two Hex Head Bolts (15) as shown in Figure 1.
- Page 8 Step 5. Insert the Seat Post (5) into the tube of the Main Frame (1) with Knob (60). Hands Tighten only at this time. Step 6. Attach the Seat (62) on the bar of the Seat Slider (7) first. Then slide this set onto the Seat Post (5) with Flat Washer (61) and Knob (60) to tighten as shown in Figure 3.
Need help?
Do you have a question about the M-FUSION and is the answer not in the manual?
Questions and answers