Advertisement
Table of Contents
- 1 Table of Contents
- 2 Sociable Remark
- 3 Safety Precautions
- 4 Safety Rules
- 5 Air Conditioner Features
- 6 Names of Parts
- 7 Accessories
- 8 Electronic Control Operating Instructions
- 9 Operatiing Instructions
- 10 Operating Instructions
- 11 Installation Instructions
- 12 Care and Maintenance
- 13 Troubleshooting Tips
- 14 Troubleshooting
- Download this manual
Advertisement
Table of Contents

Related Manuals for EnStar ENMD Series

Summary of Contents for EnStar ENMD Series
-
Page 2: Table Of Contents
CONTENTS SOCIABLE REMARK Sociable remark........................2 SAFETY PRECAUTIONS Safety rules ...........................3 AIR CONDITIONER FEATURES Names of parts ........................4 Accessories ...........................5 Electronic control operating instructions ................6 OPERATIING INSTRUCTIONS Operating instructions......................11 INSTALLATION INSTRUCTIONS Installation instructions ......................15 CARE AND MAINTENANCE Care and maintenance ......................17 TROUBLESHOOTING TIPS Troubleshooting .. -
Page 3: Sociable Remark
SOCIABLE REMARK The follow contents apply only the countries of Europe. DISPOSAL: Do not dispose this product as unsorted municipal waste. Collection of such waste separately for special treatment is necessary. It is prohibited to dispose of this appliance in domestic household waste. For disposal, there are several possibilities: A) The municipality has established collection systems, where electronic waste can be disposed of at least free of charge to the user. -
Page 4: Safety Precautions
SAFETY PRECAUTIONS SAFETY RULES 1. DO NOT CONNECT UNIT TO ANY AC SOCKET IN DISREPAIR OR WITH CONNECTIONS. 2. DO NOT USE IN THE FOLLOWING LOCATIONS: NEXT TO SOURCE OF FIRE. AN AREA WHERE OIL IS LIKELY TO SPLASH. AN AREA EXPOSED TO DIRECT SUNLIGHT. AN AREA WHERE WATER IS LIKELY TO SPLASH. -
Page 5: Air Conditioner Features
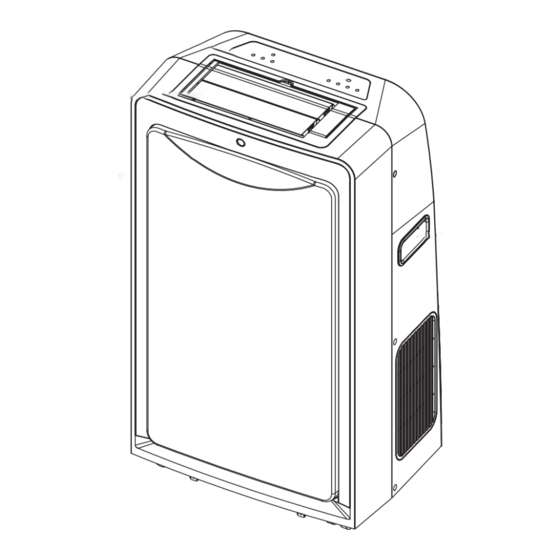
AIR CONDITIONER FEATURES NAMES OF PARTS Operation Panel Horizontal Louver Blades Signal receptor Carrying Handle (optional) (both side) Air inlet (both side) Fig.1 Air Inlet Drain hose rubber clip (insert) Water filling (open the cover) Power Cord band Air Outlet (insert) Power cord and plug... -
Page 6: Accessories
AIR CONDITIONER FEATURES Horizontal Louver Grasp here and lift it up to set the desired air-flow direction Swing up and down Fig.3 ACCESSORIES PARTS : PARTS NAME : QUANTITY : Duct Adaptor A (for permanent duct mounting) Adaptor B (for temporary duct mounting) Expansion Plug Band (For bundling the power cord) Drain Hose(For continuous drainage) -
Page 7: Electronic Control Operating Instructions
AIR CONDITIONER FEATURES ELECTRONIC CONTROL OPERATING INSTRUCTIONS Before you begin, thoroughly familiarize yourself with the control panel and remote and all its functions, then follow the symbol for the functions you desire. The unit can be controlled by the unit control alone or with the remote. LED DISPLAY PANEL MODELS: Adjusts temperaure or time... - Page 8 AIR CONDITIONER FEATURES NOTE: The following instructions represent the Unit Controls, the same instructions can be used for the Unit Controls and Remote Control. TO TURN UNIT ON: SWING NO WATER FILLING SLEEP FOLLOW ME DO THIS: Press this button. TO CHANGE TEMPERATURE SETTING: DO THIS:...
- Page 9 AIR CONDITIONER FEATURES NOTE: TO SELECT THE To choose operating mode, press the MODE OPERATING MODE: button. Each time you press the button, a mode is selected in a sequence that goes from Auto, Cool, Dry , Fan and Heat(for cooling& heating models only).
- Page 10 AIR CONDITIONER FEATURES TIMER: AUTO START/ NOTE: STOP FEATURE: When the unit is on, first press the Timer button, the indicator light above word TIMER OFFillu- DO THIS: minates. It indicates the Auto Stop program is Press Timer initiated. button When the unit is off, first press the Timer button, the indicator light above word TIMER ONillu- minates.
- Page 11 AIR CONDITIONER FEATURES TURBO/PUMP FEATURE Press TURBO/PUMP button on cooling operation, the unit will blow strong cooling air, the set temperature will reach in the shortest time. This feature is only available TIMER ON TIMER OFF AUTO on cooling mode. On heating mode, press COOL TURBO/ MODE...
-
Page 12: Operatiing Instructions
OPERATING INSTRUCTIONS OPERATING INSTRUCTIONS Before Starting This Unit 1) Select a suitable location, make sure you have easy access to an electrical outlet. 2) Install the Flexible Exhaust Hose and the Adjustable Window Slider Kit as depicted in Fig.1 & Fig.1a. 3) Remove the drain plug from the back of the unit and connect the drain hose, use the drain hose rubber clip above the drain hole to fix the drain hose upward.(see Fig.2). - Page 13 OPERATING INSTRUCTIONS OPERATING INSTRUCTIONS COOLING OPERATION (Operating temperature range: 17 C-32 C/62 F-92 F) Press the "MODE" button several times until the "COOL" indicator light comes on. Press the UP and DOWN buttons " " or " " to select your desired room temperature. The temperature can be set within a range of 17 C-30 C/62 F-88 F.
- Page 14 OPERATING INSTRUCTIONS When the desired time is established, wait 5 seconds or press the TIMER ON/OFF button again to register the time. The word OFF flashes and the clock symbol illuminates , indicating the OFF timer has been set. After pressing the TIMER ON/OFF button again, the word ON and clock symbol flash and the LCD display window appears "0.0 ".
- Page 15 OPERATING INSTRUCTIONS WATER DRAINAGE A) During Cooling Mode: When the LED(LCD) display window shows P1 , the unit stop operation automatically. Release the drain hose from the rubber clip, and pull out the rubber plug,let the drain hose slant down to a water container (which has a capacity of about 8 liters)(see Fig.1&...
-
Page 16: Installation Instructions
INSTALLATION INSTRUCTIONS INSTALLATION INSTRUCTIONS 1. Window Kit Installation Your window kit has been designed to fit most standard Vertical and horizontal window applications, However, it may be necessary for you to improvise/modify some aspects of the installation procedures for certain types of window. Please refer to Fig. 4& Fig. 5 for minimum and maximum window openings. - Page 17 INSTALLATION INSTRUCTIONS INSTALLATION INSTRUCTIONS Expansion plug A) TEMPORARY- position 1. Attach one end of the duct to the exhaust air outlet of the mobile air condition, push it downwards, be sure to fix Adapter A thoroughly. (See Fig.7) 2. Attach the other end of the duct to adaptor B. 3.
-
Page 18: Care And Maintenance
CARE AND MAINTENANCE 5. WATER FILLING FEATURE This machine is especially designed a water filling function to improve the cooling efficiency. On cooling operation, open the back cover and use a cup to fill water into the unit. 1.5 leters of water filling should be enough. -
Page 19: Troubleshooting Tips
TROUBLESHOOTING TIPS TROUBLE SHOOTING TROUBLES POSSIBLE CAUSES SUGGEST REMEDIES 1. Unit does not - Water full indicator blinks, water tank Dump the water in the water tank. Start when is full. Pressing on/off - Room temperature is higher than Reset the temperature. Button the set temperature.(Heating mode) - Room temperature is lower than... - Page 20 CS386-U 2200019186...
Need help?
Do you have a question about the ENMD Series and is the answer not in the manual?
Questions and answers