Table of Contents
Advertisement
Advertisement
Table of Contents

Related Manuals for AGL EAGL H


Summary of Contents for AGL EAGL H
- Page 1 EAGL H & H+ Owner's manual...
-
Page 3: General Information
Two models are described in this manual, the EAGL H and H+. Some sections apply only to the EAGL H+. Although either pro- duct is very simple to use, we recommend that you read this manual before operating the laser. -
Page 4: Specifications
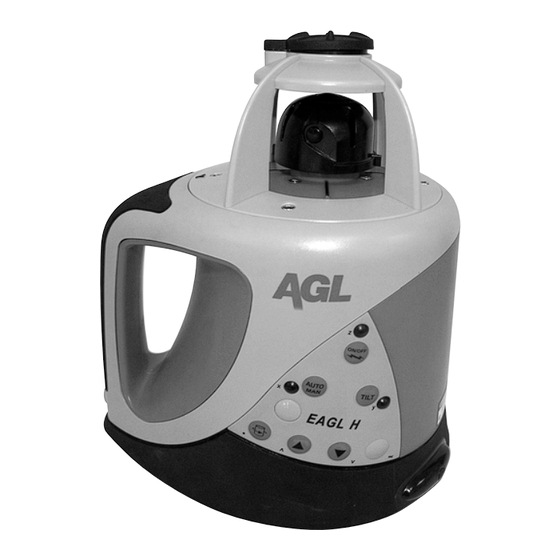
Environmental IP54 for water and dust resistance 1.3 Laser and keypad overview See inside front cover for photos corresponding to these callouts. EAGL H 1. Rotating head 2. Rotating laser beam aperture 3. Batteries (rechargeable or alkaline) 4. Jack for battery charger (on rechargeable models) 5. -
Page 5: Horizontal Setup
After it has leveled, the head will start to rotate. 2.1 Horizontal Setup The EAGL H can be used directly on the ground or on a standard 5/8" - 11 tripod. 2. Press the On / Off key to switch the laser on. It will start its automatic leveling. - Page 6 “UP” symbol. If LED C is blinking Press on the “DOWN” key on the EAGL H+ keypad (located on the bottom of the laser keypad). If you use a LS50R Receiver / Remote be sure not to have the receiver on and press the “DOWN”...
-
Page 7: Rotation Speed
The laser is no longer in H.I. Alert mode. Press Tilt to return to H.I. Alert. CAUTION: The Tilt function is not available in vertical mode on the EAGL H+. 2.4 Rotation speed There are 3 rotation settings: 0, 90 and 600 rpm (the default speed). -
Page 8: Manual Mode
also possible to stop the rotation and use the beam as a point to view at a greater distance. 2.5 Matching slope (manual grade) The laser can be used to match manual slope on both X and Y axes. Two modes are available: •... -
Page 9: Installing Alkaline Batteries
Always replace both batteries at the same time. 2.6.2 Using rechargeable batteries First-time use If your EAGL H is equipped with an optional rechargeable battery, you must charge it for 16 hours before first use. Insert the charger plug into the jack located on the battery pack. -
Page 10: Care And Handling
Later recharges The EAGL H can be charged while working. If electricity is available on the job site, simply plug in the charger and keep on working. You can also remove the battery pack to charge it, and replace with the alkaline battery compartment to keep on working. -
Page 11: Warranty
4. Warranty The EAGL H laser comes with a two-year warranty (in North America, one year, with warranty to two years with online or mail-in registration within 45 days of purchase). More information can be found at: www.agl-lasers.com 5. Accessories 5.1 LS50 Detector for grade rods or... - Page 12 Turn to attach LCD screen clamp to detector (rear) Bubble vial to plumb 9V battery compartment (follow polarity Turn to tighten indications or remove clamp inside) from rod • LCD Display Low battery ATTERY STATUS High Blinking: Normal volume Near grade high Solid: Loud On-grade...
- Page 13 • EAGL H+ This model uses the LS50R detector, which can be used as a remote control for the semiautomatic leveling mode and for calibra- tion.
-
Page 14: Other Accessories
• LS50R detector/remote control functions as a detector, similar to the LS50, plus can be used to calibrate the laser. Cannot be used as a remote control with the EAGL H, except for calibration. • TL25 remote control: facilitates calibration; cannot be used as a remote, except for calibration. -
Page 15: Calibration Overview
The laser has 2 horizontal axes: X and Y, as indicated on the top of the laser. X X ’ ’ Y Y ’ ’ Each end of each axis must be checked for calibration. If needed, the axis can be calibrated, carefully following the instructions. You can also take the laser to a service center for calibration. -
Page 16: Horizontal Checking And Calibration
amount (1/32" at 150' or 1mm at 100m). After pressing the key, the LED will blink rapidly as the laser reacts. Wait until the LED returns to a slow blink to proceed. 4.2 Horizontal checking and calibration 4.2.1 Checking X axis 1. -
Page 17: Checking Y Axis
7. After completing the X calibration, press the >> l key (11D) to change the axis and to calibrate the Y axis. On the remote, press the double arrow key >> l . 8. If the Y axis doesn’t have to be calibrated, press the Auto/Man key (6) to save the calibration you've just made on X axis. -
Page 18: Cone Error Checking
5. Y LED will blink rapidly, indicating leveling. When the LED blinks slowly, the laser is ready to calibrate. 6. If you have not moved the laser, use the Y marks made in previous steps of “Checking Y axis”. 7. Use keypad arrows to move beam up or down to the halfway mark. If the Y’... - Page 19 2202 Redmond Rd., Jacksonville, AR 72076 sales@agl-lasers.com • www.agl-lasers.com Toll Free: 800.643.9696 Fax: 501.982.0880 Phone: 501.982.4433 AM1144 7/2009 Printed in the USA...
Need help?
Do you have a question about the EAGL H and is the answer not in the manual?
Questions and answers