Advertisement
Quick Links
Advertisement

Summary of Contents for Shield N Seal Shield Sealer SNS70
- Page 1 User Manual Shield Sealer Model: SNS700...
- Page 2 Thank you for purchasing the Vacuum Packaging Unit. You are about to revolutionize your home with one of the strongest vacuum packaging systems available. With the help of the Vacuum Sealer, you will now be able to keep food fresher, longer in the refrigerator, freezer and pantry. The Vacuum Sealer system effectively removes air and extends freshness up to five times longer than normal preservation methods.
-
Page 3: Table Of Contents
Table of Contents Vacuum Packaging and Food Safety ........3 - 4 The Vacuum Sealer Features . -
Page 4: Vacuum Packaging And Food Safety
Vacuum Packaging and Food Safety Vacuum packaging extends the life of foods by removing most of the air from sealed containers and prevents fresh air escaping into the sealed containers, thereby reducing oxidation. Vacuum packaging helps preserve flavor and overall quality. It also helps inhibit the growth of aerobic microorganisms, which can lead to the problems noted below under certain conditions: Mold –... - Page 5 age and the condition of the food on the day it was vacuumed packaged. Note: vacuum packaging is not a substitute for refrigeration or freezing. Any perishable foods that require refrigeration must still be refrigerated or frozen after vacuum packaging. Preparation Guidelines Vegetables need to be blanched before vacuum packaging.
-
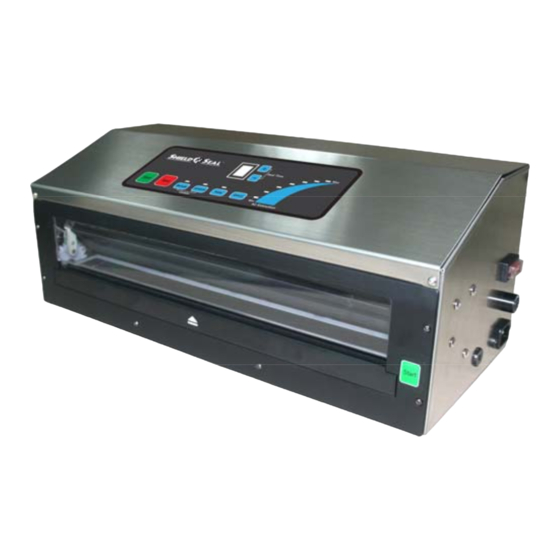
Page 6: The Vacuum Sealer Features
The Vacuum Sealer Features Control Panel Power Switch Fuse Electrical Socket illuminator Accessory Port Vacuum Chamber Easy Start Button A. Auto Vacuum Button (Start) Press “Start” button, machine will vacuum and seal automatically. This button is only for vacuum bag/roll. B. -
Page 7: Technical Data
C. Marinate Mode (Marinate) Marinate mode is for repeating the cycle of vacuuming and releasing air to canister, allowing foods to get optimum pickle infusion in the least amount of time. D. Accessory Vacuum Button (Accessory) Only for vacuum canister, bottle stopper and other accessories; press “Accessory”... - Page 8 Safety For your safety, follow these precautions when using your Vacuum Sealer: ▪ Read Owner’s Manual and carefully before using the machine for the first time. ▪ Do not use the Vacuum Sealer on wet or hot surfaces, or near a heat source. ▪...
-
Page 9: Operating Instructions
Operating Instructions Preparations ▪ Plug in machine. ▪ Press “Power” switch, digital display is on, fan starts, illuminator is on. Now the machine is ready for all cycles. (The illuminator and fan will stop automatically if no action within 10 minutes. Press any button to restart the machine, then the illuminator and fan will start again.)... - Page 10 How To Vacuum And Seal With Bags 1. Choose suitable vacuum bag, place item in bag. 2. Allow at least 4.5cm space after item is put in bag, to ensure better vacuum. 3. Put the open end of bag across the chamber seal gasket. Please make sure that the open end is within the vacuum chamber.
- Page 11 How To Use “Pulse” Vacuum Function Since the pressure under the “Pulse” vacuum function is set to be high, sometimes it is easy to destroy some delicate items by high pressure in the vacuum bag. In this case, you can use the “Pulse” vacuum function to control the vacuum time and pressure, and prevent crushing delicate items.
- Page 12 packaged. ▪ If packaging fresh meats without pre-freezing, place a folded paper towel in between the meat and the top of the bag. This will help absorb moisture. ▪ To vacuum liquids like soups, stews and casseroles, pre-freeze in a dish or ice cube tray.
- Page 13 4. Press “Accessory” button, slightly press the canister lid for 3-5s. The machine starts vacuum process. ** Press “Cancel” button to stop the machine’s all working processes. 5. After the vacuum cycle, the machine will stop automatically. Remove the hose from the canister and turn the knob to “Lock”...
- Page 14 2. Turn the knob to “Open” position. 3. Connect the hose to the Accessory port on the machine and the port on the canister lid. 4. Press “Marinate” button, choose the marinate option. Press once for Quick Marinate Mode, “1” will appear on the digital display; press twice for Normal Marinate Mode, “2”...
- Page 15 Canister Guidelines ▪ Use only canisters designed for vacuum packaging. Other containers can implode under the vacuum pressure of the Vacuum Sealer. ▪ Cool liquids in refrigerator before vacuum packaging. Hot foods should be cooled before vacuum packaging. ▪ Do not freeze vacuum canister. Suggested lowest temperature is -18℃. Too low (lower than -18℃) or too high (higher than 100℃) temperature will make the canister materials endure lower pressure or melt.
- Page 16 How To Use With Vacuum Bottle Stoppers SNS700 can vacuum bottle with bottle stoppers. If you cannot finish a bottle of wine at one time, or you need to preserve a bottle of non-carbonic acid drink, edible oil, a bottle of juice or any liquid else that is stored in a bottle, you can use the SNS700 to vacuum the bottle with a bottle stopper.
-
Page 17: Food Storage & Safety Information
Food Storage and Safety Information The Vacuum Sealer will revolutionize the way you buy and store food. Because vacuum packaging works to eliminate freezer burn and slow food spoilage, you are now able to take advantage of buying food in bulk without the threat of food waste. Vacuum packaging with the Vacuum Sealer removes up to 90% of the air from the package. -
Page 18: Vacuum Packaging Tips
Vacuum Packaging Tips Vacuum packaging greatly extends the shelf life of foods, but your Vacuum Sealer can also be used in many other areas of the house besides the kitchen. Vacuum packaging is great for camping and outdoor activities! ▪ For a quick & reusable ice pack, fill a vacuum bag about half full with water and a few tablespoons of rubbing alcohol. -
Page 19: Troubleshooting
Trouble Shooting Under the proper circumstances, your Vacuum Sealer will give you many top-notch vacuum performances. In some instances, problems may arise. Please consult the trouble shooting menu before calling customer support. Note: * Suggest stopping for about 20 seconds between each working cycle. * When machine is under long time working and is overheat, the thermal overload will start to protect the machine. - Page 20 The Vacuum Sealer doesn’t pull a complete vacuum with bags ▪ To vacuum and seal properly, edge of bag must be across the seal bar. Make sure bag is inside the chamber seal gasket and that there are no wrinkles in the bag along the seal bar.
- Page 21 to “Open” setting). ▪ Leave adequate head space at the top of the canister. ▪ Make sure there isn’t any damage to the canister and lid. Sometimes hairline cracks can develop in canisters. When this happens the canister is no longer air tight and should be discarded.
Need help?
Do you have a question about the Shield Sealer SNS70 and is the answer not in the manual?
Questions and answers