Puxing PX?777 Operation Manual
Hide thumbs
Also See for PX?777:
- Service manual (30 pages) ,
- User manual (16 pages) ,
- Service manual (30 pages)
Advertisement
Table of Contents
PX‐777 Operation Guide
The Puxing PX‐777 is an excellent, inexpensive handheld radio. The English‐
language documentation provided by the manufacturer, however, has
considerable room for improvement. This guide covers the basics of using the
PX‐777 in a more understandable format.
Introductory Notes
When placing the radio in its charging stand, be sure that it's inserted straight
and that the battery touches the charging contacts properly. It's possible to
misalign the radio, which will cause it to fail to charge. You can remove the
battery from the radio and charge it separately – not only is this useful for
charging spare batteries, but it makes it easy to see how the battery should fit in
the charger.
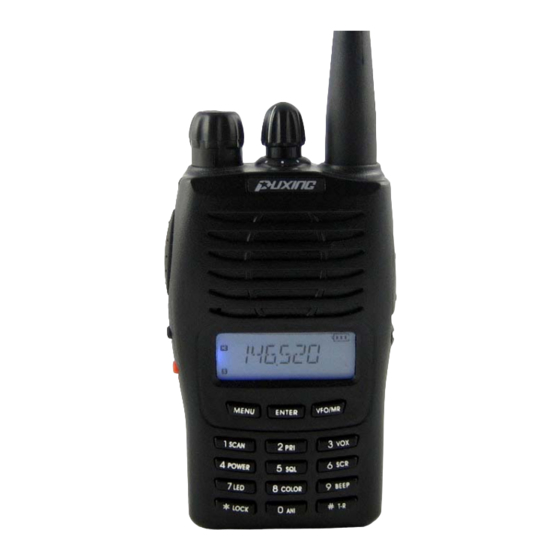
1 – On/Off and Volume
2 – Selector knob
3 – PTT button
4 – Monitor button
5 – Call button
6 – Speaker/mic jack
The PX‐777 has a channel mode with a
self‐programming feature similar to that
found on many commercial radios. This
guide addresses only the PX‐777's
memory / VFO mode, which resembles
that of most modern amateur radios.
Advertisement
Table of Contents

Related Manuals for Puxing PX?777


Summary of Contents for Puxing PX?777
- Page 1 PX‐777 Operation Guide The Puxing PX‐777 is an excellent, inexpensive handheld radio. The English‐ language documentation provided by the manufacturer, however, has considerable room for improvement. This guide covers the basics of using the PX‐777 in a more understandable format. Introductory Notes When placing the radio in its charging stand, be sure that it’s inserted straight and that the battery touches the charging contacts properly. It’s possible to misalign the radio, which will cause it to fail to charge. You can remove the battery from the radio and charge it separately – not only is this useful for charging spare batteries, but it makes it easy to see how the battery should fit in the charger. 1 – On/Off and Volume 2 – Selector knob 3 – PTT button 4 – Monitor button 5 – Call button 6 – Speaker/mic jack The PX‐777 has a channel mode with a self‐programming feature similar to that found on many commercial radios. This guide addresses only the PX‐777’s memory / VFO mode, which resembles that of most modern amateur radios. ...
- Page 2 Programming 1 Turn on the radio. If you see a channel name like ‘CH‐001’, you’re in channel mode. Turn the radio off, hold down ENTER, and turn it back on. You should now see a frequency display. 2 If there is a 2‐digit number displayed under the battery indicator, you’re in memory mode. Press the VFO/MR button to select VFO mode. 3 Enter Receive frequency from keyboard (all six numbers – no decimal points) or by turning selector knob. 4 For repeater operation, enter offset (positive, negative, or none) by pressing MENU and then *LOCK. Select offset ( ‐, +, or 0) by turning selector knob. Press ENTER to save your selection. Press VFO/MR twice to get back to the frequency display. 5 The default repeater split setting may be wrong, so be sure to check it – press MENU and use the selector knob to select DIFFR? #14 and press ENTER. Use the selector knob or keyboard to select the repeater split. For the 2‐meter band in North America, this should be 0.600 MHz. 6 Enter receiving CTCSS tone by pressing MENU and then ENTER. Turn the selector knob until R‐CDC? #15 is displayed. Turn the selector knob until you see the frequency you want and press ENTER. Select OFF for normal repeater operation. 7 Enter transmit CTCSS tone by pressing MENU and then ENTER. Turn the selector knob until T‐CDC? #16 is displayed. Turn the selector knob until you see the frequency that you want and press ENTER. 8 For power selection press MENU and then 4 POWER. Select H for high or L for low power and press ENTER to save your selection. ...
-
Page 3: Other Functions
Scanning To start scanning, press MENU and then 1 SCAN. To stop scanning, press ENTER or PTT. If the radio is in memory mode, it will scan memory channels. If it’s in VFO mode, it will start scanning at the currently selected frequency. Other Functions Reverse – Holding down the # T-R button for two seconds will put the radio into reverse mode, indicated by an ‘R’ on the display. This temporarily reverses the transmit and receive frequencies used, which can be useful for bypassing the repeater when calling another station –...
Need help?
Do you have a question about the PX?777 and is the answer not in the manual?
Questions and answers