
Related Manuals for COMAG SC25-S


Summary of Contents for COMAG SC25-S
- Page 1 Digital Satellite Receiver SC25-S Operating manual Version 1.0, as of 20/12/2007 Modifications and errors reserved. We do not assume any liability for printing errors.
- Page 2 Overview of equipment SL 30 / 12 1CI Front side of the receiver Rear side of the receiver Remote control...
-
Page 3: Overview Of Equipment
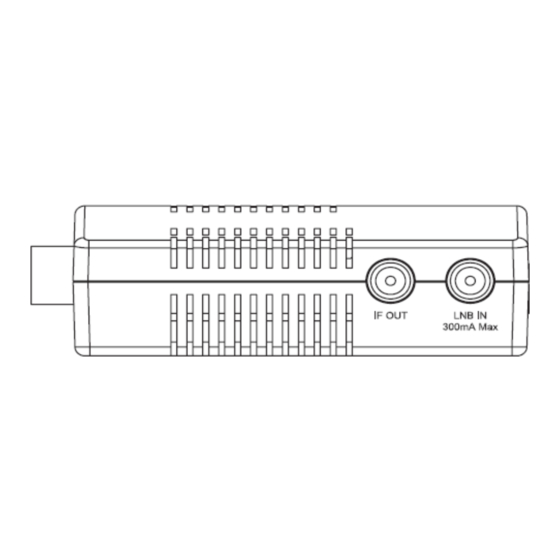
Overview of equipment Front side of the receiver IR Remote Connection for the infrared sensor to receive the signals of the remote control. DC IN 12V Connection 12V/power pack Rear side of the receiver LNB IN LNB connection for the antenna cable IF-OUT LNB connection for a second satellite receiver... -
Page 4: Remote Control
Remote control Symbol Description STANDBY Switches on and to the standby mode ZOOM Enlarges TV image LIST Invokes TV channel list TIMER Invokes timer TEXT Invokes Teletext MUTE Turns off sound Multi-picture function, invokes thumbnail view Increases volume / cursor moves to the right In normal mode: invokes current channel list In a menu: confirms menu item CH ▼... - Page 5 Invokes Electronic Programme Guide (if offered by the broadcasting station) the broadcasting station)) TV/SAT Switches between terrestrial and satellite antenna TV/RADIO Switches between TV and radio mode...
-
Page 6: Preface
Preface This operating manual will help you in the • appropriate • safe and • favourable usage of the digital satellite receiver, in short, the “receiver”. We assume that the user of the receiver has overall knowledge regarding the handling of audio and video equipment. Each person who •... -
Page 7: Table Of Contents
Contents Overview of equipment ............... 3 Remote control ................... 4 Preface....................6 Style features ..................6 Contents .................... 7 Safety instructions ................9 Basic safety instructions ..............9 Explanation of safety instructions ............. 12 Appropriate use ................12 Scope of supply ................13 Description .................. - Page 8 LIST ....................38 Switch between TV and SAT............38 Switching between TV and radio ............38 Teletext ..................... 39 FAV ....................39 PAUSE....................39 Uninstalling the receiver ..............40 Cleaning................... 40 Troubleshooting ................41 Specifications ................. 43 Manufacturer ................... 44 Declaration of conformity ..............
-
Page 9: Safety Instructions
Safety instructions Please read the safety instructions carefully before operating the receiver. Please follow all warnings and instructions on the equipment and in the operating manual. Basic safety instructions Electrical connection • Disconnect the receiver from the power source in case of operational disruptions. - Page 10 • In case of a storm, pull the external power pack or the 12V cable of the receiver out of the mains socket. In case of a storm, pull the LNB cable out of the receiver. • If the mains cable is damaged, the receiver must be repaired by an expert before reusing it.
- Page 11 Correct battery handling • Batteries may contain toxic agents. Ensure that batteries are not within the reach of children. Children may eat and swallow batteries. • Batteries that are getting discharged may damage the remote control. If the receiver is not in use for a longer period of time, remove the batteries from the remote control.
-
Page 12: Explanation Of Safety Instructions
Explanation of safety instructions The following categories of safety instructions are included in the operating manual: Danger! Instructions with the word DANGER give a warning against possible personal injuries. Caution! Instructions with the word CAUTION give a warning against possible material or environmental damages. These instructions contain special information for commercial usage of the receiver. -
Page 13: Scope Of Supply
Scope of supply Check the scope of supply after purchase. The scope of supply may vary according to the type of the receiver. Please follow the information on the packaging. Pieces Description Receiver Remote control Batteries type LR 03/AAA/1.5 V External power pack Operating manual (not shown above) 12V cable for cigarette lighter... -
Page 14: Description
Description With this receiver you are able to receive uncoded digital satellite channels (free-to-air) via a satellite antenna. It is not necessary to programme the receiver yet. The most important broadcasting stations and satellites have been pre-programmed. The satellite antenna has to be directed towards the desired satellite. The receiver will scan for further new broadcasting stations as soon as you initiate the automatic scanning of broadcasting stations for this satellite. - Page 15 • Hellasat 39E Other features of the equipment: • Software update via satellite Astra 19.2° East • Short switching time, fast boot process when switching on the receiver • Saves the channel last watched (Last Station Memory) • LNB control logic (sound 0/22 kHz), max. current delivery for LNB 300 mA •...
-
Page 16: Connecting The Receiver
• Electronic Programme Guide EPG (up to 14 days in advance, channel-dependent) • SCPC/MCPC reception standard C/Ku-band satellites • Automatic selection of the TV standard with video converter • Digital satellite finder for optical and acoustic adjustment of the paraboloidal-type reflector Connecting the receiver The receiver is connected with your satellite antenna by means of a coaxial cable. -
Page 17: Antenna Cable Installation
Antenna cable installation (Cp. the installation diagram on the next page) A pair of wire strippers and a cable cutter are required for installing the F connector on the coaxial cable. Cut 8 mm of the coaxial cable at each end up to the inner core. Carefully cut 10 mm of the outer insulation so that the wire netting is exposed. - Page 18 Installation diagram Fasten the F connector of the coaxial cable onto the “LNB IN” antenna connection of the receiver. Fasten the other end of the coaxial cable on the LNB.
-
Page 19: Connection With The Scart Cable
Connection with the SCART cable Insert the SCART receiver directly in the SCART socket of the TV set. Should this be impossible, you must buy a suitable extension (adapter cable) in a specialised shop. ATTENTION: The Scart extension cable is not included in the scope of supply!!! - Page 20 Connection diagram...
-
Page 21: Getting Started
Getting started Remote control Two Micro type batteries are required for the remote control: LR 03/AAA/1.5 V Open the battery compartment. Insert two batteries into the battery compartment paying attention to the indicated polarities and push the cover of the battery compartment carefully until the cover is locked. -
Page 22: The Receiver
The receiver Caution! Check that connections of all equipment and the antenna are proper before connecting the receiver to the mains. Insert the mains plugs of the connected equipment in the mains socket and switch them on. Switch on the AV channel of the TV set. Insert the power pack of the receiver in the mains socket. -
Page 23: Operation
Operation Screen display messages when switching channels When a channel is switched, an information bar appears on the screen for 5 seconds (adjustable via menu item "System setup – OSD settings – OSD timeout). In this information bar, you will find the following indications: Channel name Received satellite Current date... -
Page 24: User Interface On The Tv Screen
User interface on the TV screen You can do individual settings of your receiver by using the menus of the user interface. For this purpose, both the receiver and the TV set need to be switched on and connected by a cable (SCART or CINCH). -
Page 25: Menu Structure
Menu structure Main menu Sub-menu Description Language Language list Language selection for the (symbol OSD menu according to country flag) TV Channel List Channel See following text Radio Channel List See following text (symbol: Delete All See following text Antenna Setup Installation See following text Scan... -
Page 26: Menu Navigation
Menu navigation Use the keys “CH+”, “CH-”, “V+”, and “V-” to navigate within the menus. The selected menu items are marked. Confirm your selection with the “OK” key. By pressing the “EXIT” key you can exit the menu again. Changes must be confirmed additionally. Apart from this, the numerical keys are required in further sub-menus. -
Page 27: Channel (Symbol: Tv)
Channel (symbol: TV) Sub-menu Description TV channel list 1 Favorite, 2 Move, 3 Find, 4 Sort, 5 Edit , 6 Type, ▲▼Select, V- V+ Group, OK Enter, EXIT Exit. Radio channel as indicated above list Delete all Deletion of the complete channel list. For this purpose: enter password (factory setting 0000) and confirm warning message with Yes. - Page 28 Sub-menu Description Edit 1 Delete, 2 Skip, 3 Lock, 4 Create, 6 Del all, ▲▼Select, V- V+ 5 Edit, Group, P+P- Page, EXIT Exit. 1 Delete By marking with the 1 key, selected channels can be marked to be deleted. Please confirm selection by pressing the OK key.
-
Page 29: Installation (Symbol: Satellite Antenna)
Installation (symbol: satellite antenna) Sub-menu Description Antenna Setup Satellite Satellite selection (example: Astra1 19° East) LNB type Select LNB type (standard setting is Universal) 22KHz activation (Note: with LNB type Universal, activation occurs automatically) Select DiSEqC level DiSEqC DiSEqC Switch Select DiSEqC order Example: Astra 19°... - Page 30 (unique function 19.2° East) completely to search for new channels. For that can be used this purpose, no special information is needed. You can without any choose between free-to-air (FTA) channels and all TV previous and radio channels (completely with all encrypted knowledge) channels).
-
Page 31: System Setup (Symbol: Receiver)
System setup (symbol: receiver) Sub-menu Description Language Audio First Audio Preselection of the audio language (if offered by the broadcasting station) Second Audio Preselection of the audio language (if offered by the broadcasting station) System Mode Display Selection of the transmission system Default selection: Auto Mode Aspect... - Page 32 Menu transparency Transparency Load Default OSD factory setting can be restored OSD Setting Parental Lock Factory password: 0000 (password Lock Installation Enabling/disabling the password settings) input in the main menu item "Installation" Lock Channel Enabling/disabling the password input for locked channels (child lock) Password Selection of a new password.
- Page 33 Table for timer settings Sub-menu Description Timer number Selection of timer number 1-8. Repetition (once, daily, weekly, monthly, yearly, off). Timer mode With the setting “off“, the timer will be disabled. Timer service Switching between programme timer (TV or radio channels) or reminding function (message).
-
Page 34: Tools (Symbol: Tool Case)
Setting (symbol: tool case) Sub-menu Description Value Default Reset receiver to factory settings. All changes are cancelled. requires input of a password) Software- Please note: Update A software update has NOTHING to do with a scan for new TV channels. For this purpose, please initiate an automatic channel scan. -
Page 35: Software Update By Satellite
Software update by satellite The update has nothing to do with the storage of new TV channels. It is rather meant to update the system software of the receiver. Normally, the update is not required for a trouble-free operation of the receiver. You must direct your satellite system towards the satellite ASTRA 19.2°East to be able to update the software. -
Page 36: Keys With Special Functions
Keys with special functions Electronic Programme Guide. Please press the “EPG“ key to enable this function. The EPG is displayed. On the left side you will see the channel list. With the keys CH▲ and CH▼, you can select a channel. On the right side, the current and following programme will be displayed. - Page 37 An acoustic signal will be emitted by the TV set. A stronger and higher signal indicates a better direction of the antenna.
-
Page 38: Audio
AUDIO With the “AUDIO” key you can select the audio track if a broadcasting station offers multi-channel sound. ZOOM With the zoom function you can enlarge an image section. Press the “ZOOM” key. With each pressing of the “ZOOM” key, a section of the image will be enlarged gradually. -
Page 39: Teletext
Teletext Teletext is an information system displaying Teletext on your TV set. For Teletext reception, the selected channel must support this function. The TXT symbol appears when channels are changed. Comparing our receiver with others you will notice that our Teletext is extremely fast. -
Page 40: Uninstalling The Receiver
Uninstalling the receiver Separate the receiver and connected equipment from the power supply. Loosen the LNB cable from the receiver. Take the batteries out of the remote control, if you will not use the receiver for a longer period of time. Pack the receiver, the cables and the remote control in a cardboard box. -
Page 41: Troubleshooting
Troubleshooting Symptom Possible cause and remedy Satellite cannot be Example: ASTRA 19E found, or no signal 1 key (default setting: “ARD“) “INFO“ key (“ARD“, FR11837) Signal AND quality are both at 0% Direct vertical reflector towards south Turn some millimetres to the left, wait approx. 3 seconds and repeat until signal AND quality are displayed. - Page 42 Dark screen The system is not connected properly. Check connection of the SCART cable The TV set is not in AV mode. Switch the TV set to the respective AV input. Poor image, blocking The antenna is not directed exactly towards the satellite. error, formation of Direct the antenna more precisely.
-
Page 43: Specifications
Specifications Receiver Dimensions in mm (W × D × H) 100 × 62 × 30 Weight in grammes Receiver 105 g without ext. power pack Remote control 80 g (without batteries) Input frequency range 950 MHz ~ 2'150 MHz IF band width 55 MHz / 8 MHz (below 5MS/s) LNB power supply 13/18 GS, 0.30 A max. -
Page 44: Manufacturer
Manufacturer COMAG Handels AG Zillenhardtstrasse 41 D-73037 Göppingen (Germany) Telephone: +49 7161 50306 0 Fax: +49 7161 50306 11 Website: www.comag-ag.de Guarantee: The guarantee for the receiver corresponds to the legal provisions valid at the time of acquisition. Modifications of the device lead to an extinction of the manufacturer’s guarantee obligation... -
Page 45: Declaration Of Conformity
The manufacturer hereby declares conformity with the following guidelines and standards for this product: Low-voltage guideline 73/23/EEC • EN 60,065 Guideline on electromagnetic compatibility, 89/336/EEC • EN 55,013 • EN 55 020 • EN 61000-3-2 • EN 61000-3-3 Equipment type/model: Digital Satellite Receiver SC25-S... -
Page 46: Glossary
Glossary Alternating Current Connection for alternating current Direct Current Connection for direct current Cinch Coaxial connector for connecting a TV set or stereo system. connector DiSEqC Digital Satellite Equipment Control Digital system, with which the receiver can control different components of the external unit. It is especially used for selecting from multiple satellite positions (for example Astra and Eutelsat). - Page 47 Transponder Satellite frequency. Several digital channels can be broadcasted simultaneously on a transponder. Abbreviation for Video Cassette Recorder.
Need help?
Do you have a question about the SC25-S and is the answer not in the manual?
Questions and answers