Table of Contents
Advertisement
Quick Links
Advertisement
Table of Contents

Related Manuals for Suunto COBRA


Summary of Contents for Suunto COBRA
- Page 1 QUICK REFERENCE GUIDE...
- Page 2 This air-integrated dive computer is a compact and sophisticated multipurpose dive instrument, designed to give you years of trouble-free service. CHOICE OF OPERATING MODES AND SET-UP OPTIONS User options for the Cobra are selected using the push buttons. Pre Dive configuration and setup options include: •...
-
Page 3: Safety Precautions
Make sure that you fully understand the use, displays and limitations of the instrument. If you have any questions about the manual or the dive computer, contact your SUUNTO dealer before diving with the dive computer. - Page 4 1.1.3. NITROX Diving with nitrox provides the diver with an opportunity to reduce the risk of decompression illness by reducing the nitrogen content in the breathing gas mix. However, when the gas mix is altered, the oxygen content of the mix is generally increased.
-
Page 5: Getting Acquainted
Remove the high pressure (HP) port plug on the first stage of your regulator using an appropriate sized wrench. Thread the high pressure hose of the Cobra into the port of your regulator with your fingers. Tighten the hose fitting with a 16 mm [5/8"] wrench. -
Page 6: Push Buttons
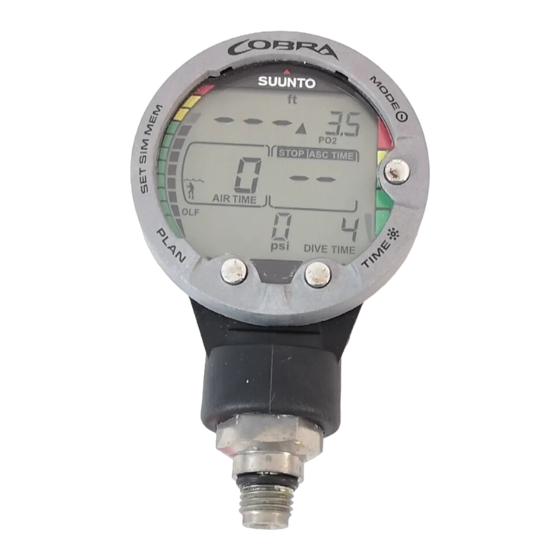
2.3. PUSH BUTTONS The dive computer has easy-to-use push buttons and an advisory display, which guides the user. The SMART (MODE) button is the key to the system. The two scroll buttons, PLAN and TIME, are used for scrolling up and down the menus and to show the alternative displays. -
Page 7: Water Contacts
2.4. WATER CONTACTS The water contacts control the automatic activation of the Dive Mode. The water and data transfer contacts are located on bottom of the case (Fig 2.3.). When submerged the water contacts are connected to the push buttons (which are the other pole of the water contact) by the conductivity of the water. -
Page 8: Diving With The Cobra
3. DIVING WITH THE COBRA DIVE CEILING This section contains instructions on how to operate the dive computer and interpret its displays. You will AVGPO2 SURF ASC TIME STOP QUIT find that this dive computer is easy to use and read. -
Page 9: Battery Power Indicator And Low Battery Warning
• you have enough air for your planned dive. You should also check the pressure reading against your back-up pressure gauge. And if set to Nitrox mode, make sure that: • the oxygen percentage is adjusted according to the measured Nitrox blend in your cylinder •... - Page 10 Temperature or an internal oxidation of the battery affects the battery voltage. If the instrument is stored for a long period, the low battery warning may be displayed even though the battery has enough capacity. The low battery warning may also be displayed at low temperatures, even though the battery has enough capacity in warmer conditions.
-
Page 11: Dive Numbering Shown During Dive Planning
(see also section 3.6.2. "Dive Numbering"). 3.1.4. USER DEFINABLE FUNCTIONS AND ALARMS This Cobra has several User Definable Functions and depth and time related alarms that you can set according to your personal preference. The dive computer model, unit of measurement and backlight preferences can be set in the MODE- SET- SET PREF submode. -
Page 12: Safety Stops
Reasons to perform a safety stop include a reduction in sub clinical DCI, microbubble reduction, ascent control, and orientation before surfacing. The Cobra displays two different types of safety stops: Recommended Safety Stop and Mandatory Safety Stop. The Safety Stops are indicated by: •... - Page 13 You must not ascend shallower than 3 m [10 ft] with the Mandatory Safety Stop warning on. If you ascend above the Mandatory Safety Stop ceiling, a downward pointing arrow will appear and a continuous beeping starts (Fig. 3.15.). You should immediately descend to, or below, the Mandatory Safety Stop ceiling depth.
-
Page 14: Diving In Air Mode
3.3. DIVING IN AIR MODE 3.3.1. BASIC DIVE DATA The dive computer will remain in the Surface mode at depths less than 1.2 m [4 feet]. At depths greater than NO DEC TIME 1.2 m the instrument will go into the Diving mode DIVE TIME (Fig. -
Page 15: Cylinder Pressure Data
The Bookmarks will also be shown as annotations in the PC-software, Suunto Dive Manager. To make a bookmark on the profile memory during a dive press the PLAN button (Fig. - Page 16 The remaining air time calculation includes a 35 bar [500 psi] safety reserve. This means that when the instrument shows the air time to be zero, there is still about 35 bar [500 psi] pressure left in your STOP cylinder depending on your air consumption rate. AIR TIME NO DEC TIME With a high consumption rate the limit will be close...
-
Page 17: Ascent Rate Indicator
(lowest) bar graph segment appears. As your body absorbs more nitrogen, more segments start to appear. Green Zone - As a safety precaution Suunto recommends you should maintain the no-decompression bar graph within the green zone. Segments start to appear when the available no-decompression time decreases below 100, 80, 60, 50, 40, 30 and 20 minutes. -
Page 18: Decompression Dives
When the maximum allowed ascent rate is exceeded, the fifth SLOW warning segment and the STOP sign appear and the depth reading starts to blink, indicating that the maximum ascent rate has been exceeded continuously or that the current ascent rate is significantly above the allowed rate. Whenever the SLOW warning segment and the STOP sign appear (Fig. - Page 19 The ascent time (ASC TIME) is the minimum amount of time needed to reach the surface in a decompression dive. It includes: • the time needed to ascend to the ceiling at an ascent rate of 10 m/min [33 ft/min] plus •...
- Page 20 Minimum total Suunto recommends that decompression takes place ascent time including safety deeper than 4 m [13 ft], even if the indicated ceiling is stop is 7 minutes.
- Page 21 DISPLAY ABOVE THE FLOOR CEILING When you ascend above the floor, the ASC TIME display stops blinking and the upward pointing arrow STOP ASC TIME disappears (Fig. 3.17.). Decompression will now begin, AIR TIME but is very slow. You should therefore continue your ascent.
-
Page 22: Diving In Nitrox Mode
3.4. DIVING IN NITROX MODE 3.4.1. BEFORE DIVING This dive computer can be set for diving with standard air only (Air mode) or it can be set for diving with Enriched Air Nitrox (EANx) (Nitrox mode). If set to the Nitrox mode, the correct oxygen percentage of the gas in your cylinder must always be entered into the computer to ensure correct Fig. -
Page 23: Oxygen Displays
3.4.2. OXYGEN DISPLAYS If set to Nitrox mode the NITROX display, with all labeled oxygen information and the label NITROX, is shown after activation. In Dive Planning mode the nitrox display shows (Fig. 3.21.): AIR TIME NO DEC TIME • the oxygen percentage, labeled with O %, is DIVE TIME... - Page 24 3.4.3. OXYGEN LIMIT FRACTION (OLF) In addition to tracking the diver's exposure to nitrogen, the instrument tracks the exposure to oxygen, if set to Nitrox mode. These calculations are treated as entirely separate functions. NO DEC TIME The dive computer calculates separately for Central °...
-
Page 25: Diving In Gauge Mode
3.5. DIVING IN GAUGE MODE If set to Gauge mode, the dive computer can be used for diving with technical diving mixed gases. If you are trained for technical diving and you plan to use Gauge mode on a regular basis, it may be preferable to set the AIR TIME instrument permanently to its Gauge mode (see section DIVE TIME... -
Page 26: At The Surface
3.6. AT THE SURFACE 3.6.1. SURFACE INTERVAL An ascent to any depth shallower than 1.2 m [4 ft] will cause the DIVING display to be replaced by the SURFACE display, giving the following information DIVE TIME (Fig. 3.28.): • maximum depth of last dive in meters [ft] •... -
Page 27: Dive Numbering
If set to Nitrox mode, the following information will also be shown: • the oxygen percentage labeled with O % is shown on the left side of the center window • the current oxygen toxicity exposure shown with an Oxygen Limit Fraction (OLF) bar °... -
Page 28: Flying After Diving
Following any dive that required a decompression stop, flying should be delayed for at least 24 hours, and if possible, for 48 hours. • Suunto recommends that flying is avoided until all the DAN and UHMS guidelines and the dive computer wait to fly conditions are satisfied. -
Page 29: Audible And Visual Alarms
3.7. AUDIBLE AND VISUAL ALARMS The dive computer features audible and visual alarms to advise when important limits are approached or to acknowledge preset alarms. A short single beep occurs, when: • the dive computer is activated. • when the dive computer automatically returns to the TIME mode. Three double beeps occur, when: •... - Page 30 You are able to preset alarms before the actual dive. The user programmable alarms can be set for maximum depth, dive time and time. The alarms activate when: • The preset maximum depth is reached - continuous beep series for 24 seconds or until any button is pressed.
-
Page 31: High Altitude Dives And Personal Adjustment
WARNING! WHEN THE OXYGEN LIMIT FRACTION INDICATES THAT THE MAXIMUM LIMIT IS REACHED, YOU MUST IMMEDIATELY ASCEND UNTIL THE WARNING STOPS BLINKING! Failure to take action to reduce oxygen exposure after the warning is given can rapidly increase the risk of oxygen toxicity and the risk of injury or death. -
Page 32: Personal Adjustment
3.8.2. PERSONAL ADJUSTMENT There are adverse personal factors for DCI which divers can predict in advance and input into the decompression model. Factors that may affect susceptibility to decompression illness vary between divers and also for the same diver from one day to another. -
Page 33: Error Conditions
3.9. ERROR CONDITIONS The dive computer has warning indicators that alert the user to react to certain situations that would significantly increased risk thew of DCI. If you do not respond to its warnings, the dive computer will enter an Error Mode, indicating that the risk of DCI has greatly increased. -
Page 34: Menu Based Modes
4. MENU BASED MODES To make yourself familiar with the menu based functions, please use your Quick Reference Guide QUIT supplied with the Cobra together with the information in this chapter. The main menu based functions are grouped under OPTIONS 1) memory, 2) dive simulation and 3) setting modes. -
Page 35: Table Of Contents
EXIT / QUIT! By pressing the SMART button for more than 1 second, any menu based function or submode can be quit and the dive computer will return directly to the Dive Mode. SELECT THE LIST OF THE MENU BASED MODES 1. -
Page 36: Logbook And Dive Profile Memory [1 Logbook
4.1. MEMORIES AND DATA page 1 TRANSFER [1 MEMORY] DIVE The memory options (Fig. 4.5.) for this dive computer include the combined Logbook and Dive Profile SELECT Memory (Fig. 4.6. - 4.12.), Dive History Memory (Fig. TIME 4.13. - 4.14.) and the Data Transfer and PC-Interface functions (Fig. - Page 37 The END text is displayed between the oldest and most recent dive. (Fig. 4.12.) DIVE Note that chronological sequence in the logbook is determined by the date, not by the dive number. QUIT The following information will be shown on four pages: DIVE TIME...
- Page 38 Page III (Fig. 4.9.) • dive number in the dive series • average depth • surface interval time before the dive ∆P describing Cylinder pressure drop during the dive. • Page IV (Fig. 4.10.) • dive number in the dive series •...
-
Page 39: Dive History Memory [2 History
999 diving hours. When these maximum values are reached, the counters will start again from zero. DIVE NOTE! The maximum depth can be reset to 0.0 m [0 ft] using the optional PC-Interface unit and Suunto QUIT Dive Manager software. DIVE TIME 4.1.3. - Page 40 20 second interval to 10, 30 or 60 seconds • input a personal, 30 character field into the Cobra (i.e. your name) • reset the Dive History's maximum depth to zero.
-
Page 41: Dive Simulator [1 Simdive
4.2.1. DIVE SIMULATOR [1 SIMDIVE] The Dive Simulator mode is an excellent tool for becoming familiar with the dive computer and planning your dives. Suunto recommends using the dive simulator to run through different dive scenarios. The SELECT Dive Simulator will allow you to "perform" dive profiles of your choice and see what the display would look like during an actual dive. -
Page 42: Dive Planning Simulator [2 Simplan
4.2.2. DIVE PLANNING SIMULATOR [2 SIMPLAN] The Dive Planning Simulator mode shows you the present no-decompression limits. In this mode, you are also able to add the desired surface interval SELECT increment to present surface interval time, which allows you to plan your dives in advance. This mode is also used to add the desired surface intervals for dive simulations. -
Page 43: Set Modes [3 Set
4.3. SET MODES [3 SET] The Set Modes (Fig. 4.22.) are divided into three submodes for setting the dive-related parameters, time-related parameters and your personal QUIT preferences. 4.3.1. DIVE PARAMETER SETTINGS OPTIONS [1 SET DIVE] To enter the Dive Parameter Setting Mode select Fig. -
Page 44: Dive Time Alarm Setting [2 D Alarm
4.3.1.2. DIVE TIME ALARM SETTING [2 D ALARM] The instrument has one Dive Time Alarm Setting, which can be used for several purposes to add to your diving safety. The alarm can be set, for example, to your planned bottom time. DIVE TIME To enter the Dive Time Alarm Setting Mode select... -
Page 45: Setting Time [2 Set Time
4.3.2. SETTING TIME [2 SET TIME] To enter the Time Setting Mode select MODE- 3 SET- 2 SET TIME. The Time Setting mode has three options: 1 Time, 2 Date and 3 Daily Time Alarm. 4.3.2.1. ADJUSTING TIME [1 ADJ TIME] To enter the Time Setting Mode select MODE- 3 SET- 2 SET TIME- 1 AdJ TIME. -
Page 46: Setting Preferences [3 Set Pref
4.3.3. SETTING PREFERENCES [3 SET PREF] To enter the Setting Preferences Mode select MODE- 3 SET- 3 SET PREF. The Setting Preferences mode has three options: 1 Light, 2 Units and 3 Model. TIME 4.3.3.1. BACKLIGHT SETTING [1 LIGHT] In the Backlight Setting mode the backlight can be turned off or on and the on time can be set to be 5 to Fig. - Page 47 MENU BASED MENU BASED MENU BASED MAIN MODE SUBMODE 1 SUBMODE 2...
Need help?
Do you have a question about the COBRA and is the answer not in the manual?
Questions and answers