Table of Contents
Advertisement
®
GT-2 S
QuietTime
Users Guide
Version 2.0
a product of
4111-A North Freeway Boulevard
Sacramento, CA 95834, USA
©2010 Burgett Inc. No part of this manual may be reproduced in whole or in part without the express written permission of PianoDisc, a
devision of Burgett, Inc.. QuietTime, PianoDisc and Burgett, Inc. all reserve the right to change product design and specifications at any time
without prior notice.
Advertisement
Table of Contents

Related Manuals for PianoDisc QuietTime GT-2 S


Summary of Contents for PianoDisc QuietTime GT-2 S
- Page 1 Sacramento, CA 95834, USA ©2010 Burgett Inc. No part of this manual may be reproduced in whole or in part without the express written permission of PianoDisc, a devision of Burgett, Inc.. QuietTime, PianoDisc and Burgett, Inc. all reserve the right to change product design and specifications at any time...
- Page 2 CE - Certification The QuietTime system meets all applying requirements*) of the council of the European community. The required tests have been done. *) These are 73/23/EWG with Norm EN 60065:1993 and 89/336/EEC with Norm EN50082-1 and Norm EN55022 Klasse B Electric and electronic products must not be disposed of in the domestic waste.
-
Page 3: Care And Safety Information
Care and safety information Information relating to possible personal injury, electric shock and fire hazard possibilities has been included in this list. WARNING - When using electrical appliances, basic precautions should always be followed, including the following: 1. Read all instructions before using the product. 2. -
Page 4: Table Of Contents
Index CARE AND SAFETY INFORMATION About QuietTime Welcome ................2 Return your registration information ........2 Warranty................2 I. QuietTime GT-2 Wiring Overview II. The GT-2 Expander Front view Rear view III. GT-2 Basic Operation Playing silently with your GT-2 system Metronome (Tempo, Beat, Rhythm, Volume) 8-11 Record/Play Demo Melody... -
Page 5: About Quiettime
(e.g. water damage, fire or opening the case). PianoDisc exchanges defective parts free-of-charge and supplies parts needed to make repairs deemed necessary. An authorized PianoDisc dealer must undertake any repairs made to a QuietTime System. -
Page 6: Quiettime Gt-2 Wiring Overview
I. QuietTime GT-2 Wiring Overview Wiring Overview Piano Mute Rail Lever Description: Mute Piano Mute Rail active Mute Lever Lever for muting the acoustic piano Normal Piano Mute Rail deactivated, the acoustic piano plays... -
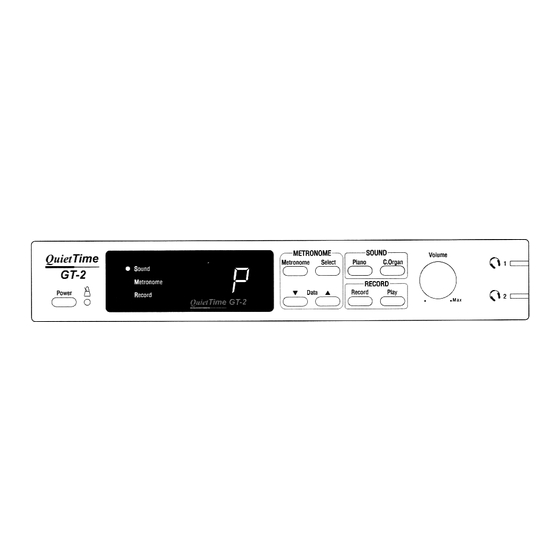
Page 7: The Gt-2 Expander
II. The GT-2 Expander Front View A. POWER Switches the GT-2 system on and off. B. Beat-Indicator Flashing according to the beat of the metronome. C. Mode-Indicator Shows the mode is active, there are three modes. D. Display Shows abbreviations and numeric values of functions. E. -
Page 8: Rear View
Rear View A. Audio Input / Output Stereo audio connectors for external audio equipment. B. MIDI Input / Thru / Output Connectors for external MIDI equipment. C. Keyboard Connector for the cable coming from the sensor strip underneath the keys of your piano. D. -
Page 9: Gt-2 Basic Operation
III. GT-2 Basic Operation The advanced technology in your piano allows you to play your piano normally or, if required, to play it silently. While playing your piano silently, only you can hear your performance through headphones. Playing silently with your GT-2 system A. - Page 10 E. Piano is the standard sound after switching the system on. If you wish you may now select Church Organ as your active sound instead. F. Use the Volume-Control to set the volume to a comfortable level. G. Enjoy your piano performance without disturbing anybody. Note: The left pedal (soft pedal) is cushioning the sound a little bit, when Piano is selected as sound.
-
Page 11: Metronome (Tempo, Beat, Rhythm, Volume)
The integrated metronome has adjustable values for tempo, beat, rhythm and volume. In this chapter you may learn how to adjust these values. METRONOME Tempo Press the [Metronome]-button The display shows the value for tempo. The standard value for tempo is 120 beats per minute. ... - Page 12 Beat Press the [Select]-button while the metronome is switched on and the tempo is displayed. The far left digit in the display now indicates the amount of beats per minute. If the beat-value is displayed and is ready for being adjusted the left decimal point is shown in the display.
- Page 13 Rhythm Press the [Select]-button again The decimal point will move to the center digit. This digit shows the Rhythm value. Press one of the [Data]-buttons to select a different rhythm (see chart below) Rhythm Chart...
- Page 14 Volume Press the [Select]-button again. The decimal point will move to the right digit which is the Volume Parameter value. Press one of the [Data]-buttons to adjust the volume up or down. Note: 1. If the metronome is switched on during recording, it’s sound will be heard through the headphones, but it is not recorded.
-
Page 15: Record/Play
The GT-2 system in your piano has a built- in one-track recorder. With it you can record your performance and later play it back through the audio and/or MIDI outputs. Record Press the [Record]-button to start recording your performance. The previous recording, if any, will be erased. -
Page 16: Demo Melody
Demo Melody Press the [Record]- and [Play]-buttons together to play the prerecorded demonstration song. Press either the [Record]-button or the [Play]-button to stop the demonstration song. How to change the Keyboard Touch The touch of your GT-2 can be changed to accommodate players with a lighter or heavier than average touch. -
Page 17: Calibration
IV. Calibration The keyboard adjustment must be performed after installing the QuietTime GT-2 system in the piano. The reason for this requirement is that the control unit of your GT-2 needs to keep travel data of each key, measured from the rest position of the key. CAUTION ! If the calibration is not performed, few, if any, of the keys will work correctly. - Page 18 Press each of the 88 keys, one at a time, all the way down, with medium force and speed. After you have finished pressing all of the keys, press the [Metronome]-button again to finish the calibration. It will take a few seconds for the data to be stored in permanent memory. ...
-
Page 19: How To Adjust Single Keys
The calibration procedure on the previous pages should make all of the keys equally sensitive. If you find that some keys still play too loudly or softly, use the following procedure to adjust the sensitivity of individual keys. Adjustment of individual keys ... - Page 20 It will take a few seconds for the adjustment data to be stored in permanent memory. When the adjustment data is successfully stored, the display will change as shown below and the piano is ready to play again.
-
Page 21: Connecting To External Equipment
V. Connecting to external Equipment Connecting GT-2 to external Audio Equipment Use two audio cables to connect the Left and Right Audio outputs of the GT-2 system to inputs of your audio system. The provided signal is a: „unbalanced, line level“-signal. See the diagram below, which is representative for a club or a performance hall audio system. -
Page 22: Connecting Gt-2 To External Midi Equipment
Connecting GT-2 to external MIDI Equipment. In order to send MDI data to a General MIDI synthesiser or a computer, connect a MIDI cable between the MIDI OUT port of the GT-2 and the MIDI IN port of your synthesiser or computer. See the drawing below. Note: Most computers do not have a MIDI interface built-in. -
Page 23: Midi Implementation Chart
VI. MIDI Implementation Chart F u c t i o n T r a n s m i t t e d R e c e i v e d R e m a r k M I D I C h a n n e l s 1 - 1 6 1 - 1 6 M o d e... -
Page 24: Specifications
Stop rail CAM Type Operated using the lever fitted under the piano The specifications listed above are subject to change without any prior notice. PianoDisc contact: PianoDisc – China Phone: +86 (755) 33301558 Fax: +86 (755) 33301559 wendy@pianodisc-china.sina.net PianoDisc – Europe...
Need help?
Do you have a question about the QuietTime GT-2 S and is the answer not in the manual?
Questions and answers