Table of Contents
Advertisement
Advertisement
Table of Contents

Related Manuals for NAPOLI ELECTRONICS NPL-3735

Summary of Contents for NAPOLI ELECTRONICS NPL-3735
- Page 1 OWNER’S MANUAL DVD730I...
-
Page 2: Table Of Contents
SAFETY INFORMATION .................... 3 DISC NOTES ..........................INSTALLATION ....................... 6-7 ELECTRICAL CONNECTION ..................8 THE PLAYER ............................9 OPERATION ......................10 POWER ON/OFF THE UNIT ..................10 SETTINGS ........................10 DISC (DVD/VCD/CD/MP3) OPERATION ............11-13 RADIO OPERATION ....................14 USB/SD ............... ¡Error! Marcador no definido. REMOTE CONTROL ................... -
Page 3: Safety Information
SAFETY INFORMATION Use This Product Safely This set has been designed and manufactured to assure personal safety. Improper use can result in electric shock or fire hazard. The safeguards incorporated in this unit protect you if you observe the following procedures for installation, use and servicing. This unit doesn’t contain any parts that can be repaired by the user. -
Page 4: Disc Notes
DISC NOTES Disc formats supported by this player disc become somewhat scratched (although not enough to 12 cm disc make it unusable) (Single-sided disc only) depending on the way it is handled and conditions in the usage environment. Video CD Note 12 cm disc these scratches are not an indication of... -
Page 5: Disc Notes
DISC NOTES Preparing New Discs with Rough Spots A new disc may have rough edges on its inside and outside edges. If a disc with rough edges is used, the proper setting will not be performed and the player will not play the disc. Therefore, remove the rough edges in advance by using a ballpoint pen or pencil as shown on the right. -
Page 6: Installation
INSTALLATION Front-mount) or “Rear”(DIN Rear-mount Notes: installation, utilizing threaded screw holes Choose the mounting location where at the sides of the unit chassis). For details, the unit will not interfere with the refer to the following illustrated installation normal driving function of the driver. methods. -
Page 7: Installation
INSTALLATION Outer Trim Ring Outer Trim Ring 4 Fix the unit by metre strap and screw... -
Page 8: Electrical Connection
ELECTRICAL CONNECTON Attention: 1.please make sure “B+”and ”ACC” pin location are correct before making connection These two pins maybe dfferent in dfferent cars,wrong connections of these two pins will burn the fuse in the out. 2.”Parking”wire must be connected to “ground” in order to active the video function 3. -
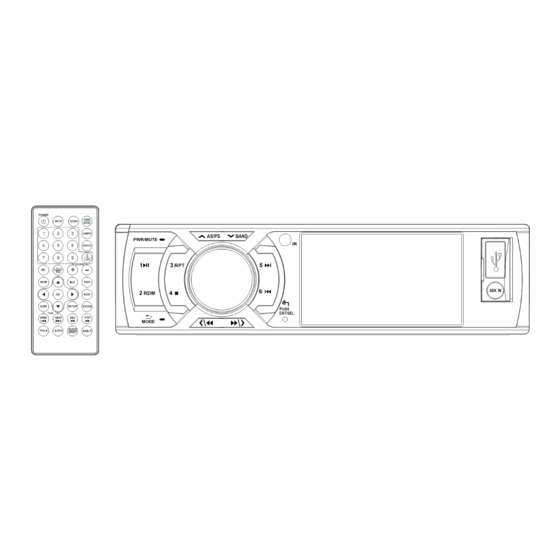
Page 9: The Player
THE PLAYER 16. “MODE/ ” button. 1. “ ” button. 17. “2 RDM ” button. 2. “PWR/ MUTE” button. 18. “1 ” button. 3. “3 RPT ” button. 19. RESET button. 4. “AS/PS/ ” button. 20. SD card slot. 5. “VOL / SEL/ENT” button. 21. -
Page 10: Operation
OPERATION POWER ON/OFF THE UNIT Press the button to turn on the unit, Screen will display the main menu. PICTURE In the settings,With the cursor and the ENT key to change the corresponding value you want TIME Using button to select one mode among:Radio,USB,SD, AUX,DVD. -
Page 11: Disc(Dvd/Vcd/Cd/Mp3) Operation
OPERATION 。 button to return to the main menu normal playback will continue. Press button twice to stop the playback RESET FUNCTION and go back to the DVD LOGO. Pressing on the front panel or on the RESET button must be activated with either remote control or on the screen during a ballpoint pen or thin metal object. - Page 12 OPERATION playback and return to the TITLE menu that is language number different stored in DVD disc. The disc will be played according to the disc. automatically and stop at menu picture. Some discs only contain one subtitle 2. Press cursor buttons on the language.
- Page 13 OPERATION Use the number keys to input the DEFAULT: Restore the system setup to desired Title, Chapter or Time, then press OK the default setup. key to confirm. DVD Setup LANGUAGE SETUP In DVD mode, when the disc is playing When you open the language setup menu, or in stop mode, press SETUP button on you will see the language setup page:...
-
Page 14: Radio Operation
OPERATION to display the console information of the Radio Function Select: current disc on the screen. Long press SETUP button on the front panel select Band->PS>AS-> RADIO OPERATION ->Station-> SWITCHING TO THE RADIO MODE Then press“ENT” to confirm the function .。 Press MODE button on remote control or select icon on the source menu to... -
Page 15: Usb/Sd
OPERATION Mono/Stereo: disconnect the USB/SD device, the unit will Press MO/ST button on remote control to switch last mode. select mono or stereo mode. You can The main unit can only support the sometimes improve reception of distant standard USB-memory(SD-memory) disc stations by selecting mono operation. - Page 16 OPERATION If no save station mode, long press the “ENT/SEL” button to select the desired adjustment mode. The audio adjustment mode will change in the following order: BASS---TREBLE---BALANCE---FADER- -EXIT MUTE In radio, DVD,USB,SD, AUX mode,Press MUTE button to muting the AUDIO output. Press it again to recover output.
-
Page 17: Remote Control
REMOTE CONTROL... -
Page 18: Remote Control
REMOTE CONTROL 1. MUTE Press to Mute the sound. Press again to recover the sound. 2.POWER Press it to turn the unit ON or OFF Inputs the corresponding number. 3. 0-9 4.LOUD/EQ Press and hold to turn on/off Loudness. Press it to select desired audio equalization 5. -
Page 19: Performance
PERFORMANCE MP3/WMA Tuning range USA:87.5~107.9 MHz USA:530~1710KHz EUR:87.5~108 MHz EUR:522~1620KHz Sensitivity 4uV(S/N=30dB) 63uV(S/N=20dB) S/N ratio 50 dB 45 dB 60 dB Stereo >25 dB 50dB separation Freq. Response 40Hz~12KHz 40Hz~2KHz 20Hz~16KHz MADE IN CHINA...
Need help?
Do you have a question about the NPL-3735 and is the answer not in the manual?
Questions and answers