Table of Contents
Advertisement
PLEASE KEEP THESE INSTRUCTIONS FOR FUTURE REFERENCE
PELLET STOVE
HP-0020S
Freestanding
OWNER'S MANUAL
Contact your building or fire officials about restrictions and
installation inspection requirements in your area.
PLEASE READ THIS ENTIRE MANUAL BEFORE INSTALLATION AND USE OF
THIS PELLET BURNING ROOM HEATER. FAILURE TO FOLLOW THESE
INSTRUCTIONS COULD RESULT IN PROPERTY DAMAGE, BODILY INJURY,
OR EVEN DEATH.
THIS MANUAL IS PRINTED ON RECYCLED PAPER. PRODUCTS SPECIFICATIONS ARE SUBJECT TO CHANGE WITHOUT NOTICE.
Page 1 / 16
Advertisement
Table of Contents

Summary of Contents for Earth Stove HP-0020S
- Page 1 PLEASE KEEP THESE INSTRUCTIONS FOR FUTURE REFERENCE PELLET STOVE HP-0020S Freestanding OWNER’S MANUAL Contact your building or fire officials about restrictions and installation inspection requirements in your area. PLEASE READ THIS ENTIRE MANUAL BEFORE INSTALLATION AND USE OF THIS PELLET BURNING ROOM HEATER. FAILURE TO FOLLOW THESE INSTRUCTIONS COULD RESULT IN PROPERTY DAMAGE, BODILY INJURY, OR EVEN DEATH.
-
Page 2: Table Of Contents
T able of Contents Product Performance Introduction-----------------------------------3 2. Structure instruction of pellet stove----------------------------------7 3. Installation---------------------------------------------------------------8 4. Operating Instructions ------------------------------------------------10 5. Caution------------------------------------------------------------------11 Safety instructions-----------------------------------------------------11 7. Maintenance------------------------------------------------------------11 8. Troubleshooting--------------------------------------------------------12 9. Warranty-----------------------------------------------------------------13 Figure: Electricity control ------ -------------------------------------14 Page 2 / 16... - Page 3 Introduction ELLET UALITY Pellet quality is important, please read the following: Your pellet stove has been designed to burn wood pellets only. Do not use any other type of fuel, as this will void any warranties stated in this manual. The performance of your pellet stove is greatly affected by the type and quality of wood pellets being burned.
- Page 4 the burning process]. This hard mass will block the air flow through the Burn Pot Liner and affect the performance of the stove. Any fuel, even approved types, may tend to clinker. Check the Burn-Pot Liner daily to ensure that the holes are not blocked with clinkers. If they become blocked, remove the liner (when the unit is cold) and clean/scrape the clinkers out.
- Page 5 home and bolted to the floor. Make sure that the structural integrity of the home is maintained and all construction meets local building codes. Minor soot or creosote may accumulate when the stove is operated under incorrect conditions such as an extremely rich burn (black tipped, lazy orange flames).
- Page 6 America Standard). Be careful that the electrical cord is not trapped under the appliance and that it is clear of any hot surfaces or sharp edges and also must be accessible. If this power cord should become damaged, a replacement power cord must be purchased from the manufacture or a qualified dealer. The stove’s maximum power requirement is 520 watts.
-
Page 7: Product Performance Introduction
UTOMATIC AFETY EATURES Your pellet Stove has the following safety features: A. The stove will shut off when the fire goes out and the exhaust temperature drops below 120°F (52°C). B. The stove has a high temperature safety switch. If the temperature on the hopper reaches 200°F (93°C), the auger will automatically stop and the stove will shut down when the exhaust temperature cools. -
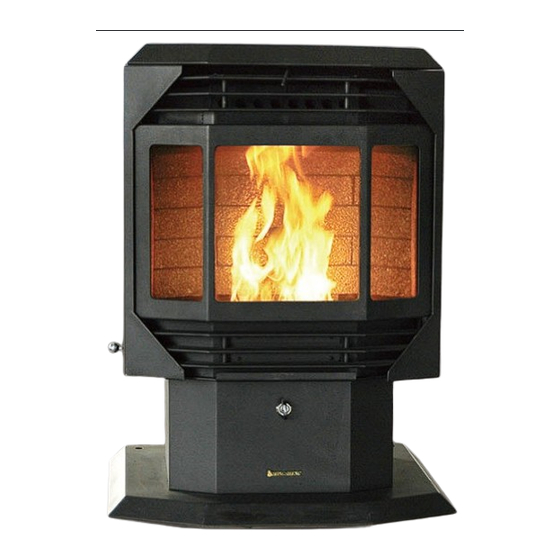
Page 8: Structure Instruction Of Pellet Stove
Structure instruction of pellet stove Note: Page 8 / 16... - Page 9 1. hopper cover 2.top cover 3.ash scraper 4.heat exchanger 5.burning chamber 6.window 7.hot wind channel 8.pellet grill 9.seal rope 10.fresh air chamber 11.ash cleaner 12.ash drawer 13.base 14.hopper 15.auger 16. auger motor 17.venting pipe 18. air input pipe 19. exhaust blower 20.pedestal 21.fresh air pipe 22.
-
Page 10: Installation
Installation 1. Deciding Where to Locate your Pellet Appliance and LEARANCES TO OMBUSTIBLES When installing this unit on a combustible floor (for example linoleum, hardwood flooring) a non-combustible (15mm thickness) hearth pad must be under the unit. The pad must extend at least the width of the appliance [22”... - Page 11 properly for smooth convection. If not, it will influence the burning and the stove can not work properly. The owner should connect with the local seller for the right installation. When pellet stove is normal working, the temperature on venting pipe surface can reach 200˚C, so the combustible things, clothes and furniture should be away from the venting pipe.
-
Page 12: Operating Instructions
Operation Instructions 1. The first ignition Please open the window and door when igniting first. The paint smell can be get rid of by burning. Please connect the power and put wood pellet fuel(10kg) into the hopper ,then operate as the instruction on section 2“start and operation”... -
Page 13: Caution
Caution 1. It is important to select and use only pellets that are dry and free of dirt or any impurities such as high salt content. Dirty fuel will adversely affect the operation and performance of the unit and will void the warranty. -
Page 14: Troubleshooting
a. Move the airmate board, clean the surface with the brush, and then recover it. b. Screw out the bolts from the connection of input and output on the convection blower, clean the dust deposited inside the blower with the brush. Take off the venting pipe, clean the dust inside the pipes and elbows. -
Page 15: Warranty
affect combustion. 5. The fire put out and The hopper is empty. Put fuel into the hopper. power is off automatically. No fuel feed. refer to (2) The fuel feed is too little. Increase the fuel feed. High temperature switch Cool the stove at least 1 hour then operate (93˚C) is wrong. - Page 16 Figure: Electrical figure Page 16 / 16...
Need help?
Do you have a question about the HP-0020S and is the answer not in the manual?
Questions and answers