Advertisement
Advertisement
Table of Contents

Related Manuals for Meistergram PRO1200


Summary of Contents for Meistergram PRO1200
- Page 1 User’s Guide...
-
Page 3: Table Of Contents
Contents Warnings Installation and Power Up Overview Controller Functions Thread Trim Function Head Rotate Function Needle Selection Arrow Keys Drive Mode Idle (Float) Mode Color Change Mode Controller Menu Options Disk (Read) Menu Machine Parameters Menu Common Advanced Design Memory Menu Manual Operations Menu Assistant Menu Machine Functions... -
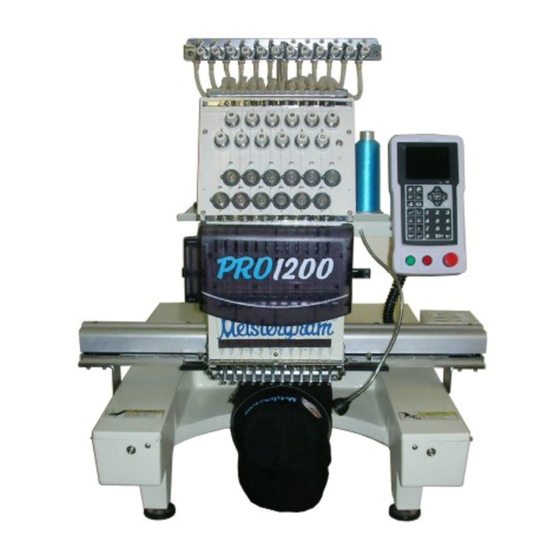
Page 4: Machine Overview
Machine Overview Thread Stand Thread Tension Base Controller Pantograph... - Page 5 Controller Overview Display Head Position Indicator (Machine stops at 100°) Arrow Keys Operational Control Buttons Adjust Machine Speed Emergency Start Stop Stop Button Switch Button...
- Page 6 Controller Overview Button Descriptions Disk (Read) Design Menu Menu Assistant Set Design Menu Parameters Menu Clear Manual Button Operations Menu Drive (or Sewing) Mode Idling (Float) with Indicator (Lit when in Mode Select Drive mode) Thread Trim Button Color Change Mode Alternate Rotate...
- Page 7 Arrow Keys: Normally used to move the pantograph frame. When in any menu, the up and down arrows are used to move up and down the list of menu options and the left and right arrows are used to page up and page down through the menu options High Speed Pantograph mode.
- Page 8 Controller Overview Screen Layout Float (or Idling) Color Change mode status mode status Total Stitches Drive (or Sewing) Sewn (resettable) mode status Machine Speed Current needle selection Current Design Information Design Orientation Indicator Current Machine stop design cause display area indicator...
-
Page 9: Controller Functions
Controller Functions This section covers: Thread Trim Function Head Rotate Function Needle Selection Arrow Keys Drive Mode Idle (Float) Mode Color Change Mode... -
Page 10: Thread Trim Function
Thread Trim Function The Thread Trim key will cause the machine to perform a thread trim at any time. Simply press The machine will then perform a thread trim instantly Head Rotate Function If for some reason the sewing head is in a the wrong position, the machine will not start. -
Page 11: Needle Selection
Needle Selection To change to a different needle, press the desired needle number from the Numeric Keypad. Then Needles are numbered from right to left. To select a needle number of 10 or higher, first press the 10+ button and then the corresponding number to add to it to equal the desired needle number. -
Page 12: Drive Mode
Drive Mode Drive mode sets the machine so that when the Start button is pressed, the machine will begin sewing. If the machine is out of drive, the Start button is inactive. While in Drive, there are certain menu options that are inaccessible. (I.e. You cannot switch designs while in Drive mode) Additionally, there are certain menu options that are only available while in Drive. -
Page 13: Idle (Float) Mode
Idle Mode Idle mode, or Float, is the ability to move through the design without stitching. The Idle Mode button has three settings: Normal Embroidery, Low-Speed Float and High-Speed Float. The display shows which mode is selected in the top right hand corner of the machine display. -
Page 14: Color Change Mode
Color Change Mode The Color Change Mode determines how the machine will handle color changes within a design while it is sewing. There are three modes for handling color changes: Manual, Automatic and Semi-Automatic. The display shows which mode is selected in the top of the machine display. Color Change mode indicator Manual Color... -
Page 15: Controller Menu Options
Controller Menu Options This section covers: Disk (Read) Menu Machine Parameters Design Memory Menu Assistant Menu... - Page 16 Machine Parameters Settings The Machine Parameters setting allow you to change various things about the way the design will sew such as the color sequence or to rotate the design upside To change any setting in the Machine Parameters window, you can use the arrow keys to select that option and then press Or you may key in the corresponding number as that selection and then press...
- Page 17 Machine Parameters Settings Setting Description Scales Allows you to expand or shrink the design. Once selected, use the numeric keypad to key in the percentage value for the X direction (left and right) and then press Enter. Then key in the percentage value for the Y direction (top to bottom) and press Enter again.
- Page 18 Disk (Read) Menu The Disk menu allows designs to be loaded into the machine. There are 3 basic options for getting designs into the machine: Floppy Disk, USB Flash Disk or the *Serial Port (*Not all machines have the Serial Port enabled). After pressing to enter the Disk menu, the screen below will be displayed.
- Page 19 Inputting a design to sew from a USB Flash Drive 1. Press to enter Read Mode. 2. Press 5 on the numeric keypad and then 3. Any patterns stored on the USB flash disk will be displayed. Using the arrow keys, select the desired pattern and press 4.
Need help?
Do you have a question about the PRO1200 and is the answer not in the manual?
Questions and answers