Solid State Logic MadiXtreme Hi-speed MADI I/O Reference Manual
Multichannel digital audio interface for pc and macintosh based digital audio workstations
Hide thumbs
Also See for MadiXtreme Hi-speed MADI I/O:
- Installation manual (40 pages) ,
- Reference manual (52 pages)
Table of Contents
Advertisement
Quick Links
Download this manual
See also:
Installation Manual
Advertisement
Table of Contents

Related Manuals for Solid State Logic MadiXtreme Hi-speed MADI I/O


Summary of Contents for Solid State Logic MadiXtreme Hi-speed MADI I/O
- Page 1 www.solid-state-logic.com MadiXtreme. Hi-speed MADI I/O Multichannel Digital Audio Interface for PC and Macintosh based Digital Audio Workstations Reference Guide MadiXtreme. This is SSL.
-
Page 3: Table Of Contents
Table of Contents 1. Introduction How to use this manual Reading conventions Key commands, key combinations and key sequences Screenshots Safety and Installation Considerations Disclaimer Trademarks Website 2. MadiXtreme Overview Hardware Software Drivers Macintosh MADI 3. Package Contents 4a. Installation (PC) Hardware and Software Installation Overview (PC) Preparing Windows Plug and Play (Windows XP and Vista) Hardware installation (Windows XP and Vista) - Page 4 7. Audio and Clock Settings (Macintosh) Accessing the Audio and Clock Settings (Macintosh) MadiXtreme Preferences Pane (Macintosh) Clock Master Sample Rate Selection MADI Channel Count MADI Frame Format 8. Driver Settings (PC) Using the WDM/KS Drivers (Windows XP) Using the Multimedia (MME) Drivers (Windows XP) Using the WDM/KS drivers (Windows Vista) Using the SSL Soundscape ASIO-2 Driver (Windows XP and Vista) Multiple SSL Audio Cards and ASIO-2...
- Page 5 Magix Samplitude Selecting the Driver Audio Connections and Clock Settings Overview Selecting an Input for the Track/Channel Strip Selecting an Output for the Track/Channel Strip Monitoring the Signal Recording Apple Logic Pro Selecting the Driver Audio Connections and Clock Settings Creating a Logic Project Mixer Overview Selecting an Input or Output...
- Page 6 Document History October 2008 Rev 0A Initial Release December 2008 Rev 0A Addition of latency figures & minor corrections November 2014 Rev 0B Addition of new information regarding drvsetup.exe Page iv...
-
Page 7: Introduction
SSL XLogic Alpha-Link converter series, the pristine audio quality you expect from any SSL product. Should you ever need assistance in setting up or using your MadiXtreme, Solid State Logic’s worldwide customer support team is easy to contact via the Support section of the SSL website and is always happy to help. -
Page 8: How To Use This Manual
This manual has been written with great care and attention to detail, and we have attempted to cover every operational aspect of the SSL MadiXtreme. However, it is not a contractual document. Solid State Logic and/or the writer(s) of this manual cannot be held responsible for any loss or damage arising directly or indirectly from any error or omission in this manual. -
Page 9: Madixtreme Overview
2. MadiXtreme Overview Hardware The MadiXtreme is available in two versions; MadiXtreme 64 and MadiXtreme 128. • MadiXtreme 64 features one MADI input and one MADI output, providing 56 or 64 simultaneous inputs and outputs at up to 48kHz, 28 or 32 simultaneous inputs and outputs at up to 96kHz, or 14 or 16 simultaneous inputs and outputs at up to 192kHz. -
Page 10: Madi
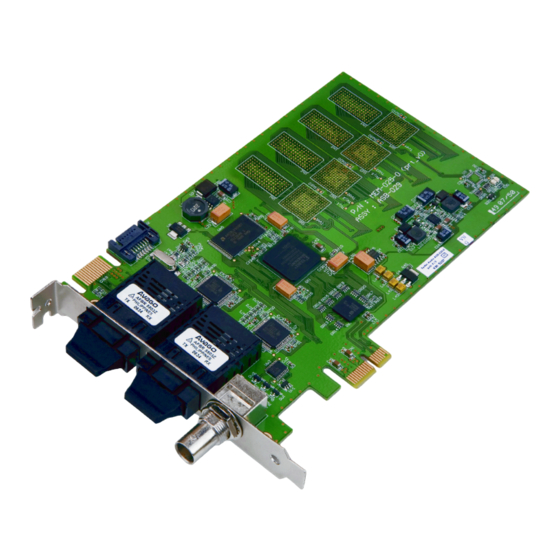
3. Package Contents Your MadiXtreme box should contain: • The MadiXtreme card ( MadiXtreme 128 version shown here ) • The MadiXtreme CD • Printed Installation Guide MadiXtreme. Hi-speed MADI I/O Installation Guide Installations-Handbuch Guide d’Installation Guia de Instalación Guida di Installazione MadiXtreme. -
Page 11: 4A. Installation (Pc)
4a. Installation (PC) Hardware and Software Installation Overview (PC) Before proceeding with the hardware installation, please read and understand the Safety and Installation Considerations on page 2 of this manual. In addition to this, please ensure that the host computer meets the minimum system requirements listed in the Technical Specifications section before you begin. -
Page 12: Preparing Windows Plug And Play (Windows Xp And Vista)
Preparing Windows Plug and Play (Windows 32 bit only) WARNING: DO NOT launch the drvsetup.exe program on a Windows 64 system, as this could make it impossible for the card to be detected unless Windows is reinstalled. Just clicking drvsetup.exe once can cause this, even though the Driver Setup dialogue will not open. - Page 13 • At the end of the process you will see SSL Soundscape Driver Setup – Completed in the title bar. Click Done, shut down the computer and move on to installing the hardware. Page 7...
-
Page 14: Hardware Installation (Windows Xp And Vista)
Hardware installation (Windows XP and Vista) The guidelines below are general and apply in most cases. However, since all PCs are different it is advisable to check your computer’s instruction manual for specific information. For example, on some PC cases the front panel needs to be removed first in order the access the cover mounting screws. - Page 15 • Windows will then invite you to insert the installation CD for your hardware and let you choose an automatic or manual installation. Having pre-installed the driver as described earlier, just make sure that Install the software automatically (Recommended) is selected, and click Next.
-
Page 16: Installing The Wdm/Ks Driver (Windows Xp)
Installing the WDM/KS Driver (Windows XP) Immediately after installing the main driver files, the Found New Hardware Wizard will start again. This time the WDM/KS driver will be installed. The series of dialogue boxes is almost identical to the one displayed for the main driver files, with the exception of a warning regarding Windows Logo testing. -
Page 17: Installing The Ssl Drivers (Windows Vista)
• Further windows will be displayed while Windows copies the WDM/KS driver files. At one point, Windows will display a warning regarding Windows Logo testing. Click Continue Anyway: • Eventually, a dialog box confirms that the installation has been completed. Clicking Finish closes the Wizard. Installing the SSL Drivers (Windows Vista) If you have run the DrvSetup.exe application as described in the Preparing Windows Plug and Play section, then Windows Vista will install the drivers automatically when you restart the computer after physically installing the MadiXtreme. -
Page 18: Device Manager (Windows Xp And Vista)
Device Manager (Windows XP and Vista) After a successful installation, the SSL MadiXtreme appears in the SSL Soundscape Devices category in the Windows Device Manager. The SSL Soundscape WDM/KS Device is listed under Sound, video and game controllers. Page 12... -
Page 19: 4B. Installation (Macintosh)
4b. Installation (Macintosh) Hardware Installation (Macintosh) Before proceeding with the hardware installation, please read and understand the Safety and Installation Considerations on page 2 of this manual. In addition to this, please ensure that the host computer meets the minimum system requirements listed in the Technical Specifications section before you begin. The following instructions are general and provided for guidance only. -
Page 20: Software Installation (Macintosh)
Software Installation (Macintosh) Locate and run the MadiXtreme Macintosh Driver Installer. This application can be found on the Installation CD that came with your card but, if possible, please use the latest version that can be downloaded from our website. MADI A Input &... -
Page 21: Audio And Clock Connections
5. Audio and Clock Connections Audio Connections The MadiXtreme 64 features one MADI input connector and one MADI output connector. The MadiXtreme 128 (pictured below) features two MADI input connectors and two MADI output connectors. Pull out the protective plugs from the MADI ports on the MadiXtreme and Alpha-Link(s) to gain access to the connectors: Use multimode optical fibre cables to connect MadiXtreme’s MADI input and output port(s) to the XLogic Alpha-Link(s)’s MADI output and input ports respectively. -
Page 22: Clock Connections
Clock Connections Digital audio devices that exchange audio data must be synchronized to the same clock reference. This clock reference signal can either be a ‘WordClock’ signal, transmitted and received via dedicated coaxial connectors (BNC or RCA), or an embedded clock signal transmitted via a digital audio connection such as TDIF Clock, ADAT Clock, MADI Clock, etc. The device that provides the clock reference signal for the whole system is called the clock master, and any device that locks to this signal is called a clock slave. -
Page 23: Audio And Clock Settings (Pc)
6. Audio and Clock Settings (PC) Accessing the Audio and Clock Settings (PC) For Windows XP and Vista, the MadiXtreme audio and clock settings can be accessed via the Device Manager, or by using the TRack.exe application which is included in the driver download package. •... -
Page 24: Clock Settings
• The MadiXtreme Properties window is divided into three sections. The top section (Clock) allows you to define the clock settings you require for your studio. The middle section (Format) controls the audio configuration. The bottom section (Status) shows whether the MadiXtreme is correctly synchronized to a clock signal and whether the MADI inputs are locked to a valid incoming MADI signal. -
Page 25: Sample Rate Selection Menu
Sample Rate Selection Menu When the card is set as a Master Soundscape device and the Internal clock setting is selected, this menu allows a sample rate to be selected. The available sample rates are 44100Hz, 48000Hz, 88200Hz, 96000Hz, 176400Hz and 192000Hz. In all other cases, the Sample Rate menu is greyed-out and cannot be used. -
Page 26: Audio And Clock Settings (Macintosh)
7. Audio and Clock Settings (Macintosh) Accessing the Audio and Clock Settings (Macintosh) Click the Apple ( ) icon and select System Preferences…. In the System Preferences window click the MadiXtreme icon to display the MadiXtreme Preferences pane. Page 20... -
Page 27: Madixtreme Preferences Pane (Macintosh)
MadiXtreme Preferences Pane (Macintosh) Clock Master Use this drop-down to set the master clock source for the selected MadiXtreme card: • Internal. If this option is selected, MadiXtreme locks to its own on-board clock generator. Additionally, the BNC connector operates as a WordClock output suitable to provide a clock reference to a slave device. •... -
Page 28: Driver Settings (Pc)
8. Driver Settings (PC) Using the WDM/KS Drivers (Windows XP) The WDM/KS drivers are loaded during log on. These drivers can be set up in the Windows Control Panel, Sounds and Audio Devices, Audio tab. The individual inputs and outputs are always listed as pairs. However, multichannel audio can be used. -
Page 29: Using The Multimedia (Mme) Drivers (Windows Xp)
Using the Multimedia (MME) Drivers (Windows XP) The legacy MME drivers are loaded during log on and are still available for compatibility with certain applications: The default setting is for multiple stereo input and output devices (ie., one SSL MadiXtreme 64 = thirty-two stereo devices). -
Page 30: Using The Wdm/Ks Drivers (Windows Vista)
Using the WDM/KS drivers (Windows Vista) In Windows 2000 and XP, multichannel audio cards were treated as surround devices. A 16 input/output audio card such as the Soundscape Mixtreme would be seen as a 16 channel surround device, a 64 channel audio card (such as the Soundscape Mixpander) would be seen as a 64 channel surround device. -
Page 31: Using The Ssl Soundscape Asio-2 Driver (Windows Xp And Vista)
Using the SSL Soundscape ASIO-2 Driver (Windows XP and Vista) ASIO (Audio Streaming Input Output) is a Steinberg specification, originally developed for Cubase VST and used thereafter in subsequent versions of Cubase and Nuendo. This driver provides a more direct interface for multi-channel audio streaming than the legacy Multimedia drivers and most PC-based software DAWs (for instance Cakewalk Sonar, Magix Samplitude or Cockos Reaper) now also support ASIO as an option. - Page 32 • To access the Direct Monitoring option, select Device Setup under the Devices menu, then select SSL Soundscape ASIO under VST Audio System. The Direct Monitoring box should be checked to switch monitoring between the input (for recording) and output (for playback) from Cubase or Nuendo. Please note that at the time of writing, Direct Monitoring has not been implemented for MadiXtreme.
-
Page 33: Multiple Ssl Audio Cards And Asio-2
Multiple SSL Audio Cards and ASIO-2 The ASIO-2 driver specification allows for only one audio card to be used at any single time. However, the current implementation of the SSL Soundscape Device Driver allows multiple SSL audio cards to be used simultaneously under ASIO-2 by presenting them to the application as a single device. -
Page 34: Driver Settings (Macintosh)
9. Driver Settings (Macintosh) To select the MadiXtreme as the default Core Audio input and/or output device, click the Apple ( ) icon and select System Preferences…. In the System Preferences window click the Sound icon to display the Sound Preferences pane. In the Sound Preferences pane, use the Output and Input buttons to view the available output and input devices. -
Page 35: 10. Driver Updates And Uninstalling Older Driver Versions
10. Driver Updates and Uninstalling Older Driver Versions Windows XP and Windows Vista The description below shows the procedure in Windows XP. In Vista the procedure is similar but more warnings may be displayed. Always click the option that allows the procedure to continue. New versions of the Soundscape Device Driver can be downloaded from our website. -
Page 36: 11. Firmware Updates
11. Firmware Updates Updated MadiXtreme firmware will be available for download from our website whenever necessary. Typically, any new firmware will be included as part of a new driver package. Windows XP and Windows Vista When the TRack software is launched, the Firmware Updater starts up automatically if a MadiXtreme with obsolete firmware is detected. -
Page 37: Macintosh
Macintosh To update the MadiXtreme firmware, open the MadiXtreme Preferences pane (click the Apple ( ) icon and select System Preferences…. then in the System Preferences window click the MadiXtreme icon). In the MadiXtreme Preferences pane, click the Update Firmware button and follow the on-screen instructions. You will be prompted to locate the firmware file that you want to load into the card. -
Page 38: 12. Working With Your Audio Applications
12. Working With Your Audio Applications In order to use your MadiXtreme effectively, you will need to be familiar with the operation of your sequencer or other audio application(s). If necessary, please spend time reading the manual(s) for your application(s) of choice. In particular, if you are using a sequencer, make sure you understand the basics such as setting up the clock synchronization, configuring the inputs and outputs of the software mixer, arming tracks etc. -
Page 39: Steinberg Nuendo
Steinberg Nuendo (Based on Nuendo 4.1.2 Build 851 running under Windows XP) Selecting the Driver For this quick-start example, we have chosen to use the ASIO driver (Devices menu, click Device Setup, highlight VST Audio System in the left-hand pane, select SSL Soundscape ASIO in the ASIO Driver drop-down menu then click OK). Input Channel Strip Centre Section Output Channel Strip... -
Page 40: Overview
Overview The Nuendo Mixer is divided into three main sections (press function key to display the Mixer): • Input channel strips (or ‘input busses’), to the left of the mixer • Output channel strips (or ‘output busses’), to the right of the mixer •... -
Page 41: Input Channel Strips
Input Channel Strips Click the VST connections button (bottom left of the mixer) to open the VST Connections window. In the VST connections window, check that the Inputs tab is selected. Click the Add Bus button and use the resulting dialogue box to create input channel strips as required. -
Page 42: Audio Channel Strips
Audio Channel Strips In the Project menu select Add Track and click Audio. Use the resulting Add Audio Track dialogue box to create audio tracks as required. The corresponding channel strips will be added to the mixer. The input and output channel strips that are currently connected to the audio channel strips are indicated in routing boxes located above the audio channel strips. -
Page 43: Cakewalk Sonar
Cakewalk Sonar (Based on Sonar 7.0 Producer Edition running under Windows XP) Selecting the Driver The ASIO driver mode was chosen for this quick-start example (Options menu, click Audio, click the Advanced tab, select ASIO using the Driver Mode drop-down menu and click OK to confirm and close the window). Tracks Section Busses Section Mains Section... -
Page 44: Overview
Overview The Sonar Console is divided into three main sections (on the keyboard, press to display the Console). For clarity, we have used the buttons on the left of the console to hide the EQ Plot, EQ, FX and Send sections of the channel strips. -
Page 45: Selecting An Input For The Track/Channel Strip
Selecting an Input for the Track/Channel Strip In order to hear the input signal an input must be selected for the channel strip. Click the input field near the top of the track channel strip to display a selection menu. If you are receiving a stereo test signal via MadiXtreme inputs 1 and 2, highlight SSL Soundscape ASIO. -
Page 46: Magix Samplitude
Magix Samplitude (Based on Samplitude 10 Pro running under Windows XP) Selecting the Driver The ASIO Driver System was selected for this quick-start example (Options menu, click System/Audio, select the ASIO option box. Click OK to confirm your selection and close the window. Channel Strips Master Section Global... -
Page 47: Overview
Overview The Samplitude Mixer is divided into three main sections (on the keyboard, press to display the Mixer). For clarity, we have used the buttons on the left of the Mixer to hide the EQ Insert and Aux sections of the channel strips. -
Page 48: Selecting An Input For The Track/Channel Strip
Selecting an Input for the Track/Channel Strip In order to hear an input signal the track input must be selected. Click the input field near the top of the track channel strip to display a selection menu. If you are receiving a stereo test signal via MadiXtreme inputs 1 and 2, make sure that 1. -
Page 49: Apple Logic Pro
Apple Logic Pro (Based on Logic Pro 8 running under Mac OS X 10.5.4) Selecting the Driver Click the Logic Pro menu header, highlight Preferences in the menu, click Audio in the submenu to open the Logic Preferences window. Click the Devices tab if necessary, and under Core Audio, select the MadiXtreme in the Device menu. Audio Channel Strip Output Channel Strip Master Channel Strip... -
Page 50: Creating A Logic Project
Creating a Logic Project In the Logic Pro File menu, select New. In the New window and click Empty Project – you will be prompted to create new audio tracks. Create a single stereo audio track, assigned to inputs and outputs 1 and 2. Finally, click on File again, select Save As…, name your trial project and click Save. -
Page 51: Selecting An Input Or Output
Selecting an Input or Output Note that you can select any adjacent pair of MadiXtreme inputs or outputs for the stereo track you have created by clicking the Input and Output slots in the I/O section of the Track channel strip and using the menu and submenus that will thus be displayed. -
Page 52: Technical Specifications
No part of this publication may be reproduced in any form or by any means, whether mechanical or electronic, without the written permission of Solid State Logic, Oxford, OX5 1RU, England As research and development is a continual process, Solid State Logic reserves the right to change the features and specifications described herein without notice or obligation.
Need help?
Do you have a question about the MadiXtreme Hi-speed MADI I/O and is the answer not in the manual?
Questions and answers