
Summary of Contents for Muza FD800
- Page 1 DIGITAL MULTI MODULATION EFFECTS PEDAL Owner's Manual aw_FD800_Manual_G12_101118 2010 12:49:57...
- Page 2 INFORMATION FOR YOUR SAFETY! PRECAUTIONS PLEASE READ CAREFULLY BEFORE PROCEEDING. Please keep this manual in a safe place for future reference. Power Supply Interference with other electrical devices Please connect the designated AC adaptor to an AC Radios and televisions placed nearby may experience outlet of the correct voltage.
-
Page 3: Table Of Contents
Contents Panel Description Store and Recall Patches Front Panel ............Storing Your Favorite Tones ......Recalling the Saved Memories ....... Setup Battery Replacement Diagram ......Advanced Use FOOT SWITCH Control Mode ......Connection............7 Additional Parameter Setting ......Effects Introduction Troubleshooting .......... -
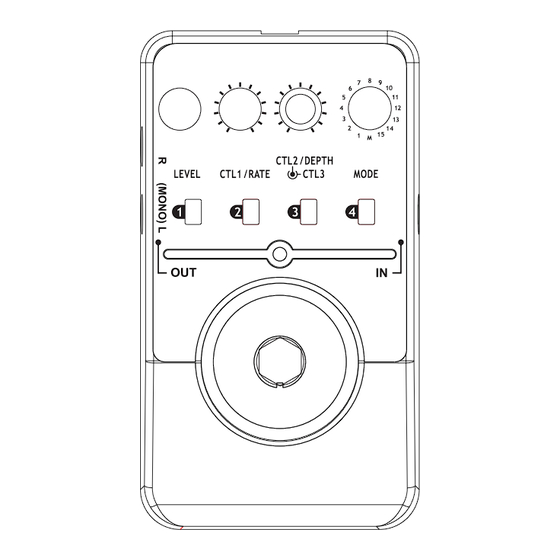
Page 4: Panel Description
Panel Description Front Panel aw_FD800_Manual_G12_101118 2010 12:49:59... - Page 5 Panel Description 7.ON/OFF LED 1.LEVEL Knob Indicate the on/off status of the unit. Control the OUTPUT LEVEL or EFFECT LEVEL or BALANCE of the selected effect. 8.FOOT SWITCH Press the switch to turn effects on and off or 2.CTL1/RATE Knob for patch memory selection.
-
Page 6: Setup
Setup Battery Replacement Diagram Warning: 1. A 9V battery (optional) must be installed before you plug the mono audio cable into the input jack. 2. While the power supply is low, the LED will extinguish. Please replace the battery accordingly. 3. -
Page 7: Connection
Connection Connection AC Adaptor 1. Connect the optional power supply to the power jack or insert a 9V battery (optional) into the battery compartment on the bottom. OUT DC 9V OUT L (MONO) 2. Connect your guitar to input jack and an amplifier to output jack of the Pedal. -
Page 8: Effects Introduction
Effects Introduction This digital multi modulation effects pedal contains 15 excellent modulation effects. It also includes the storage function, allows you to store and recall up to 4 patch memories. Effects List EFFECT MODES TREMOLO/PANNER STEP TREMOLO/PANNER VIBRATOR ROTARY CHORUS FLANGER NFB FLANGER TREMOLO FLANGER... -
Page 9: Effect Modes Introduction
Effects Introduction 01. Tremolo/Panner This effect produces TREMOLO effect when using a mono output cable, and produces PANNER effect when using a stereo output cable. Turn the CTL3 knob to change modulation WAVE from TRIANGLE WAVE→SINE WAVE→ SQUARE WAVE gradually. KNOBS LEVEL CTL1/RATE... -
Page 10: Vibrator
Effects Introduction 03. Vibrator It provides VIBRATO effect. KNOBS LEVEL CTL1/RATE CTL2/DEPTH CTL3 EFFECT VIBRATO OUTPUT LEVEL RATE DEPTH TONE 04. Rotary It simulates a rotary speaker. Turn the CTL3 knob to adjust the level of modulation panner. KNOBS LEVEL CTL1/RATE CTL2/DEPTH CTL3... -
Page 11: Flanger
Effects Introduction 06. Flanger It produces FLANGER effect with stereo output. KNOBS LEVEL CTL1/RATE CTL2/DEPTH CTL3 EFFECT EFFECT LEVEL STEREO FLANGER RATE DEPTH FEEDBACK (PRE-DELAY) When using ADDITIONAL PARAMETER SETTING function, turn LEVEL knob to adjust the PRE- DELAY. 07. NFB Flanger It produces STEREO FLANGER effect with negative feedback. -
Page 12: Phaser
Effects Introduction When using ADDITIONAL PARAMETER SETTING function, turn LEVEL knob to change MODULATION WAVE of TREMOLO from TRIANGLE WAVE→SINE WAVE→SQUARE WAVE gradually. 09. Phaser It provides PHASER effect with stereo output. KNOBS LEVEL CTL1/RATE CTL2/DEPTH CTL3 EFFECT STEREO PHASER EFFECT LEVEL RATE DEPTH... -
Page 13: Ring Modulation
Effects Introduction 12. Ring Modulation It provides RING MODULATOR effect. Turn CTL2/DEPTH knob and CTL3 knob to produce AUTO RING MODULATIOR. When CTL3 knob is being set to the minimal level, it will produce normal RING MODULATOR. KNOBS LEVEL CTL1/RATE CTL2/DEPTH CTL3 EFFECT... -
Page 14: Feedback Pitchshifter
Effects Introduction KNOBS LEVEL CTL1/RATE CTL2/DEPTH CTL3 EFFECT 2-VOICE PITCH SHIFTER PITCH1 E.LEVEL PITCH1 PITCH2 E.LEVEL PITCH2 -2 -1 1 2 15. Feedback PitchShifter It produces ONE-VOICE PITCH SHIFTER effect with a short delay and feedback. The amount of PITCH SHIFTER in semitone steps is: -12, -9, -7, -5, -2, -1, 1, 2, 5, 7, 9, 12. -
Page 15: Store And Recall Patches
Store and Recall Patches Warning: To avoid the possibility of losing the stored patches or results in an unsuccessful storage, you are suggested to use an appropriate adaptor while performing the storage operation. Ensure the power will not be terminated. Storing Your Favorite Tones You can store your favorite tones into one of the 4 patches when the Pedal knob is turned to a... - Page 16 Store and Recall Patches Press and hold the 2 button for another 2 seconds to enter the storage function; all LED indicators will flash from 1 to 4 in a fast speed. You can then release the button. The LED indicator of this button will be lighted for the final one second, then the whole action will stop;...
-
Page 17: Recalling The Saved Memories
Store and Recall Patches Recalling the Saved Memories If you want to recall the patches that you have saved, you must turn the MODE knob to the M position: At this time, the LED indicator of the latest stored patch will be lighted automatically. For example, if you want to recall patch 1, just press the 1st button: When the MODE knob points to the M position,... -
Page 18: Advanced Use
“MODE.2”. You can hit the FOOT SWITCH to swap from one patch to another in sequence. If you do not press and hold the FOOT SWITCH before first powers on, FD800 will enter the default mode MODE1. Note: FOOT SWITCH Control Mode setting will be saved after power off. -
Page 19: Additional Parameter Setting
Advanced Use Additional Parameter Setting 1. Entering the Additional Parameter Setting Function When the MODE knob points to the position 5,6,7 and 8, and the ON/OFF LED indicator is off at the same time, press the FOOT SWITCH and hold for at least 3 seconds, then the 1 PATCH MEMORY button's LED indicator will flash. - Page 20 Advanced Use 2. Exiting the Additional Parameter Setting Function You can press one time FOOT SWITCH to exit this function when having entered the ADDITIONAL PARAMETER SETTING function. Before returning to the normal mode, the unit can store the parameter you have changed automatically.
- Page 21 Advanced Use 3. Reload the Factory Preset of the Additional Parameter Setting If you want to reload the FACTORTY PRESET of these ADDITIONAL PARAMETERS, you can operate the unit like this: 1. Enter the ADDITIONAL PARAMETER SETTING function in any MODE between 5,6,7,8.
-
Page 22: Troubleshooting
Troubleshooting Can't power on [On/Off LED doesn't light Check the LEVEL knob, do you set it to Min? normally] Set the LEVEL to a higher value. Check the connection of power. Make sure the power is connected correctly. No/low effect sound Are you in Bypass status? Check the adaptor, is the type of adaptor right Press the FOOT SWITCH to get in effect... -
Page 23: Specifications
Specifications No. of Modulation Types Power Requirements Optional AC adaptor DC9V/300mA/center negative type or 6LR61 9V battery No. of Patch Memories Dimensions 126.5(L) x 79.5(W) x 64.5(H) mm Guitar Input 1/4" monaural jack Weight 355g (without battery) Input impedance 1 M Ohms Line Output a pair of 1/4"... -
Page 24: Appendices
Appendices Setting Samples 2. STEP TREMOLO/PANNER 1. TREMOLO/PANNER Stutter: step tremolo under 4/4 Vintage wave: a vintage tremolo sound Notice: This sample need stereo gear to listen. Triangle: blazing step tremolo under 3/4 or 6/8 Notice: Airscrew: a speedy, powerful tremolo sound This sample need stereo gear to listen. - Page 25 Appendices 3. VIBRATOR 4. ROTARY Good boy: vibrato with a little bending Look around: a slow rotary sound Notice: This sample need stereo gear to listen. Little sick: a good vibrato sound Dizzy man: a quickly rotary sound cause a little dizzy Notice: This sample need stereo gear to listen.
- Page 26 Appendices 6. FLANGER 5. CHORUS Slow whirl: slow whirly flanger Bright thing: a bright chorus sound Warm feather: a warm, fast chorus sound Water gum: a fast shocking flanging sound Wide plan: wide chorus Notice: This sample need to set the PRE-DELAY to MAX in ADDITIONAL PARAMETER SETTING.
- Page 27 Appendices 7. NFB FLANGER 8. TREMOLO FLANGER Deep sea: a flanger sound like under the Jumping Stairs: slow whirly flanger with water normal speed tremolo Depth charge: a deep negative feedback Choking speed: a speedy tremolo flanger flanger aw_FD800_Manual_G12_101118 2010 12:50:03...
- Page 28 Appendices 9. PHASER 10. STEP PHASER Classic phase: a classic phaser sound Harmonic kid: a random harmonic step phaser sound Small circle: a fast phaser sound Bored autumn: step phaser with strong jumping feeling aw_FD800_Manual_G12_101118 2010 12:50:03...
- Page 29 Appendices 11. STEP PHASER 12. RING MODULATOR Funky machine: a filter effect similar to Happy mouse: a familiar ring modulator auto-wah sound Rompish tail: a standard step filter sound Rolling balls: an auto ring modulator sound aw_FD800_Manual_G12_101118 2010 12:50:03...
- Page 30 Appendices 13. STEP RING MODULATOR 14. 2-VOICE PITCH SHIFTER Electronic talk: an electronic step ring Nice 2-voice: the tow voice parts' semitone modulator sound steps are 4 and 12 Robot fighting: sci-fi sound with step ring Double shock: the tow voice parts' semitone modulator steps are -12 and 12 aw_FD800_Manual_G12_101118...
- Page 31 Appendices 15. FEEDBACK PITCH SHIFTER Spring legend: add delay with high Brief chat: turn off the delay, one voice part feedback, sounds like a synthesizer, the pitch, the semitone step is 7 semitone step is 2 Hard dialog: add delay with low feedback, 16.
- Page 32 FD800_G12 aw_FD800_Manual_G12_101118 2010 12:50:03...
Need help?
Do you have a question about the FD800 and is the answer not in the manual?
Questions and answers