Table of Contents

Subscribe to Our Youtube Channel
Summary of Contents for Smart-M HDMV-Plus
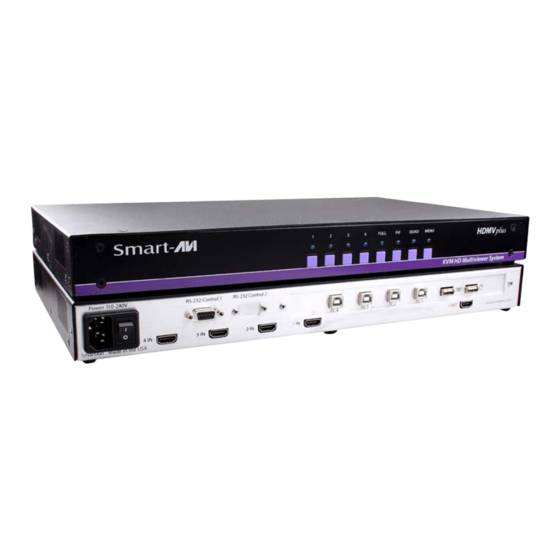
- Page 1 HDMV-Plus 4-Port Full HD Multiviewer View four different HDMI video sources simultaneously on one screen with USB keyboard and mouse support. Installation Manual www.smartavi.com 1-800-AVI-2131 www.smartavi.com Made in the U.S.A.
- Page 2 PROGRAMMING THE EDID UPGRADING THE VIDEO/USB FIRMWARE 12-13 What’s in the Box? Q & A PART NO. QTY DESCRIPTION HDMV-Plus 4-Port HDMI-Plus, USB 1.1 KVM Switch with PiP/Dual/Quad/Full modes Power Cord 6ft Power Cable CBLDB906 6ft DB9 Serial RS-232 Cable www.smartavi.com...
-
Page 3: Technical Specifications
Technical Specifications VIDEO Video Bandwidth Single-link 340MHz [10.2Gbps] Resolution HDTV 480i,480p,720i,720p,1080i,1080p PC Resolution 800 x 600 up to 1920 x 1200 Input Video Signal 1.2 volts Input DDC Signal 5 volts Single Link Range 1080p Format HDMI 1.4 DVI Compliance Single-link DVI-D 2.0 Output Cable Length Up to 20 ft. - Page 4 Introduction The HDMV-Plus Multiviewer Switch allows you to view up to four different high definition video sources simultaneously on one display device. It also supports keyboard and mouse functionality, allowing you to access all four displays with one set of interface controls.
- Page 5 Applications • Law enforcement • Security Clearance • Hospital and Hospice Care Patient Monitoring • Professional Presentations • Corporate or Educational Presentations • Financial (Remote Servers/User Control) • Call Centers for Technical Support • Industrial (Long-Range Workstation Isolation) • Airport Installations (Air Traffic Control/Passenger Information) Application Diagram S M T C P - 2...
-
Page 6: Connecting The Box
The power connection and switch are located at the back of the unit as well as the RS-232 connection and all HDMI and USB inputs and outputs. Connect all peripheral devices first and turn them on before powering on the HDMV-Plus. Modes Using the Front Control Panel To switch to Full Screen Mode press the button “FULL”... -
Page 7: Using The On-Screen Display
(by default) press “Ctrl + Ctrl+ O” and the OSD will come up. The OSD allows you to change modes, change the hotkey button, move the OSD position, toggle the hot plugs, and restore the HDMV-Plus to factory defaults. To change modes with the OSD simply navigate with the attached keyboard and press the up and down arrow keys, press the right key to activate the submenu and the left to deactivate it. - Page 8 To save the settings navigate to the “Save” text and press the Enter key. The next time the HDMV-Plus is started the current screen mode will load by default. To restore the factory settings click scroll down to “Factory Reset” and press enter. The HDMV-Plus will perform a power reset on itself.
-
Page 9: Using Hotkey Commands
Re-Boot the HDMV-Plus RS-232 Operation and Console Commands The HDMV-Plus may also be controlled via RS-232 commands; this feature requires an RS-232 card installed on your computer or a USB to RS-232 adapter. First connect the RS-232 cable between your PC and the HDMV-Plus. -
Page 10: Console Command
Console Commands Continued MODE CONSOLE DESCRIPTION & EXAMPLE COMMAND Quad Mode //Q#<CR> 4 inputs on screen, equally displayed. “//Q2” quad mode, channel 2 as user control Full Screen Mode //F#<CR> 1 input on screen, displaying full screen. “//F4” Full mode, input 4 selected Picture in Picture Mode //P#<CR>... - Page 11 Information pertaining to color depth, resolution, and sound must be properly configured in order for the optimum viewing . To program the EDID first disconnect any inputs to the HDMV-Plus and plug a monitor in to the output. Next power the device on.
- Page 12 5) With the power to the HDMV off, press “Connect to Bootloader” then turn the power to the HDMV-Plus on. 6) Once connected click on “Program Flash” 7) When finished click “Disconnect from bootloader” and power cycle the HDMV-Plus.
- Page 13 (select “show all” if you don’t see it) and then click open. Type “pf” at the prompt and the HDMV-Plus will begin loading the firmware for the USB. Reset the HDMV-Plus after the console prompt is shown. The console will display ”USB…PASS“ if there were no errors when the device is rebooted.
- Page 14 HDMV- Plus. The solution is to change the hotkey of either the HDMV-Plus or your computer. If you are using windows simply press the windows button one time, and then issue another hotkey command to get out;...
- Page 15 Notes: www.smartavi.com...
- Page 16 At SmartAVI, we offer a complete line of audio/video solutions for high-quality signal switching and distribution. Our devices support multiple signal types including VGA, DVI, HDMI, USB, RS232, IR and more. EXTENDERS CAT5/5e/6 UTP/STP FIBER OPTIC COMPUTER DISPLAY EXTENDER SPLITTERS BLUERAY PLAYER SPLITTER DISPLAYS...
Need help?
Do you have a question about the HDMV-Plus and is the answer not in the manual?
Questions and answers