Advertisement
Quick Links
Instruction Manual
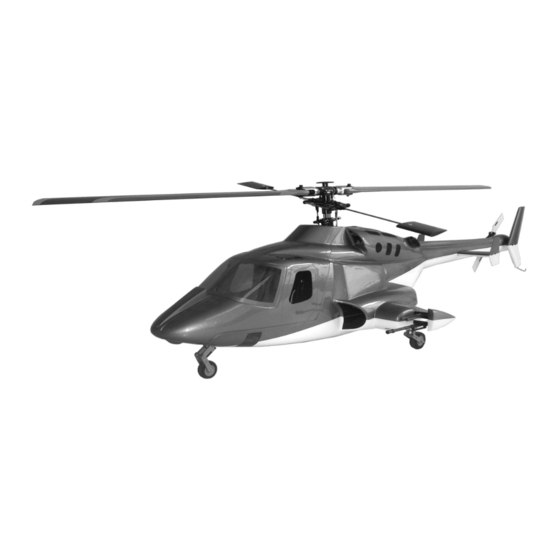
Scale Fuselage Airwolf
600 size
1. INTRODUCTION
Thank you for buying Scaleflying products. The 600 size Airwolf scale fuselage is designed as
an easy to use product. Please read the manual carefully before assembling the model, and
follow all precautions and recommendations located within the manual. Be sure to retain the
manual for future reference, routine maintenance and tuning. The scale fuselage is designed
for T-REX 600 ESP Helicopter series use. You can easily put it on your T-REX 600 for new
clothing.
Important Note
R/C helicopters are not toys. R/C helicopter utilize various high-tech products and
technologies to provide superior performance. lmproper use of this product can result in
serious injury or even death. Please read this manual carefully before using and make sure to
be conscious of your own personal safety and the safety kf others and your environment
when operating all Scaleflying products.
Manufacturer and seller assume no liability for the operation or the use of this product.
lntended for use only by adults with experience flying remote control helicopters at a legal
flying field. After the sale of this product we cannot maintain any control over its operation or
usage.
After assembling the scale fuselage, the weight will increase and the structure will more
complex, hence its not recommend to fly 3D to avoid any accident and damage..
2. SAFETY NOTE
R/C products require a certain degree of skill to operate. Any damage or dissatisfaction as a
result of accidents or modifications are not covered by any warranty and cannot be returned
for repair or experience problems during operation or maintenance.
Advertisement

Summary of Contents for Scaleflying Airwolf 600 size
-
Page 1: Instruction Manual
1. INTRODUCTION Thank you for buying Scaleflying products. The 600 size Airwolf scale fuselage is designed as an easy to use product. Please read the manual carefully before assembling the model, and follow all precautions and recommendations located within the manual. Be sure to retain the manual for future reference, routine maintenance and tuning. -
Page 2: Prior To Installation
Fly only safe areas, away from other people. Do not operate R/C aircraft within the vicinity of homes or crowds of people. R/C aircraft are prone to accidents, failures and crashes due to a variety of reasons including lack of maintenance, pilot error and radio interference. Pilots are responsible for their actions and damage or injury occurring during the operation or as of a result of R/C aircraft models. -
Page 3: Installation
9:Nut M3 x4 24:Tail wing horizontal x2 39:Screw M3x14 x2 10:Screw M3x10 x4 25:Tail wing vertikal x2 40:Screw A2x8 x4 11:Shaft ring 5mm x4 26:Screw A2x5 x4 41:Screw A3x12 x4 12:Set screw M3 x4 27:MG big x2 42:aft servo holder x1 13:Carbon rod 5x100 x2 28:MG small x2 43:Servo lever x1... - Page 4 2. Mount the servo links onto the rods as shown. 3. Mount levers, blocks and front landing gear as shown. ...
- Page 5 4. Mount the landing gear as shown inside the fuselage. 5. Lock the landing gear assy with nut M3 and screw M3x10 in place as shown. ...
- Page 6 6. Mount the front servo as shown.
- Page 7 7. Insert carbon rods 3x45 as shown. 8. Mount the aft landing gear as shown using the aluminum bushings. Long sleeve inboard, short sleeve outboard. Then install the shaft was shown, using retaining rings and the retract lever. ...
- Page 8 10. Then mount the ball links as shown using screws and nuts. 11. Mount the servo as shown in the wooden frame. Then mount the horn and prepared lever onto the servo. Use the pushrods with the ball link ends to connec the servo lever with the levers on the retract shafts as shown.
- Page 9 12. Adjust the shaft levers position so that a full servo cycle will extend and retract the landing gear fully. Once properly adjusted, glue the servo frame into the fuselage. Make sure that you adjust the servo travel limit properly in your radiocontrol!
- Page 10 11. Mount the wooden blocks as shown and onto the mechanic. 12. Remove the tail cap.
- Page 11 13. Insert the mechanic into the fuselage as shown. 14. Mount the EVA tail dampener as shown...
- Page 12 15. Mount the tail rotor. 16. Mount the tail cap. ...
- Page 13 17. Lock the mechanics in place using screws M2x20 washers M2. 19. Mount the tail fin as shown.
- Page 14 20. Glue the tail wings in. This has to be done when everything else is installed. Use tape to to keep the wings at the right angle while the glue is setting. Do this by connecting both tip ends over the top of the boom with two or three stips of masking or duct tape. Do not rely on the grooves on the boom, due to manufacturing tolerances, these grooves do not provide you any guidance.
- Page 15 21. Mount the rocket launcher with screws. 22. Glue the machine guns in as shown.
- Page 16 23. Glue in the end piece. 24. Glue the main window in. We recommend to use slow settling yellow glue. Do not attempt installing windows with super glue (cyanoacrylate bases). The fumes the glue produces leave hard to remove white stains on painted surfaces. ...
- Page 17 24. Glue the bottom window in.
- Page 18 4. ILLUSTRATION OF READY MOUNTED HELICOPTER Specifications: Length: 1006mm Height: 226mm Width: 385mm Weight: 710g Suitable for Align TREX600ESP und similar mechanics Copyright 2012 – www.scaleflying.com...
Need help?
Do you have a question about the Airwolf 600 size and is the answer not in the manual?
Questions and answers